Showing posts with label Kaisercraft. Show all posts

Friday, 28 February 2014

DT Project #2 by Minxy, Featuring:

Kaisercraft: Life is Art


Hay Snazzy Gang
Another day means another project... and yep another vid to share, just because I can! 

Enjoy 


Here's a few pics
 and some more

I hope you've enjoyed this weeks projects from me, and their matching vids... Your comments are always appreciated xo
Don't forget to stop by again as the rest of the team have plenty more inspiring projects to share with this stunning kit.

Till next time, Stay Inky

Monday, 24 February 2014

DT Project #1 by Minxy, Featuring...

Kaisercraft: Life is Art

Hay Snazzy Gang
Today i'm sharing my first of 2 projects this week.
{Yep I cheated and did a vid as there are far too many details to list}


Here are some close up shots:

Closer:

Closer still: 

I hope you like todays project, Any questions, feel free to ask here or in the comments on the utube xo
 I'll be back on Friday with my 2nd piece xo 
Till then, Stay Inky

Saturday, 22 February 2014

DT Project #1 by Val featuring Kaisercraft Art of Life

Gosh, when I said later, I never imagined days later, but sometimes life just gets in the way!

 Anyways, here is one of this month's workshop projects with the beautiful Art of Life kit - if you haven't seen the kit you can have a look here.


Our younger daughter is 18 this week, she is currently studying engineering and is not really a flowery, girly girl so this little book is for her. The 'bones' of it are made from mount board cut to 4" x 6" with black card stock hinges and spine so it is very robust, an ideal design for a keepsake.

Here are the pages....


... and the back cover.


This workshop will run on Saturday 8 March from 11am to 5pm, it costs £30, and we currently have a couple of spaces available if anyone is interested.

Thank you for stopping by, and for your patience this week. A couple more workshop projects with this kit will be on the store blog next week and Minxy will of course be here next week with more inspiration.

Valxx


Friday, 3 January 2014

A Snazzy little challenge....

Hello, and a very Happy Hew Year to all.

This is traditionally the time of year when leftovers feature. Following last week's 100 ways with leftover Christmas turkey and stuffing, almost all papercrafters now move along to resolving not to buy any more stash until they have used up all the crafty stuff they already have hoarded in every nook and cranny.

Does this sound like you?

Most resolve weakens almost as soon as the new CHA Sneak Peeks appear, meantime..........

I'd like to challenge you to share what you make with your leftovers.

I am reknowned for not being able to throw the smallest scrap of paper away, even the gutters showing the revese side of double sided cardstock find themselves stashed away.

So, to start us off, here is what I made from my leftovers from the last DT kit.

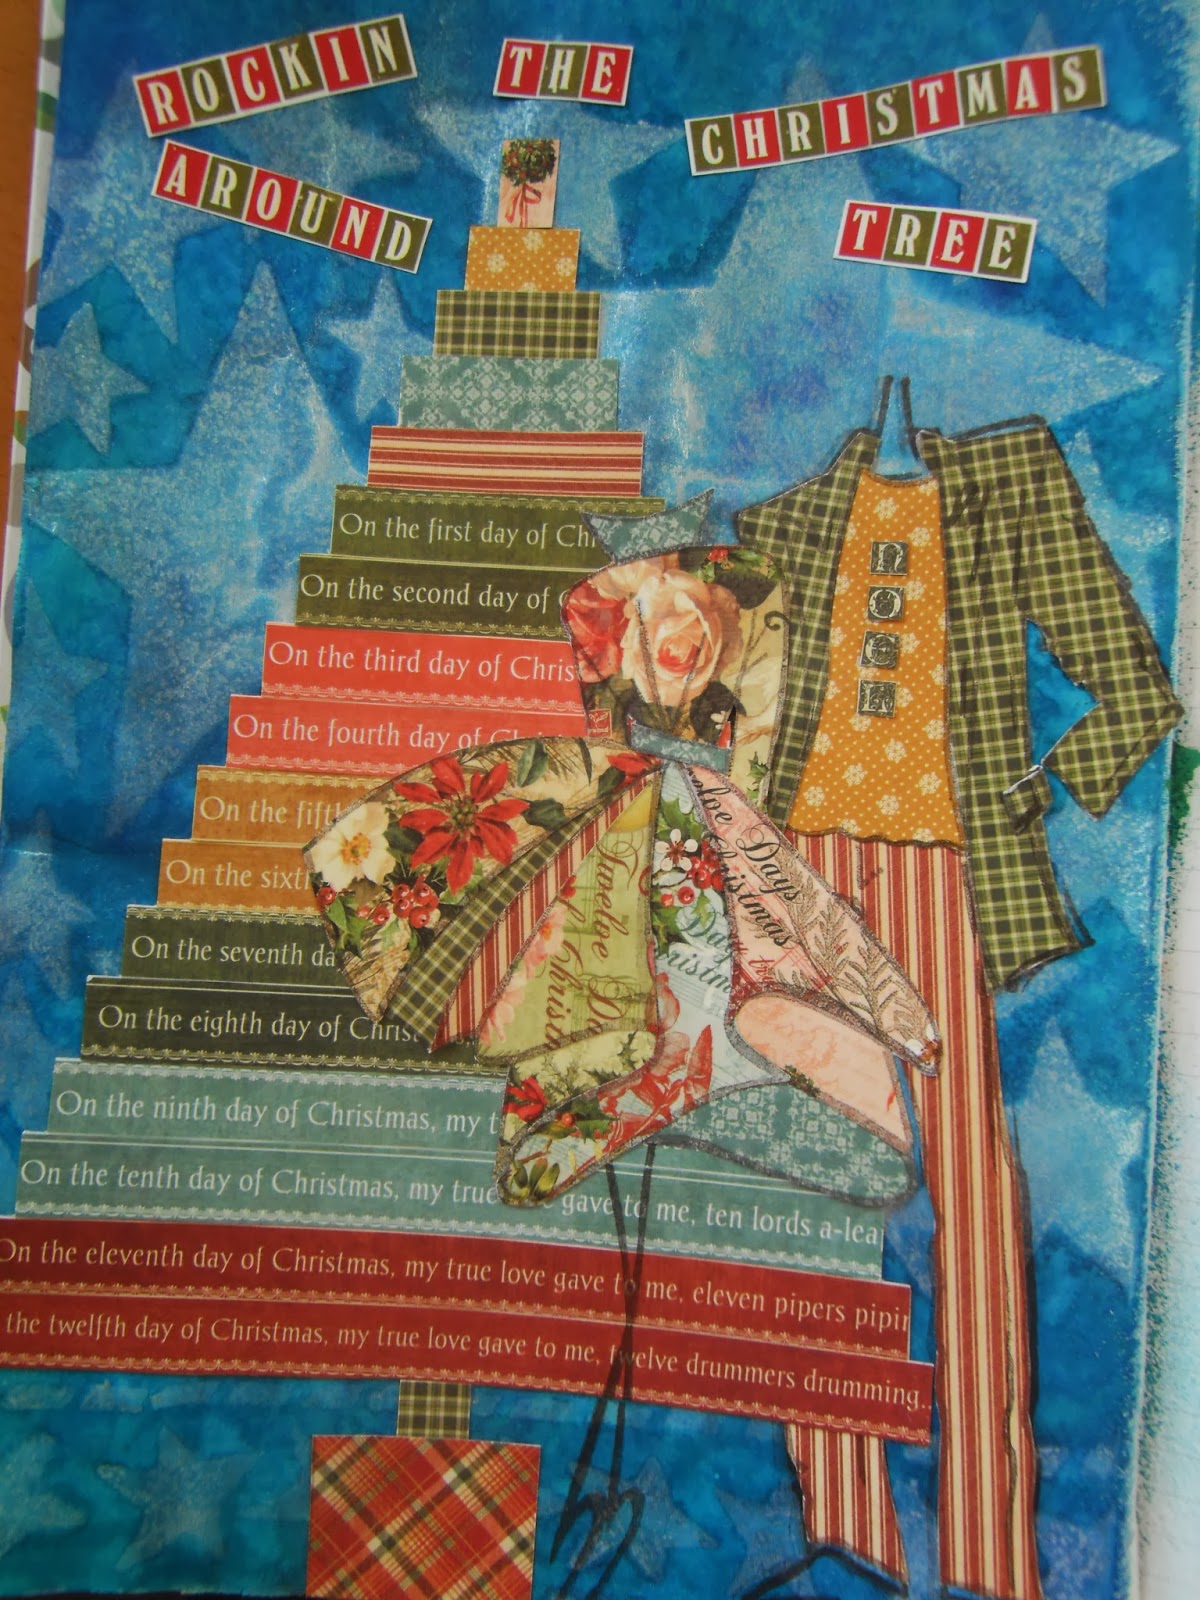
I started by jazzing up a blue inked background in my journal that had been blank for too long with some Perfect Pearl Mist through a Dylusions stencil.


I had been playing with some small scraps plus the borders I had removed from the paper sheets I used to line the Christmas House project to create a Christmas tree shape and then paper pieced some stamps from the Dylusions Couture release. An old sticker alphabet came to the rescue for the sentiment. Not at all my usual sort of thing but my scrap box is a tad lighter lol!

 
More my style is the second piece I'd like to share, again all made from scraps of paper, washi tape, vellum, Kaisercraft background stamps and a fair bit of ink and paint with just a smidge of embossing powder.
  
 
This graffiti style piece started as something to console myself with on a rainy afternoon when my mojo had left the premises in a sulk, and blow me over it turned itself into a workshop project somewhere along the way lol!
 
So, share with us what you make with your leftovers in the comments below, with a link to a project made with same, and you could win the paper collection from the Snazzy DTeamies next kit - it's a goodie but I'm not telling you any more just yet.
 
Entries by midnight GMT on 9 January and I will pick my favourite and announce the winner on January 10.
 
Look forward to hearing from you. Happy crafting.
Val xx


Thursday, 12 September 2013

Design Team Project #2 By Gillian

Today for my final project here at Snazzy's, I'm back sharing a simple and clean project {well for me it is simple and it's clean .. i.e not grungy. Gather up your ingredients, it won't take long.

I used Distress Stain (Picked Raspberry) along with the Kaisercraft Clear Stamp (Smile). Simply splat and stamp .... seriously it's that easy. I then adhered the clean background onto some black cardstock.


 This time I used Distress Stain (Peacock Feathers) and the Kaisercraft Clear Stamp (Confidence).

 
To add some more dimension I used the bottle cap from the Distress Stain and inked it up using Archival Ink (Jet Black).


Well as they say "that's it folks" .. I would like to wish everyone at Snazzy's continued success and a huge thank you to YOU the Snazzy followers for all your support and kind comments during my time here. x

Lesley will be back on Monday sharing her creativity using this months kit.


Monday, 9 September 2013

Snazzy Design Team Project #1 By Gillian ....

Good morning everyone, Gillian here with my first project of the week. Yet another month has sprung from nowhere and it is time for the Design Team to create with some more goodies. This month we will be featuring the Chalk Studio/MME - Enjoy Everyone Paper Kit along with these Kaisercraft Clear Stamps ... I'm working with Smile (CS130), Confidence (CS124) & Life (CS125).

The base of my project is using a Studio 490 Art Parts Fancy Oval Frames which I covered using the 12x12 Lettered Paper from the Paper Kit, adhering with Cosmic Shimmer Glue then sanding around the edges, this saves any cutting.


These papers have a beautiful white shading/chalk effect throughout the designs, so bearing this in mind I sponged Distress Paint (Picket Fence) around the edges to pull everything together. I then painted the Gears from the Art Parts Set Steampunk Gears & More using Distress Paint (Pitch Black), before stamping with Kaisercraft Clear Stamp - Arty, again using Distress Paint (Picket Fence).


I've sprayed the flowers {which were Gold/Bronze in colour prior to spraying} from the Prima Sunrise/Sunset Collection with Dylusions Black Marble & White Linen then thouroughly heat drying before adhering using Cosmic Shimmer Glue. I then added some Ideaology Light Bulbs and a Philosophy Tag.


Next using a left over rectangle Art Part shape, I painted this using Snowflake fresco Paint as I wanted  full coverage before stamping with Archival Ink (Jet Black). At this point I did not fully load the Kaisercraft Clear Stamp {Life} with ink as I didn't want a "crisp image" this would then match the whole overall effect of the project.


To tie in the top right hand side, I painted a Kaisercraft Wooden embellishment using Distress Paint (Pitch Black) then spritzed some Dylusions White Linen over the top before adding some more flowers as above.


So that's project #1 ..... I will be back on Thursday with my final project for Snazzy's. I have had the privilege of assisting Val & Don over the last few years in sharing the business that is Snazzy's with you all, setting up the Design Team blog and working with the best teamie's. As the old saying goes "all good things come to an end" .... with another year of studies ahead as well as working full time, something has to give. I would like to say a huge thanks to everyone at Snazzy's for letting me share the journey with you guys, and I wish you all the very best in the future. x

Without further ado the winner of last months Random Comment is ..... Helen (StampingByH)
Helen said...
Gorgeous mix of colours. Hope your studies allow you to "play" more soon... this is just beautiful. 

Congratulations Helen, please contact Snazzy's with your details to claim your prize.

To be in with a chance of winning the Random Prize, leave a comment HERE.

Friday, 14 June 2013

DT Project #3 by Minxy, Featuring

Kaisercraft Base Coat Collection


So here I am with my 3rd and final piece of the week
I was searching on utube and I came across another variation on the 1 sheet mini book so decided to give it a go.


I used the 'whitewash' paper and followed instructions via utube {just search 1 sheet mini}


Once I had stuck all my pages together I stamped the 'memory' clear stamp in 'coffee' archival ink randomly on the lower pockets, and over the front and back cover.


I distressed some tags with distress ink and stamped words from the 'secret admirer- definitions' clear stamps also in 'coffee' archival ink.


I used a tando creative small chipboard compass inked with 'vintage photo' distress ink to hold in place some twine for the closure.
You could make these into very cool little note carriers or photo holders, the possibilities are endless.
*****
So this concludes my week of kaisercraft fun, I hope you have enjoyed my projects this week.
Astrid will be along on monday with more wonderful projects, along with Hels the following week so plenty more ideas for these scrummy papers.
***
Take Care and Stay Inky

Wednesday, 12 June 2013

DT Project #2 by Minxy, Featuring:

Kaisercraft Base Coat Collection

Here I am as promised with my second offering using the Base Coat papers.


I opted for a scrapbook layout as I am on a shabby chic kick ATM and felt the papers really lent themselves well to it.
I started by using 'raindrops' prima stencil and gloss gel on the 'weathered' sheet.
When dry I spritzed some 'patina' cosmic shimmer vintage mist all over the page.
I stamped in white stazon using the 'memory' kaisercraft clear stamp randomly over the page.


Next I cut several strips from the 'Distressed' paper and mounted them onto some card to give them a bit more dimension, like little planks of wood. I also used the 'distressed' paper to back small slits I had torn and rolled on the outer edges of the page.


I arranged the mini planks into a frame and stuck in place with stix2 ultra clear tape.
I used some cheap photo corners to hold the pic in place, covering them with some fancy moulded corners I made from clay.


I then set about embellishing the page with other bits from my stash like the 7 Dot studio 'dreamer elements' and prima flowers, oh and some gauze kindly given to me by my teamie Gillian xo
*****
Well that's another piece done.. only 1 more project to see on friday,
Hope you'll be back, Don't forget after leaving a comment for me to leave another HERE for your chance to win the random comment prize.
Till Friday... Stay Inky

Monday, 10 June 2013

DT Project #1 by Minxy, Featuring:

Kaisercraft Base Coat Collection

Hay Snazzy fans. 
Hope everyone is enjoying the nice summery spell we have been having here in the UK.
So as you know we are working with the very cool kaisercraft base coat papers and some of their clear stamps too.
My first project is using the 'Bark' sheet.


I started by giving a blank wooden box {from Snazzy's} a coat of cream eco green acrylic paint but only on the edges as I knew most of it would be covered with papers.


I then measured and cut out the paper to fit each side and the top and stuck it all down with cosmic shimmer glue.


I diecut a butterfly and some swirls from the same paper and from some manilla card.

I then stamped the box using the 'perfume' clear stamp for the top, the 'journal' clear stamp for the sides, along with one of the words from the 'secret admire-definitions' clear stamp set for the front.


I used a prima 'engraver collection' flower coloured with a bit of distress ink to match the paper and the die-cut pieces to embellish the top. A brad for the faux knob and some old bingo chips painted black for the feet.

I hope today's project has been to your liking, I'll be back again with a nice shabby scrapbook layout on wednesday, 
so till then Stay Inky

Saturday, 1 June 2013

Design Team Project #3 ... London To Paris

Happy Saturday everyone, hope you are all enjoying the weekend so far. Today I'm back with my final project of the week featuring the Base Coat Collection from Kaisercraft.


In conjunction with some Tim Holtz/Studio 490/Ranger goodies also available at Snazzy's. I'm not normally a "Green" person but these weathered shabby papers are lush. I started out by painting this Studio 490 Art Parts Five Panel Frame using Distress Paints (Mowed Lawn) then some (Bundled Sage) to tone it down a bit. I then added some Walnut Stain Distress Ink around the edges. Next I cut the "Weathered 12x12" cardstock to size. Using Archival Ink (Sepia), I then stamped the "Chicken Wire" design from Tim Holtz Mixed Media Set randonmly over the background. For the next layer of stamping I used Archival Ink (Jet Black) to stamp the "Collage" design from Tim Holtz Paris Memoir set.


I stamped further images from Tim Holtz Paris Memoir & London Sights stamp sets onto the "Distressed 12x12" cardstock from the Base Coat collection. The word "Journey" is from the Secret Admirer Definitions Clear Stamp Set from Kaisercraft.


And finally some more stamping on the outer panel and my favourite Ideaology embellies .... Hitch Fastners.

Don't forget to leave a comment HERE to be in with a chance of winning a Snazzy prize.  Lesley is up next on Monday with the most stinkin cool project featuring the Base Coat Collection.

Until next time ....

Wednesday, 29 May 2013

Design Team Project #2 Featuring Kaisercraft ....

Morning everyone, today I am back with my second project of the week featuring the gorgeous Base Coat Collection from Kaisercraft.


To create the tag background I started by using a Size 12 Black Tag from Ranger then mirroring a slightly smaller tag using the "Whitewash Cardstock" from the Base Coat Collection. I then added some stamping by using the Clear Flutter Stamp using Archival Ink (Jet Black).


I then layered a strip from the reverse side of the "Whitewash Cardstock" onto the inner tag. Next I die cut hearts using a Sizzix die, again using the "Whitewash Cardstock" and adhered with 3d foam to add some dimension.


The "Words" are Kaisercraft Secret Admirer Clear Stamps (also included in this months kit) which have been stamped using Archival Ink (Jet Black). I then mounted the tags onto some recycled  corrugated cardboard and randomly drybrushed Stone Fresco Paint.

I will be back over the weekend with another make using this collection. Until then ....