Showing posts with label Dylusions. Show all posts

Friday, 3 January 2014

A Snazzy little challenge....

Hello, and a very Happy Hew Year to all.

This is traditionally the time of year when leftovers feature. Following last week's 100 ways with leftover Christmas turkey and stuffing, almost all papercrafters now move along to resolving not to buy any more stash until they have used up all the crafty stuff they already have hoarded in every nook and cranny.

Does this sound like you?

Most resolve weakens almost as soon as the new CHA Sneak Peeks appear, meantime..........

I'd like to challenge you to share what you make with your leftovers.

I am reknowned for not being able to throw the smallest scrap of paper away, even the gutters showing the revese side of double sided cardstock find themselves stashed away.

So, to start us off, here is what I made from my leftovers from the last DT kit.

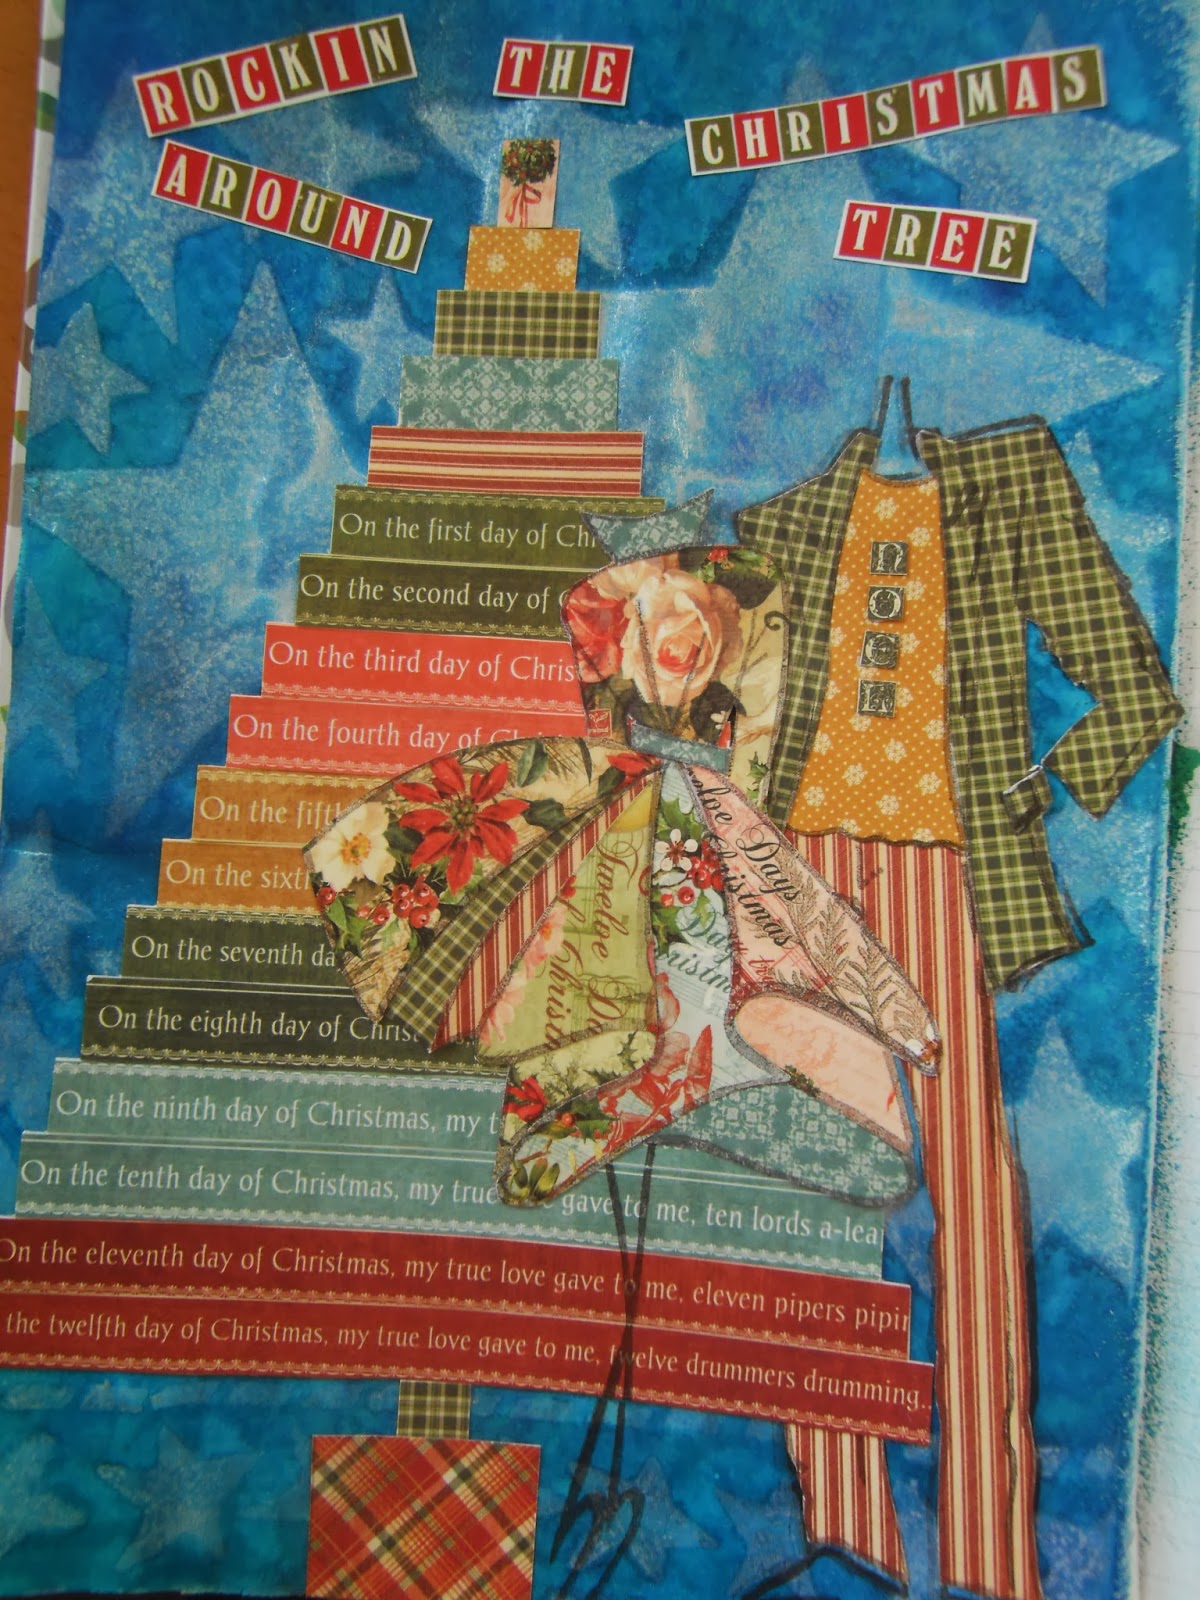
I started by jazzing up a blue inked background in my journal that had been blank for too long with some Perfect Pearl Mist through a Dylusions stencil.


I had been playing with some small scraps plus the borders I had removed from the paper sheets I used to line the Christmas House project to create a Christmas tree shape and then paper pieced some stamps from the Dylusions Couture release. An old sticker alphabet came to the rescue for the sentiment. Not at all my usual sort of thing but my scrap box is a tad lighter lol!
 
More my style is the second piece I'd like to share, again all made from scraps of paper, washi tape, vellum, Kaisercraft background stamps and a fair bit of ink and paint with just a smidge of embossing powder.
  
 
This graffiti style piece started as something to console myself with on a rainy afternoon when my mojo had left the premises in a sulk, and blow me over it turned itself into a workshop project somewhere along the way lol!
 
So, share with us what you make with your leftovers in the comments below, with a link to a project made with same, and you could win the paper collection from the Snazzy DTeamies next kit - it's a goodie but I'm not telling you any more just yet.
 
Entries by midnight GMT on 9 January and I will pick my favourite and announce the winner on January 10.
 
Look forward to hearing from you. Happy crafting.
Val xx


Monday, 15 July 2013

DT Project #1 by Minxy, Featuring:

PaperArtsy JOFY Stamps

Hay Snazzy gang, Is everyone enjoying the first proper summer we've had in years!!!
My goodness it's been scorching down here in somerset, I've actually found it very hard to get in my craft room as my place is like a greenhouse.. But alas needs must, couldn't disappoint the snazzy fans so here for my first project is a wee birdhouse.


I started by spraying one of the snazzy mini birdhouses with white linen dylusions spray


I stamped the roof with little leaves from the JOFY15 set and then coloured them with distress markers.
{I stamped in black archival ink and coloured in with peeled paint}


I stamped the 2 little birds from the JOFY JM20 mini set onto white card and coloured them again with distress markers. I cut them out and stuck them to the birdhouse with cosmic shimmer glue.


To finish I stamped the word love birds and the little heart both from the JOFY JM20 mini set directly onto the birdhouse, colouring in the little heart. I also coloured the little perch and edged with vintage photo.

Hope you've enjoyed today's offering, I'll be back on thursday with another offering xo
Till then, Stay Inky

Thursday, 16 May 2013

DT project #2 by Astrid

Featuring Gallerie Wrap Canvas Kit

Hello, hello dear Snazzys visitors, I am here to show you the second project I created with the awesome Gallerie Wrap Canvas....
This time I wanted to make something in more neutral tones. But before I tell you how I went about putting this together, I am going to let you in on a little secret: When the DT first heard we were going to work with this kit, we were all a bit dismayed... What is the point of working with a canvas that you have to put together your self, - help!!! Well let me tell you, - all of us have totally changed our minds, these kits are awesome! They are easy and quick to put together, Gillian has posted a link to a video on how to do it here and the fact that they are flat at first make them fantastic to stamp and layer on, and the quality of the canvas is superb and all pre prepped, no need to Gesso. This kit has probably been one of my most favourite things to work with, which is saying a lot, because we always get super stuff to play with. Anyway, enough of the waffle and onto the project: I started with three colours of Distress Paints, Antique Linen, Bundled Sage and Frayed Burlap. I layered on a good layer of paint, spritzt a bit with water and then dried with my heat gun. I then played around with some Tim Holtz Tissue Tape  and Prima Washi Tapes left over from previous DT projects. I also used some stencils and masks  from my stash, but Snazzys has a great selection!. Next came various background stamps and the main stamp, (La Blanche) stamped on Tissue Paper, just to make sure it would land up exactly where I wanted it... I glued that onto the canvas and dabbed some Distress Inks over and around it.
I made a cluster from various bits and pieces and adhered it with Gel Medium. Snazzys has a great selection of  metal embellishments including some fantastic Steampunk ones. I also added some Prima Flowers. I masked the main image with a damp baby wipe and some kitchen roll. I then painted the cluster with Gesso and when that was dry took a deep breath and spritzt it with Dylusions Sprays in Melted Chocolate and Black Marble. Oops, a bit dark, so White Linen came to the rescue... I also rubbed some Treasure Gold over the flowers.
Next came some of the wonderful new Tim Holtz Remnant Rubs. At this point I put my canvas together and added the finishing touches afterwards. I added some crackle to the corners, did some more background stamping and added the sentiment, (a Tim Holtz stamp which I cut into strips and stamped on to some scraps of left over Prima Tea Thyme paper). A bit of shading around the words, and voila, project complete.

Here are a few close ups still:


Hope I have given you a wee bit of inspiration, the kit has enough stuff to put together two canvasses and remember, to be in with a chance to win a kit, leave a comment HERE

Don't forget to come back on Monday when the wonderful Hels will show her take on the kit, - can't wait to see what she will do with it!!
Until then, stay happy, inky and creative!

Thursday, 9 May 2013

Dt Project #2 by Minxy, Featuring:

 Gallerie Wrap Canvas Kit

Ello Snazzy fans, Here I am again as promised with my second canvas offering.
***
This time you may need to put on your shades as it's a bright one!


I went in a completely different direction on this one using many of the Dylusions products that Snazzys stock.
I started by stamping a line of bunting using the 'bags of buntingdylusions stamps, I masked them all off then started spraying the canvas with a mix of 'lemon zest', 'london blue' and 'postbox reddylusions ink sprays knowing that being primary colours I would get some green, orange & purple tones coming through too.


When the whole canvas was covered I felt it to be a wee bit bright {i'm not good with very bright colours} so I dulled them back with the new 'white linendylusions ink spray.


Next I used more stamps 'inbetweenies' and 'basic backgrounds' to build up my layers, I stamped in 'vermillion' & 'manganese blue' archival ink
I stencilled 'chipped sapphire' & 'ripe persimmons' distress inks through 2 of the dylusions stencils 'diamond border' and 'dotted flower'.


 I stamped 3 flowers from the Wendy Vecchi 'art from the heart' stamp set using 'cherry pie' & 'funky fuchsia' dylusions sprays for the heads and 'cut grass' & 'dirty martini' dylusions sprays for the stems and leaves by putting a bit of each spray on the craft mat and stamping into it, I wasn't sure if this was gonna work but it came out better than expected, I did pre-ink the stamp with versamark as wasn't sure how the spray would be on the rubber. 
I used a water brush to pull the colour across the whole image.
I also used the same colours and water brush to fill in the bunting.
I printed out the quote on my computer, and mounted it to the canvas with foam tape.
***
Astrid will be along on Monday with more canvas creativity, Thanks for taking the time to visit, I truly appreciate it. And don't forget 1 lucky person can win a little prize just for leaving a comment HERE.. after you've left me a comment obviously lol
Till next time
Stay Inky

Thursday, 21 March 2013

DT Project #2 Sunrise/Sunset Collection ....


Good morning everyone .... Gillian here, hope you are all braving the ever changing weather elements that we seem to have right now in the U.K!

The design team are soooo lucky to be working with this amazing collection this month ....


For today's project I have used the #12 size tag from Ranger along with various papers from the Sunrise/Sunset collection.


I've used Distress Ink (Wild Honey and Walnut Stain) through the "Checker" 6x6 stencil to build up the layers in the background along with Dylusion Spray Ink (Cherry Pie)


The paper flowers from my own stash have been spritzed with Dylusion Spray Ink (Cherry Pie, Black Marble & Dark Chocolate). The "Checker" wooden border has been inked with Distress Paint (Wild Honey) and spritzed with some Dylusion Spray (Dark Chocolate).


I've used Archival Ink (Jet Black) to stamp the circles and the "Checker" stamp from Clear Stamp No 4 and then highlighted the circle with an Epoxy Sticker. I've added some metal bits n bobs to the flowers and some Ideaology findings too. The wording on the tag is from the Ideaology Chit Chat sticker book.

Included in this months kit is *squealllll* this Finnabair Mixed Media Journal


To say it is a beauty is an understatement .... to see what I've been doing with this join us for our challenge on the 8th of April and show the design team how Anna Dabrowska's style inspires you .... one lucky person will win this Journal!

Until next time ..........


Monday, 18 March 2013

DT Project #1 Feat Sunrise/Sunset By Anna Dabrowska For Prima

Good morning everyone .... Gillian here with my first project for this month using the GORGEOUS Sunrise/Sunset Collection by Anna Dawbrowska for Prima. This month the design team have been given the A4 Paper Pad, Finnabair's Mixed Media Journal and an assortment of stamps (Cling 1,2,3 & 4). from the collection.

This months Random Comment Winner is .......

No 15 .... Ria Gall! Congratulations please email Snazzy's to collect your prize. 


My 1st project is a 5x7 canvas board which I have covered with paper (X-Radient) from the A4 Paper Pad. I've then used Distress Ink (Walnut Stain & Wild Honey) through Anna's new 6x6 stencils (Checker & Doily).


The "little girl" image is from a previous Somerset Studio issue. The words "Laughter of the Soul" is from the Ideaology Chit Chat Sticker book. The Grungeboard Crown has been coloured with Treasure Gold (Spanish Topaz & Onyxite). I've then highlighted the "inked" circles using the Sunrise/Sunset Clear Epoxy Stickers.


{Cling Clear Stamp1 - Doily Stamp}

Next I painted the Sunrise/Sunset Wooden Icon Borders with Wild Honey Distress Paint and edged using Walnut Stain Distress Ink.

{Cling Clear Stamp 4 - Mini Flower Stamp}
 
These paper flowers have been spritzed with Dylusion Sprays (Black Marble, Pure Sunshine & Dark Chocolate). The wooden leaves were painted with Distress Paints (Bundled Sage & Mowed Lawn) then lightly spritzed with Dark Chocolate again. I've then added some Ideaology embellishments. 

 
Between the grey/dull weather and my phone camera, the pics are not ideal, but hope you get the jist of things.

To be in with a chance of winning the A4 Sunrise/Sunset Paper Pad simply leave a comment HERE on the first post of the month. I will be back on Thursday with another Sunrise/Sunset make ... until then!


Wednesday, 13 March 2013

Find Delight - DT Project by Hels

Gooodly Morning Snazzyfans!  I am back again with another taggy offering using the gorgeous Prima Engraver Collection that we DT girlies have been using this past month.  Before I waffle on, please do remember that Snazzy's very kindly offer a discount on the DT Kit that we are using... so  you can grab yourself the same kit we have used... and get a bargain into... erm... the bargain!  HERE are all the deets how to snaffle one for yourself :O))


Another tag from me, this time a smaller one.  This is a normal size 8 manila tag from Ranger.  I used Distress Inks to colour the tag:  starting with Antique Linen, I blended over the entire tag and then added Frayed Burlap DI around the edges.  Around the very edgy bits I added Brushed Corduroy DI - this colour tones perfectly with the Engraver collection.  Next I did a bit of stamping for the background using the Engraver stamps and Ochre Archival Ink.  I added a smidge more interest using a clock stencil and Frayed Burlap DI.


Next I used some of the offcuts of paper from my previous project and made a little banner piece... adding stickyback metallic pearls for a bit of bling and then sticking it directly to the tag base.  I had a Grungepaper diecut hinge kicking about on my desk, so I coloured that with Brushed Corduroy and Walnut Stain DI and popped that onto the bottom of the tag.  The flowers in the kit are to die for so I had to use those aswell... spritzing them with Black Marble Dylusions and Cosmic Shimmer Ancient Copper to add a bit of sparkle.   The sentiment was made up using Idea-ology Chit Chat Stickers and popped onto 3d foam to make the sentiment pop a little more.  In the kit are some little pearly swirls so I stuck those on after adding a smidge of gilding wax to them to tone them in... how pretty!


Anyways, that's all from me for now... don't forget you could be in with a chance of winning the fabby DT Kit that we have been using too... simply leave a comment on this post HERE.   Thanks for looking... TTFN!


Monday, 11 March 2013

Memories - DT Project by Hels

Goodly Morning Snazzyfans and a very happy Monday to you all!  If you have been following the blog this past month you will have seen some gorgeous creations from my teamies using the fabby Prima Engraver Collection of papers, stamps and flowers.  CLICK HERE to see the collection we have been working with and also... remember you can grab yourself a goodly bargain because our DT kit is for sale at a bargain price too :O))  


My first offering this month is a mahoosive Size 12 tag from Ranger.  The tag base is manila in colour and to make it match with the colour theme of the Engraver papers, I used Vintage Photo and Walnut Stain DI's to blend around the edges.   I cut the tag into two pieces so I could then attach it back together with eyelets and a bit of hemp.  I cut some of the papers (they are so gorgeous... almost too difficult to cut them lol) to fit onto the tag in layers... making a focal point on the bottom half of the tag with the clockface.  I added a Tim Holtz Fragment to the centre of the clock to make it pop more.


The cut papers were all edged with Walnut Stain DI and I scruffed up the edges to make it a little more shabby looking.  I added a couple of pieces of the ruler papers so the top bit of the tag as an arty addition.


The sentiment was stamped onto an offcut of paper using Jet Black Archival Ink and then edged with Vintage Photo to make it blend in nicely.   One of the papers has some fabby circle designs on it... and it just so happened that I had three more Fragments that fitted over the circles perfectly... so they were glued on with Glossy Accents and when cut out, edged with more Vintage Photo just so there weren't any white cut bits showing.


The embellishing was fun indeedily... the flowers in the Engraver collection are stunning... the larger ones have a broken glass style of glitter attached to the petals, once I had given them a good spritz with Black Marble Dylusions and Ancient Copper Cosmic Shimmer they really came to life.


The butterflies are also from the stamp set... stamped onto the papers again, using Black Archival and Walnut Stain DI to edge them around to make them match in... and I added some metal spinners to the middles for bodies.

Don't forget that you can still win this fabby collection - just CLICK HERE for the details... easy peasy!   Please do scroll back to see the other beautiful creations that the team have made with this fabby collection...


Thanks for looking... have a fabby day!


Saturday, 9 March 2013

DT Project # 3 by Astrid ....

Hi everyone Astrid here sharing my 3rd and final project this month using the beautiful Prima Engraver Collection.


 This project was ideal in using up the last little snippets of the wonderful paper collection we have been working with.

I used a Paper Mache Hanging Board and covered it with random strips of paper left over from my previous two projects. Next I added some texture paste (plain old Polyfilla) through a stencil from my stash and when it was dry I covered it all with some thin washes of white acrylic paint to make the different papers blend together. I mixed two different colours of Dylusions Spray, Black Marble and Melted Chocolate in a mini mister with some water and sprayed it here and there over my hanger. I then stamped the numbers stamp in random places in Coffee Archival, added a vintage image from Land of Nod Studios, to be the vocal point and added the word "Memories" which I had stamped in Black Archival on a piece of scrap card. The last step was to add some flowers from the Collection, I also highlighted the raised bits and edges of my hanger with some Treasure Gold.

Here are some close ups:


I shaded around the image with a charcoal pencil to make it "pop" a bit more.
Well, that's it, - hope you liked my hanger and don't forget to come back on Monday to see what the wonderful Hels will do with this collection!

Don't forget to leave a comment HERE to be in with a chance of winning this months Random Comment prize. 

See you next time!