Wednesday 27 February 2013

DT Project #2 by Minxy, Featuring:

Prima's Engraver Collection

Hay Snazzy Followers,
I hope you enjoyed my first project and matching video from Monday.. Today I am back with my second offering of the month, This time something nice and simple
The humble scrapbook layout.


I always find that if you have nice papers, you don't really need alot else to make a fun and interesting layout.
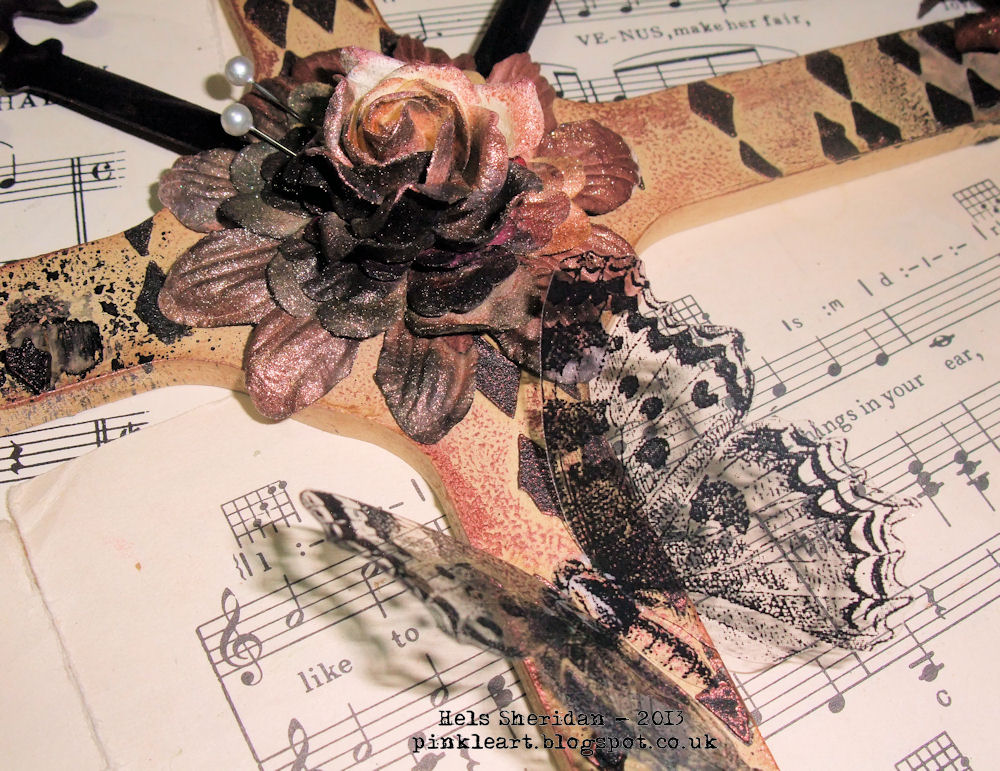
For mine I used the 'Roulette' sheet as my base. 
It was actually black and white but it looked far too stark for the photo's I wanted to use so I swiped the whole page with 'antique linen' distress ink, rubbing in on harder in places to get a patchy effect. I then distressed the sides with my distress-it-all and punched out some sections with a border punch, I then inked it all round making it nice and grungy.


I cut out the old polaroid type frames from the 'Calligraphy' sheet to mount my photo's on, along with the tape measure strip and pocket watch.
I backed the pocket watch onto some card before fussy cutting it out, I then covered it in 'rock candy' distress crackle. Once it was dry I rubbed 'vintage photo' distress ink over the top, and pushed into the cracks with a baby wipe to give a nice aged look.


I backed the strip of measure tape with some raffia lace from my stash, and embellished the page with idea-ology tickets and tickets from the 'Bank Note' sheet, along with some of the yummy patterned Engraver Roses.
***
I hope you have enjoyed today's page.. Do leave a comment to let me know what you think, Your comments are ALWAYS appreciated.
Oh! and talking of comments.. don't forget to leave one HERE to be in with your chance of winning the random comment prize, You gotta be in it to win it!
***
I'll be back on Friday with my final piece.
Till then.. Stay Inky

Monday 25 February 2013

DT Project #1 by Minxy, Featuring:


Hay Snazzy Folks 
As you know we are working with a truly STUNNING collection this month.
I am totally in love with all the papers and ended up using every last scrap from the kit bar a few flowers!!
The main bulk of that went on this, my first of 3 projects i'll be sharing this week.


I knew as soon as we were told about the kit that I wanted to make a mini-book of some kind, but by the end it wasn't so mini after all lol


It started as a book but evolved into a little case when I added the handle and clasp.
I choose the 'Cartouche' paper for the cover as it is easy on the eye whether your looking at it vertically or horizontally.
***
Now I know your all gonna wanna see this in more depth, so not to disappoint {and so I don't make this a mammoth post with hundreds of photo's} I have made a little UTube for your viewing pleasure.
ENJOY

Thanks for stopping by, I hope you are inspired to get out your papers and create something.
 I'll be back again on Wednesday with my second offering.. 
Till then Stay Inky

Friday 22 February 2013

Snazzy's DT project #3 showcasing Prima Engraver Collection (by Lesley)


Hello Snazzy's friends

It's my final blog post with the fabulous Prima Engraver Collection of goodies.  I have to say I wish I could come back after Hels' rounds us off this month and I've had more time to play with these beautiful products.  They lend themselves to almost any papercraft project and I think the next one on my list would be a mini book/album.  Although I haven't seen what the other girls have in store for us I'd like to bet at least one of them has done something along those lines and who knows what else.  I can't wait to see!

For my final project I have made another card but this time a feminine one.  Well, I just had to didn't I?  All those beautiful flowers ........ what's a girl to do, ;D!


When completely folded and the ribbon tied the card is 18 cm sq.  You'll see what I mean shortly.  I took one of the lovely flower images and tore round the section I wanted.  I just love that beautiful script in the background!  I did quite a bit of highlighting with a Sakura clear Sparkle pen but no matter how I tried I couldn't really capture it in a photo.  On the dark panel I stamped the pretty little flower from the stamp set with Versamark Ink and then dusted with Ranger Heirloom Gold Perfect Pearls.  I very lightly inked the edges with Walnut Stain DI, then Versamark and then dusted with the PP.  I distressed the edges of a co-ordinating square of card, lightly inked the edges and then tore a darker co-ordinating square and dusted the edges with the PP again.  Before layering up onto the cream base card I used a lace fragment stamp from a Chocolate Baroque set with Sepia Versafine ink to stamp a background.


This photo shows the extra side panel which folds over the front for the ribbon to tie and keep closed for presentation in a box.  I again used the lace fragment stamp and then attached the ribbon before arranging all the beautiful flowers and blingy flourishes together with some die cut leaves I already had in my stash.


I think this card would have to be for someone very dear to me to deserve using all those beautiful blooms on one card, lol!


And here is the card folded and tied ready for it's box.  I wonder if you can spot the very undeliberate mistake?  It wasn't until I had nearly finished typing this post that I realised I'd forgotten to use the lovely blingy flourishes.  I particularly wanted to put them on this feminine card so added them and retook a pic of the side panel so there aren't any on all the other photos, lol!  Sorry about that! I had intended making a presentation box too as part of this post but unfortunately I went down with the lurgy at the beginning of the week and only managed to finish the card today.  Keep your eye on my blog and I'll try to do one over the weekend.

Don't forget to leave a comment HERE on Gillian's first post with this kit if you want to be in the random draw to win the same.  Believe me it's well worth trying for!

Next week it's our Nicky's turn and I know ('cos she said) she's been having a lot of fun with this kit so I'm really excited to see what she's done.  Till next time, bye and


Wednesday 20 February 2013

Snazzy's DT Project #2 Prima Engraver Collection (by Lesley)

Good Morning All,

I'm back with my second project for this wonderful collection of products, the Prima Engraver Collection.  Today I have a card to share for those difficult to make for men.  These beautiful papers are so versatile.


I've used my favourite 21cm x 21cm format white base card and then cut a 20cm square from co-ordinating cardstock.  I stamped the ruler from the Engraver set of stamps all round the edge using Walnut Stain Distress ink to get the patchy, random look.  I lightly distressed the edges and blended a little Walnut Stain DI and attached it to the card with double sided tape.  I followed this with a smaller square of the Caligraphy paper design from the Collection, again distressed and inked around the edges and I wrapped some hemp thread to one side too.


Next I took some more of the co-ordinating cardstock for another smaller still square, ran it through an Alterations embossing folder and then highlighted the embossing with Walnut Stain DI.  Then came a piece of corrugated card from which I ripped some of the surface layer before lightly covering with watered down tan acrylic paint.  I then stamped it with the number stamp from the kit and inked the edges again using the Walnut Stain DI.  I attached it to the embossed square and again wrapped some hemp thread.before attaching it to the card.


I cut the watch image to size from the paper, distressed and inked the edges and attached it to the card.  I cut the word 'LOVE' from a scrap from my first project and the tickets, inked all the edges and attached them to the card with 3D foam pads.  Finally, I highlighed the area on the watch face with Crackle Accents which very obligingly went a nice sepia colour all by itself as it dried, lol!


That's it from me for today but I'll be back in a couple of days with my final piece for this week. I hope you get chance to drop by.


Monday 18 February 2013

Snazzy's DT Project #1 Prima Engraver Collection (posted by Lesley)

Hello again lovely visitors,

Wow, I can't believe we're half way through February already.  Slow down world you're going too fast, lol!
Anyway, it's soon come round to my second week of projects for 2013 and if you visited last week to see Gillian's design you will know we are showcasing gorgeous papers, stamps and wonderful embellishments from the Prima Engraver Collection.  From the Ooohs and Aaahs to be heard when we got our DT kits this month I think the whole team is unanimous in loving this collection and if you go back to Gillian's post and leave a comment you will be entered into the random draw after the rest of the team have shown us their inspiration and might be lucky enough to win this fabulous kit.

For my first project this week I have decorated a blank wooden frame which the DT received from the Bosses a while back in our box of 'bits and bobs'.  It does come with the support at the back so that it's free standing but I chose to take that off and make it wall hanging.


First of all I drew round the frame onto the back of the paper design I wanted to use, in this case I used Atlas and I drew inside the aperture too and then cut the paper out and set it aside.  I then covered the frame with Black Gesso (I used Claudine Hellmuth's Studio).  Once it was dry I adhered the paper 'frame' using Cosmic Shimmer dries clear Glue.  After a few minutes when it was well and truly stuck I sanded all the edges including inside the aperture to make it look a bit weathered and I put some Picket Fence Distress Stain onto my craft mat, picked it up with Cut n Dry and streaked it lightly across the frame.


I took an Ideology Word Band which says 'Capture Life's Moments' (the light reflection makes it difficult to read on here) and smeared some white acrylic paint over it and then wiped it off with a wet wipe so that it just stayed in the etched letters.  I used some hemp thread to tie it round the frame and secured the band itself with a little Cosmic Shimmer Glue.


I then took some Studio 490 leaves, painted them with green acrylic paint and then overstamped with a Studio 490 background stamp using Archival Black ink.  I then arranged them on the frame, adhered with Cosmic Shimmer Glue and then arranged some of the fabulous Prima Engraver Collection flowers over the top ....... these flowers are absolutely lush!

Now, I did have a specific photo in mind which I wanted to put in the frame but it's one my Son took of his Daughter and his partner and I forgot to get him to send it to me :-( which is why the aperture has been empty so far, lol!  But, at the last minute I decided to stamp something to fill in for the time being.


  I stamped the quote, which is from a Dark Room Door set using Onyx Black Versafine ink and then using the same ink I stamped the flower which is from the Engraver stamps in the kit.  I blended some Pumice Stone Distress Ink round the edges and then used Distress Markers and a water brush to colour the flowers.  Finally I stamped the script (from my own stamps) using Smokey Grey Versafine Ink and here is the completed frame.


I shall be back towards the end of the week with another offering for you but in the meantime, have a lovely week everyone and thank you for stopping by.  


Sunday 17 February 2013

DT Project #2 By Gillian ....

Good morning everyone, Gillian here with one more project to share before the week is out. The Engraver Collection from Prima is a truly beautiful collection so with this project I wanted to try and keep it clean, simple and elegant (which is most unlike me).


For this 8x8 card I have layered the following papers from the collection .... Arcade, Black Leaf & Roulette.


I stamped the "butterfly" image from the Cling Mount Stamps onto co-ordinating cardstock from the collection and mounted using 3d foam pads then added some crystals for the antenna then I added a dimensional vintage ticket adhering using Cosmic Shimmer Glue.


The word "Memories", "Ruler" image and the "Lace Clock" image are from the Cling Mount Stamps Engraver which have been stamped using Archival Ink (Jet Black).


To create some dimensional detail to the card I have added a Heart Doily, some Say It In Crystals bling and some Mini Paper Rose Stems.

I hope you have enjoyed this project, Lesley will be back on Monday sharing her projects using the Engraver Collection. Don't forget by leaving a comment HERE you could be in with a chance of winning this collection. Until next time ....


Monday 11 February 2013

Snazzy DT Project #1 Prima Engraver Collection

Good morning everyone Gillian here to kick start another month of projects for Snazzy's. If you read yesterdays post you may have saw that we are working with the scrummy Prima Engraver Collection ( I can tell ya we all did a happy dance when we received this kit) ... and its available online now either individually or as a collection. Can't wait to see what the design team create with this kit.

Now you know I love all things Studio 490 by Wendy Vecchi so it will be no surprise when I tell you my base for this project is a Studio 490 Art Parts SweetHeart Frame perfect I thought for these papers.

I started out by deciding what cardstock I wanted to use to cover the main heart shape, I was immediately drawn to the boldness of the Atlas sheet, simply trace round the heart and cut out, I then used Cosmic Shimmer Glue to adhere the cardstock, then chose collage images from different papers. Instead of using the apperture in the centre of the heart I opted to use it as a feature to the left of the heart. 


In this collection there are the most yummy paper roses, I have sprayed mine with Dylusions Spray (Black Marble) then highlighted areas with Treasure Gold (Classic)

 
 The "Memories" stamp is from the Engraver Cling Mount Stamp Set.


I finished off by adding more Treasure Gold around the edges of the heart then adding some eye hooks & metal chain to hang the heart .... perfect gift for Valentines day me thinks!


The ruler images are from the Cartouche sheet which have been trimmed to size. The numbers are from the Engraver Cling Mounted Stamp Set which have been inked using Archival Ink (Jet Black).


and *unlike me* some Crystal Bling to jazz things up .... (also included in the collection).

To be in with a chance of winning this collection simply leave a comment HERE.

Until next time ....


Sunday 10 February 2013

Winner ....

Hello all, Gillian here to announce this months random comment winner and a sneak peak of what the Design Team are working with for the month ahead.

Winner is #27: Andrews Stamping Pad, congrats Andrew please email Snazzy's with your details to claim your prize.


This month the design team are working with the new Prima Engraver Collection. This is a beautiful collection consisting of Creams/Browns/Blacks & Whites ..... One lucky random comment winner could win this kit by simply leaving a comment on the first post of the month.

 
 So do stop by tomorrow .... Good luck everyone.

Friday 8 February 2013

DT Project - Art Life - By Hels

Goooodly Morning Snazzyfans!  Apologies for the late start, Mr Internet decided to take a long break last night so I couldn't post at the usual time!  Anyways, better late than never I always say so here we are with the last DT post using the MDF Man's Cogs that we have all been working with this past month.  Speaking of which - if you scroll back through all the recent posts, you can see the adorable art that the other girlies on the team have created.  Also, if you click HERE you will be magically transported to the Snazzy's online store... and... if you click HERE you will be whizzed away to the first post of the month where you can leave a comment and be in with a chance of a spot prize! 


So, a few days ago you saw the faux clock I made... and being as I lurves my flowers, I decided to go down the same route with this creation, only this time I used all Studio 490 flowers and leaves - did you know Snazzy's has an amazing collection of Studio 490No?  Click HERE to see it all in its glory!   I started out by painting the base cogs with Mushroom paint, I applied it all over with a brush and then once dried, I used the same brush (now quite dry) to add a bit of texture with sweeping strokes across the cogs.


Next I applied Vintage Photo DI around the edges of the cogs - because the Mushroom paint is acrylic, it has a bit of a chalkiness to it... which meant the Distress Ink was lovely and muted, just the ticket!   Next I used some Studio 490 Stencils for Art and applied Tumbled Glass DI over the diamond pattern... a quick zap with a heat tool to set the ink and then applied Iced Spruce DI over the long liney pattern stencil, ensuring I didn't cover the entire cog face.  Once these had been dried off, I used Cosmic Shimmer Glue to stick the Cogs together so when this piece was finished it became a wall hanging.


Now to the happy place of stamping out some Studio 490 flowers and leaves onto pretty patterned papers.  I could have used Grungepaper but I wanted to keep the light pretty feel of the piece so double sided papers were perfect.   Once stamped, in Coffee Archival for the flowers and Olive Archival for the leaves, I cut them all out.  Next came the tidying up bit, were I edged all the flowers with Tumbled Glass DI - this gets rid of any nasty white cut bits... and Forest Moss DI for the leaves.


Finally, I assembled them onto the cogs and added some butterflies and my fave bits... Embellish Your Art, the ickle resin delights from the Studio 490 range.  The letters making the words are Idea-ology Alpha Parts that I jazzed up a bit with some gilding wax.    And there you have it.  A pretty was to use a quite masculine object.   Do pop back on Monday BTW because Gillian will be here with the brand new DT kit we are playing with next month... ohhhlalalaaa.. are you in for a treat!   Thanks for looking... have a great day!  TTFN


Monday 4 February 2013

DT Project... Take Time For The Flowers...by Hels

Gooooodly Morning Snazzyfans and a very happy February to you all! I can't believe the last time I was here it was Christmas Eve! Where did January go huh?  Anyways, I am here today with my main project using the fabby DT kit that we have been all playing with this month ... the fabulous cogs from the MDF Man.  I have had a ball playing with this very large cog - it is about 30cm across so you can get an idea that it's a cool size to alter.  Please do take time to have a browse on the Snazzy website, more and more delish products are being added regularly :O))


I started by colouring the MDF with cream paint ... applying with Cut & Dry foam in a pouncy motion, I find this is a good way to cover most surfaces and you don't waste a load of paint on a brush either.  Once the paint had dried, I used a Dylusions Stencil and some Embossing Paste to add diamonds to the cog.  This was dry within about 30mins so I got cracking with the flowers whilst I was waiting... adding layers of paper flowers together, some were plain white so I used Dylusions Sprays to alter the colour of them and dried them on my little wall radiator (don't ask what colour it has become lol)  A quick mist of Cosmic Shimmer spray made a little blingy sparkle for the flowers.


I used some Clearly For Art (Black) and diecut some hinges... cut them to size and used these as hands for my clock.  I added a couple of eyelets to just make the hands look a bit fancier... and then smidged on some gilding wax to sparkle them a bit.  I also added a smidge of gilding wax to the clock too... and then coated the whole surface with Multi Medium... once dried, I used Black Marble Dylusions Sprays to add some black splots to the piece.  Finally, I cut out some acetate butterflies that have lived in my stash for about 731 years... sticking them with the ever useful Cosmic Shimmer Glue. 


Please do scroll back through the DT posts this past few weeks... the girls have made some fabulous creations with the MDF Man's stuff.... oh and also CLICK HERE to leave a comment to be in with a chance of a random prize.  The winner will be announced next week :O)  Thanks for looking... TTFN!