Showing posts with label Dylusions Sprays. Show all posts

Monday, 9 September 2013

Snazzy Design Team Project #1 By Gillian ....

Good morning everyone, Gillian here with my first project of the week. Yet another month has sprung from nowhere and it is time for the Design Team to create with some more goodies. This month we will be featuring the Chalk Studio/MME - Enjoy Everyone Paper Kit along with these Kaisercraft Clear Stamps ... I'm working with Smile (CS130), Confidence (CS124) & Life (CS125).

The base of my project is using a Studio 490 Art Parts Fancy Oval Frames which I covered using the 12x12 Lettered Paper from the Paper Kit, adhering with Cosmic Shimmer Glue then sanding around the edges, this saves any cutting.


These papers have a beautiful white shading/chalk effect throughout the designs, so bearing this in mind I sponged Distress Paint (Picket Fence) around the edges to pull everything together. I then painted the Gears from the Art Parts Set Steampunk Gears & More using Distress Paint (Pitch Black), before stamping with Kaisercraft Clear Stamp - Arty, again using Distress Paint (Picket Fence).


I've sprayed the flowers {which were Gold/Bronze in colour prior to spraying} from the Prima Sunrise/Sunset Collection with Dylusions Black Marble & White Linen then thouroughly heat drying before adhering using Cosmic Shimmer Glue. I then added some Ideaology Light Bulbs and a Philosophy Tag.


Next using a left over rectangle Art Part shape, I painted this using Snowflake fresco Paint as I wanted  full coverage before stamping with Archival Ink (Jet Black). At this point I did not fully load the Kaisercraft Clear Stamp {Life} with ink as I didn't want a "crisp image" this would then match the whole overall effect of the project.


To tie in the top right hand side, I painted a Kaisercraft Wooden embellishment using Distress Paint (Pitch Black) then spritzed some Dylusions White Linen over the top before adding some more flowers as above.


So that's project #1 ..... I will be back on Thursday with my final project for Snazzy's. I have had the privilege of assisting Val & Don over the last few years in sharing the business that is Snazzy's with you all, setting up the Design Team blog and working with the best teamie's. As the old saying goes "all good things come to an end" .... with another year of studies ahead as well as working full time, something has to give. I would like to say a huge thanks to everyone at Snazzy's for letting me share the journey with you guys, and I wish you all the very best in the future. x

Without further ado the winner of last months Random Comment is ..... Helen (StampingByH)
Helen said...
Gorgeous mix of colours. Hope your studies allow you to "play" more soon... this is just beautiful. 

Congratulations Helen, please contact Snazzy's with your details to claim your prize.

To be in with a chance of winning the Random Prize, leave a comment HERE.

Monday, 2 September 2013

Love Bird - DT Project By Hels

Gooodly Morning Snazzyfans and a very happy Monday to you all!  Blimey, we are already in September, I don't know where the time is flashing past to!  This month we lucky DT girlies have been playing with the most delish papers from 7Dots Studio, designed by the uber awesomely talented Finnabair.  The paper collection is called 9th Wave and, as ever with Finn's designs, it is beautifully coloured and the textured backgrounds are a delight to work with.  Coupled with a fabby Hero Arts Stamp Set and matching Stencil, I have created an altered photo frame for my first piece this month. 


I am a self confessed donut and forgot to get a piccie of the frame before alterations took place... I shall politely describe it as cheapo plastic covered faux wood circa 1970's stylee... but with a little bit of TLC, I transformed it into something much more glam.  Here's the paper insert I created.... and how I made it:


Starting with a piece of 6 x 8" paper from the 9th Wave Collection, I tore up a couple of strips of paper that are more purpley/pink in hue and used those colours for the base of my composition.  I used Dusty Concord and Black Soot Distress Ink to add some stencilling in the form of little dots to the edge of the paper, nudging the stencil so I have a nice subtle shadow going on.  Next up I used Ultramarine Archival Ink to stamp the torn paper image over the dotty inked bits and zapped this with a heat tool to dry the ink.  I added some larger stencilled dots by spritzing White Linen Dylusions through the Hero Arts stencil and then did a little bit more stamping, firstly using Plum Archival for the heart - stamping this twice to over lap the hearts and then with some Jet Black Archival to add a few solid lines and a couple of dotty lines.  The background papers are so gorgeous that you don't need to add anything extra to them but I do like the subtlety that the stencilling has introduced.


Next I set about adding some colour to paper flowers, using Crushed Grape and Black Marble Dylusions and some spritzes of Antique Rose Cosmic Shimmer to add some blingyness to the flowers.  These were then layered up with some metal Mechanical's embellies and some other bits and bobs from my stash.  The word was added using Alphaparts.  The frame was rather sad looking so I applied White Fire, Pewter and Royal Amethyst Treasure Gold to it using a brush... I love the way the metallic colours have blended together to give just a hint of purple on the frame.


As ever, the generous folks at Snazzy's are doing their random-commenter prize again this month.  Do CLICK HERE to see Gillian's first post and the deets how to partake... and also, please do scroll back through the months' posts to see all the delish designs the other DT girlies have made... they are all amazing as ever.  I will be back later in the week with my next offering... these papers are just soooo lush, I have hardly any left... oooh, any excuse to buy more stash right?  Speaking of which, don't forget that Snazzy's has a website... CLICK HERE for the shop!   Thanks for looking, have a fabby day!  TTFN


Saturday, 10 August 2013

Design Team Project #2 By Gillian ....

Good morning everyone, Gillian here with another make featuring the 9thWave collection from 7Dots Studio incorporating some Hero Art goodies.

For this project I started out by covering a piece of Grey Board with Little Black Dress Paint. I then used {Wavy Ocean} from the 7Dots 9th Wave Collection which was cut to size and adhered using Cosmic Shimmer Glue.


I then sprayed the reverse of {Wavy Ocean} with the following Dylusions Ink Sprays {Pure Sunshine, Postbox Red, Calypso Teal}.


I also used Pure Sunshine to spritz through the Hero Arts Stencil included in this months kit. Next I stamped the images from the Eclectica Collection By Sara Naumann {ESN01 & ESN07} onto white cardstock using Jet Black Archival Ink before laying the stencil over the stamped images and spritzing with the above Dylusions colours. The words were then adhered to the background using 3D Foam Pads.


The heart images are from the Hero Arts Grafitti Glam Collection which were stamped and coloured as above.


The Wood Icon ruler was coloured using Dylusions Ink {Calypso Teal & Cut Grass}.


To finish with I "flicked" more Dylusions Inks, this time using White Linen & Black Marble.

That's it for me this week, don't forget to be in with a chance of winning, leave a comment HERE.

Until next time x


Tuesday, 6 August 2013

Design Team Project #1 Featuring 7Dots Studio and Hero Arts ....

Good morning everyone, I cannot believe we are into August already .... seriously where does the time go!

For the next five weeks the design team will be working with the new 7Dots Studio 9th Wave Paper Collection in conjunction with Hero Arts .

Before we begin though I'd like to announce the winner of last months Random Comment winner ....

.... which was No 15 ..... Congratulations Beryl, please email Snazzy's with your contact details to claim your prize.


For my first project I opted for an inky splatty tag, inspired by Anna Dawbrowska (of course). Those lucky enough to have secured a class at Snazzy's do not have long to wait now .... excited!!

I started out by using the {Stormy Sea} paper from the 7Dots Studio 9th Wave Collection cutting two different size tag templates. I then stamped an image from the Grafitti Glam Collection by Traci Bautista using Archival Ink (Jet Black). Using the Hero Arts Stencil in this months kit, I sprayed Dylusions Ink Spray {Vibrant Turquoise}, again using the Vibrant Turquoise & Black Marble to create ink splats over the background.

I then added some Tim Holtz Ideaology Remnant Rub Ons to the top left of the backround. Using a left over scrap of paper from the collection, I stamped the {Dragonfly} image from Stampers Anonymous Classics #1 collection, I used Distress Ink {Vintage Photo} to distress around the edges. I repeated the previous step with the word {Voyage}. I then adhered Clear Epoxy Stickers from the Sunrise/Sunset collection from Prima.

The wooden leaf embellishments have also been sprayed with Vibrant Turquoise then stamped with Archival Ink using the Traci Bautista background image.


I've then layered some more embellishments .... Ideaology Ticket along with some twine and a Wood Icon ruler from the Sunrise/Sunset Collection by Prima.
 
To be in with a chance of being this months Random Comment Winner, simply leave a comment on this first post.

I will be back again later in the week with another project to share. Until then thanks for stopping by.


Wednesday, 19 June 2013

DT Project 2 by Astrid featuring

Kaisercraft Basecoat Collection

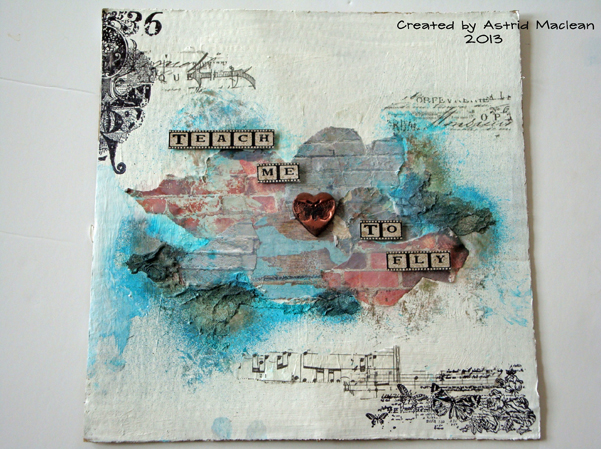
Hello everyone and I am so happy you came to visit today. As you may know already, the paper collection we are featuring this month is full of wonderful amazing textures, you could use them just as they are. BUT one of my latest addictions is playing  and creating with textures and texture paste, so I wanted to see how I could combine the two together, - here is the result:
I started with a piece of 12 x 12 packaging card I had flying around the floor of my craft space (I know, I know, I am very messy). I covered it with two coats of Gesso and when dry tore up random bits of the papers (in fact I used the front and the back of the same paper, "Bricks" and a few bits of the "Concrete" paper, left over from my previous project) I put a very watered down wash of Gesso over them to blend them together a bit and then started to add thick texture past around it with my fingers, trying to create a kind of stucco effect.


Next came some stamping, I added two of the wonderful Kaisercraft Texture Stamps Texture 36 and Texture Botanical in Black Archival on opposite ends of my piece.

I also added a few torn bits of Tim Holtz tissue wrap, to fill up some of the blank spaces.
At this stage it was all a bit bland, so out came the Dylusions Sprays, Vibrant Turquoise and Melted Chocolate. First I covered the papers with some wet baby wipes and then I sprayed randomly over the textured bits and did a bit of dabing with some kitchen roll.
The little heart in the center was made from Sculpey clay, stamped with a little butterfly stamp from my stash and then baked and coloured with some Treasure Gold and Black Paint Dabber. Finally, the text was computer generated and added using some foam mounting squares.


Well, hope you like my bit of paper play.


 I am going to be back with one more crafty project on Saturday and hope to see you then