Monday, 11 February 2013

Snazzy DT Project #1 Prima Engraver Collection

Good morning everyone Gillian here to kick start another month of projects for Snazzy's. If you read yesterdays post you may have saw that we are working with the scrummy Prima Engraver Collection ( I can tell ya we all did a happy dance when we received this kit) ... and its available online now either individually or as a collection. Can't wait to see what the design team create with this kit.

Now you know I love all things Studio 490 by Wendy Vecchi so it will be no surprise when I tell you my base for this project is a Studio 490 Art Parts SweetHeart Frame perfect I thought for these papers.

I started out by deciding what cardstock I wanted to use to cover the main heart shape, I was immediately drawn to the boldness of the Atlas sheet, simply trace round the heart and cut out, I then used Cosmic Shimmer Glue to adhere the cardstock, then chose collage images from different papers. Instead of using the apperture in the centre of the heart I opted to use it as a feature to the left of the heart. 


In this collection there are the most yummy paper roses, I have sprayed mine with Dylusions Spray (Black Marble) then highlighted areas with Treasure Gold (Classic)

 
 The "Memories" stamp is from the Engraver Cling Mount Stamp Set.


I finished off by adding more Treasure Gold around the edges of the heart then adding some eye hooks & metal chain to hang the heart .... perfect gift for Valentines day me thinks!


The ruler images are from the Cartouche sheet which have been trimmed to size. The numbers are from the Engraver Cling Mounted Stamp Set which have been inked using Archival Ink (Jet Black).


and *unlike me* some Crystal Bling to jazz things up .... (also included in the collection).

To be in with a chance of winning this collection simply leave a comment HERE.

Until next time ....


Sunday, 10 February 2013

Winner ....

Hello all, Gillian here to announce this months random comment winner and a sneak peak of what the Design Team are working with for the month ahead.

Winner is #27: Andrews Stamping Pad, congrats Andrew please email Snazzy's with your details to claim your prize.


This month the design team are working with the new Prima Engraver Collection. This is a beautiful collection consisting of Creams/Browns/Blacks & Whites ..... One lucky random comment winner could win this kit by simply leaving a comment on the first post of the month.

 
 So do stop by tomorrow .... Good luck everyone.

Friday, 8 February 2013

DT Project - Art Life - By Hels

Goooodly Morning Snazzyfans!  Apologies for the late start, Mr Internet decided to take a long break last night so I couldn't post at the usual time!  Anyways, better late than never I always say so here we are with the last DT post using the MDF Man's Cogs that we have all been working with this past month.  Speaking of which - if you scroll back through all the recent posts, you can see the adorable art that the other girlies on the team have created.  Also, if you click HERE you will be magically transported to the Snazzy's online store... and... if you click HERE you will be whizzed away to the first post of the month where you can leave a comment and be in with a chance of a spot prize! 


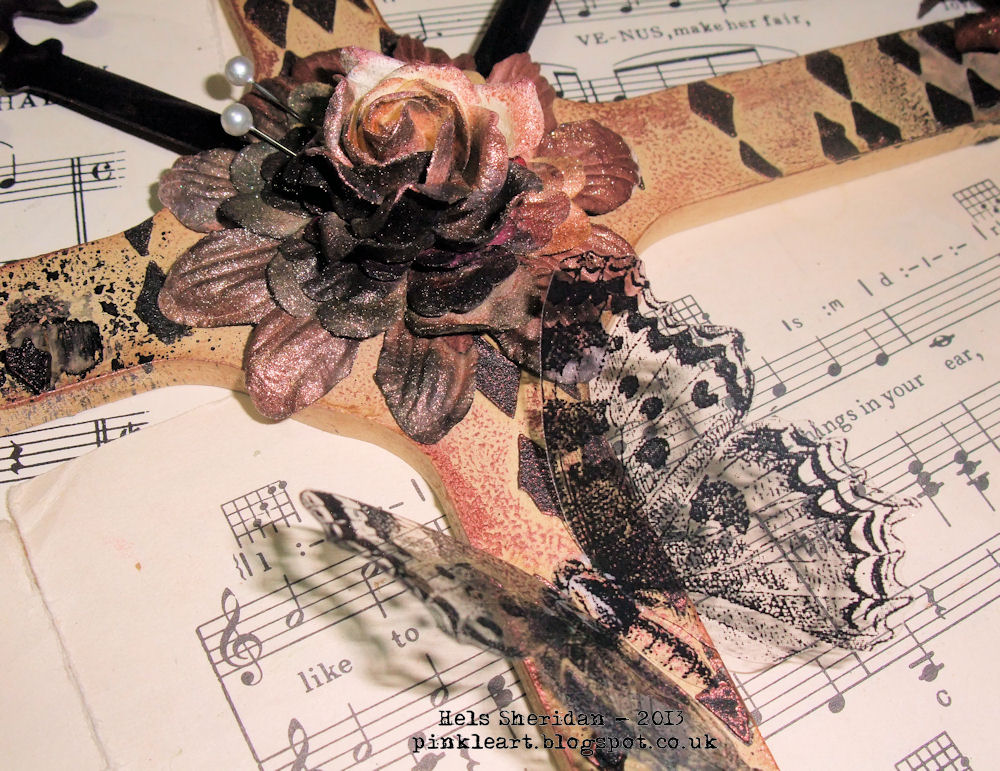
So, a few days ago you saw the faux clock I made... and being as I lurves my flowers, I decided to go down the same route with this creation, only this time I used all Studio 490 flowers and leaves - did you know Snazzy's has an amazing collection of Studio 490No?  Click HERE to see it all in its glory!   I started out by painting the base cogs with Mushroom paint, I applied it all over with a brush and then once dried, I used the same brush (now quite dry) to add a bit of texture with sweeping strokes across the cogs.


Next I applied Vintage Photo DI around the edges of the cogs - because the Mushroom paint is acrylic, it has a bit of a chalkiness to it... which meant the Distress Ink was lovely and muted, just the ticket!   Next I used some Studio 490 Stencils for Art and applied Tumbled Glass DI over the diamond pattern... a quick zap with a heat tool to set the ink and then applied Iced Spruce DI over the long liney pattern stencil, ensuring I didn't cover the entire cog face.  Once these had been dried off, I used Cosmic Shimmer Glue to stick the Cogs together so when this piece was finished it became a wall hanging.


Now to the happy place of stamping out some Studio 490 flowers and leaves onto pretty patterned papers.  I could have used Grungepaper but I wanted to keep the light pretty feel of the piece so double sided papers were perfect.   Once stamped, in Coffee Archival for the flowers and Olive Archival for the leaves, I cut them all out.  Next came the tidying up bit, were I edged all the flowers with Tumbled Glass DI - this gets rid of any nasty white cut bits... and Forest Moss DI for the leaves.


Finally, I assembled them onto the cogs and added some butterflies and my fave bits... Embellish Your Art, the ickle resin delights from the Studio 490 range.  The letters making the words are Idea-ology Alpha Parts that I jazzed up a bit with some gilding wax.    And there you have it.  A pretty was to use a quite masculine object.   Do pop back on Monday BTW because Gillian will be here with the brand new DT kit we are playing with next month... ohhhlalalaaa.. are you in for a treat!   Thanks for looking... have a great day!  TTFN


Monday, 4 February 2013

DT Project... Take Time For The Flowers...by Hels

Gooooodly Morning Snazzyfans and a very happy February to you all! I can't believe the last time I was here it was Christmas Eve! Where did January go huh?  Anyways, I am here today with my main project using the fabby DT kit that we have been all playing with this month ... the fabulous cogs from the MDF Man.  I have had a ball playing with this very large cog - it is about 30cm across so you can get an idea that it's a cool size to alter.  Please do take time to have a browse on the Snazzy website, more and more delish products are being added regularly :O))


I started by colouring the MDF with cream paint ... applying with Cut & Dry foam in a pouncy motion, I find this is a good way to cover most surfaces and you don't waste a load of paint on a brush either.  Once the paint had dried, I used a Dylusions Stencil and some Embossing Paste to add diamonds to the cog.  This was dry within about 30mins so I got cracking with the flowers whilst I was waiting... adding layers of paper flowers together, some were plain white so I used Dylusions Sprays to alter the colour of them and dried them on my little wall radiator (don't ask what colour it has become lol)  A quick mist of Cosmic Shimmer spray made a little blingy sparkle for the flowers.


I used some Clearly For Art (Black) and diecut some hinges... cut them to size and used these as hands for my clock.  I added a couple of eyelets to just make the hands look a bit fancier... and then smidged on some gilding wax to sparkle them a bit.  I also added a smidge of gilding wax to the clock too... and then coated the whole surface with Multi Medium... once dried, I used Black Marble Dylusions Sprays to add some black splots to the piece.  Finally, I cut out some acetate butterflies that have lived in my stash for about 731 years... sticking them with the ever useful Cosmic Shimmer Glue. 


Please do scroll back through the DT posts this past few weeks... the girls have made some fabulous creations with the MDF Man's stuff.... oh and also CLICK HERE to leave a comment to be in with a chance of a random prize.  The winner will be announced next week :O)  Thanks for looking... TTFN!


Tuesday, 29 January 2013

DT Project #1 by Astrid Dance to the Music of the Times

Hello dear Snazzys visitors and welcome to our DT Blog!!!


Regulars will know that this month we are featuring some wonderful Steampunk cogs and wheels from The MDF Man and we had free range as what to do with. A challenge? - definitely.... great fun? - for sure!!
Make sure to scroll down to see what my wonderful teamies have created so far and if you want a chance to win a set of these fab blanks, leave a comment on this post.

Well, as to my project, after tossing around all sorts of things in my head, in the end the best I could come up with is another piece of wall art, not very original, but I had great fun playing around with paints, sprays, texture paste and inks. I started off by arranging 4 of the cogs together in an arrangement that I liked and then I glued them together with thick gel medium. Next I added texture paste through various stencils and masks. Snazzys has a great selection of these available. Following that, I added various Steampunk embellishments, again Snazzys has a fab collection and then I coated it all in a thick layer of Gesso. While that was drying I stamped my vocal image, a La Blache steampunk stamp from my stash with Black Archival Ink, cut it out with a circle die and put it aside.


Back to the cogs, - once the Gesso had dried I added various background stamps, partly straight to the mdf and partly onto tissue paper which I then glued to the piece in strips. Then the fun of colouring  mdf pieces with various inks and sprays started. When I was happy the results, I highlighted the raised bits with two colours of Treasure Gold and coloured my stamped image with Distress Inkpads in Peacock Feather, Chipped Saphire, Dusty Concord and Walnut stain..

For the background piece I covered a piece of 12 x 12 chipboard with music paper from my stash, inked and stencilled the edges and then glued the mdf to it. Finally I glued on my vocal image and computer generated a sentiment which I curled, inked and fastened with a Tim Holtz ideaology pen nib.
Here are some more close ups:


Well that's it from me for this time, - don't forget to come back next Monday to see what Hels will have created for you!


Until then ....

Thursday, 24 January 2013

DT Project #2 by Minxy: Featuring

The MDF Man

Hay Snazzy Gang, Here I am again as promised with another cog project.
This time I used the clock piece cog, I say clock piece as it is a thicker cog and has an opening at the back so as to be able to fit the clock workings behind and for it to lay flat against the wall.


 I started by covering my cog edges with a layer of gesso, I knew I was going to cover the front with paper so didn't need to paint the whole cog.
I've used a sheet of my much loved and treasured 'Lille' papers by 7 Gypsies, Now you may be thinking.. wow those papers are old, and yes they are, BUT there is a reason behind me using them.
***
In case you didn't know Snazzy's Online Store has a Clearance section that is bursting at the seams with bargain stamps at the moment, And I spied the set of 'Lille' clear stamps I had been after for an age, suffice to say I snapped up a set quick smart.


 I stamped the stars from the set direct onto the paper covered clock in 'faded jeans' Distress ink, and then re-stamped and layered up on foam pads so they were protruding more, I also gave them a coat of 'rock candy' Distress Stickles to bling them up a bit.


 I gave the wording on the paper a coat of 'rock candy' Distress Crackle Paint.


I stamped, coloured and cut out the bird from the 'Lille' stamp set.
 I also stamped the word abundance with versamark ink and clear embossed with Snazzy's 'clear' EP.
Then to finish I just highlighted the hands of the clock and the edges of the clock with some 'indigo' treasure gold.
I hope you have enjoyed my project today, Sometimes it's the simple things that make the most impact don't you think!
***
Don't forget to stop by HERE and leave a comment {after you've left one for me of course!!} to be in with a chance of winning a 'random comment prize' which will be drawn in a couple of weeks time.
We still have projects from the lovely Astrid who will be blogging on Tuesday and Hels coming up the following week so do pop back for more inspiration. 
***
Till next time, Stay Inky 


Monday, 21 January 2013

DT Project #1 by Minxy: Featuring:

The MDF Man

Hay Snazzy Folks
Well here I am for my first Snazzy posting of 2013.. 
I know it's a bit late now but Happy New Year to you x
I hope you have been enjoying the inspiration so far this month from both Gillian and Lesley, If not do scroll back and take a peek.
..........
So on to my project,


I have to admit that this was a fairly challenging kit as we literally had free range, Obviously my first instinct with cogs was to go grungy and brown but I stopped myself and had a little brain storm.. I have to confess I got my other half in on the brainstorming and it was his idea of making some of the pieces into a shelf that sparked my imagination and the piece you see before you.


I made a thin channel in the back cog the thickness of the mdf, and sawed off some of the cog teeth on the shelf so I had a snug fit, using the tiny cog underneath to make the shelf more stable. I glued and pinned the pieces together.


I painted the the whole piece with Studio 'black' gesso, I than stamped the very cool handwriting text from the Wendy Vecchi Studio 490 'art from the heart' stamp set in StazOn opaque 'cotton white' ink all over the gears as I thought it looked like scribbles on a blackboard.


I backed the cog onto a piece of Kaisercraft 'timeless' paper {which I thought looked like school writing paper} and then stamped in 'desert sand' & 'london fog' Memento ink with some of the Kaisercraft acrylic clear stamps {I used Numbers, Graffiti and Grid}.
I also used some of the stamps from the My Minds Eye 'funday: happy days' clear stamp set and some distress inks. I added some grungeboard arrows all over that I coloured with distress inks and a couple of die-cut man/woman shapes to finish off the piece. {oops I almost forgot, the screws to hold the piece to the wall are hidden behind the grungeboard arrows, in case you were wondering}
***
I hope you have enjoyed today's offering, I am thinking it might go down quite well with Don {snazzy boss} as he has the nickname 'The Headmaster' so I had to make the apple as a little extra prop to keep in the good books as teachers pet LOL
***
I'll be back on Thursday with my next project.. 
Till then Stay Inky