Gooodly Morning Snazzyfans and a very happy Monday to you all! This month us teamies have been playing with the superb new Base Coat Collection from KaiserCraft, plus some new gorgeous clear stamps from them too. To see the rest of the team's gorgeous creations, please do scroll back through the past months posts... from scrapbook pages to mini books, the ladies have made some glorious eyecandy to drool over. As ever, the generous guys at Snazzy's are offering a prize to a "random comment" left on THIS POST by Gillian, right back at the beginning of our DT month. Tis simples to join in... just leave a comment for Gillian and the winner will be chosen at random and announced next Monday. And, as ever, to see a plethora of loveliness, CLICK HERE for the Snazzy online store.
On with my offering... so, I am really into the colour brown, that is no secret... so when I first had a look through the papers, the first thing that leapt at me was that whilst there is brown in the papers, it was the amount of different shades of brown... cue gasps and oooh-ahhh's. Not only are the papers lush, they are also double sided... and yep, the other side of the papers are equally as lush and also have different colours to them... nothing bright and smack you in the face colourful, instead, they are muted and delicious and ever so shabby. So, as ever, whenever I get my mits on a d/s sheet of paper, I have to make a rose... it would be rude not to! There is a step-by-step tut over on my blog HERE where I show exactly how to make this type of rose if you fancy a nosey. I started out with a piece of mountboard which I painted with black Gesso and then cut a piece of corrugated card (catfood box) and used the Gesso on this too but left some of the card bits showing to keep the colours tied in.
Next I cut some of the papers to fit, the bottom layer was cut twice, adding the top layer on and then tearing the second of the two same size pieces so it looks like the top layer is being revealed (cool cheats way btw) I used a paper distresser and Walnut Stain Distress Ink to shabby up the edges of the papers. On the torn piece, I used the Botanical clear stamp with Jet Black Archival to add the floral collage, stamping this again three times onto a different paper and then cutting out the butterflies to use as embellies. The Secret Admirer words were also stamped onto the torn paper bit using the same ink. I cut a small strip of cardboard and painted this with the Gesso too and layered this over the paper collage.
Next I began assembling the piece, using Treasure Gold to add some gilding to the base and cardboard... adding in a few faux screw brads so it added to the "wood" effect of the papers... and then finally assembling my rose with some twiggy bits behind for added texture.
That is all from me for now... Have a great week and thanks for looking... TTFN!
Showing posts with label Kaisercraft Base Coat Collection. Show all posts
Monday, 24 June 2013
Saturday, 22 June 2013
DT Ptoject # 3 by Astrid
Featuring Kaisercraft Basecoat Collection
Hello everyone, welcome and lovely to see you! Today I am showing you another project, using the left over bits of paper from my previous projects. I made a Tagalope. Don't know what a Tagalope is? Well it's an envelope for a tag, - easy....
I started my making the envelope. For that I cut a large circle out of the Concrete paper. I happen to own the Spellbinders large circle die which I used for it, but you could just as easily draw around a plate or use a compass. You fold in the sides, then fold up. the bottom, making sure it lines up properly, and that's all there is to it. I inked the edges with Walnut Stain Distress Ink and then embellished it. For that, I cut a strip of manila card stock, made puddles with Antique Linen, Bundled Sage, Picket Fence and Antiques Bronze Distress Stains on my craft sheet and swiped both this strip and a size 8 tag through this, blending the colours to match the paper. I then inked the edges with some Rusty Hinge, Bundled Sage and Walnut Stain Distress Ink and stamped the Texture Believe stamp in Sepia Archival and edged it with a punch from my stash.
If you look carefully, you can see I stamped it up-side-down by mistake, ah well, embrace imperfection lol.... I also added a Butterfly, Ideaology Pen-nib and a couple of Chit Chat Stickers
Here you can see the whole envelope without the tag in it.
Alright, now to the tag: I made the background in the same way as the strip at the bottom of the envelope.
I then stamped the Texture 36 stamp with Distress Ink in Bundled Sage in one corner and inked over it with Walnut Stain Distress Ink
I cut a doily with another bit of the Concrete paper, stamped two Kaisercraft clear stamps to create tickets and layered them all up as shown. I stamped the word Believe from the Secret Admirer Definitions stamp on one of them.
The main sentiment is from the Tim Holtz Classics # 5 set. At the top I added a banner with some left over paper and a brad from the Prima Engraver collection and that was it.
Well hope you liked my little Tagelope. Thank you for visiting and don't forget to come back on Monday to see what Hels will have made to show you.
Wednesday, 19 June 2013
DT Project 2 by Astrid featuring
Kaisercraft Basecoat Collection
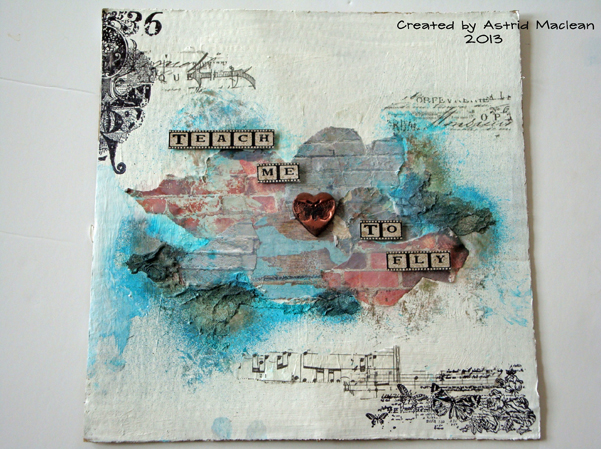
Hello everyone and I am so happy you came to visit today. As you may know already, the paper collection we are featuring this month is full of wonderful amazing textures, you could use them just as they are. BUT one of my latest addictions is playing and creating with textures and texture paste, so I wanted to see how I could combine the two together, - here is the result:
I started with a piece of 12 x 12 packaging card I had flying around the floor of my craft space (I know, I know, I am very messy). I covered it with two coats of Gesso and when dry tore up random bits of the papers (in fact I used the front and the back of the same paper, "Bricks" and a few bits of the "Concrete" paper, left over from my previous project) I put a very watered down wash of Gesso over them to blend them together a bit and then started to add thick texture past around it with my fingers, trying to create a kind of stucco effect.
Next came some stamping, I added two of the wonderful Kaisercraft Texture Stamps Texture 36 and Texture Botanical in Black Archival on opposite ends of my piece.
I also added a few torn bits of Tim Holtz tissue wrap, to fill up some of the blank spaces.
At this stage it was all a bit bland, so out came the Dylusions Sprays, Vibrant Turquoise and Melted Chocolate. First I covered the papers with some wet baby wipes and then I sprayed randomly over the textured bits and did a bit of dabing with some kitchen roll.
The little heart in the center was made from Sculpey clay, stamped with a little butterfly stamp from my stash and then baked and coloured with some Treasure Gold and Black Paint Dabber. Finally, the text was computer generated and added using some foam mounting squares.
Well, hope you like my bit of paper play.
I am going to be back with one more crafty project on Saturday and hope to see you then
Monday, 17 June 2013
DT Project #1 by Astrid featuring
Kaisercraft Base Coat Collection
Hello everyone, welcome and lovely to see you here.
The moment I saw the lovely Base Coat collection I knew I would use them to create a Lay Out. The hardest bit about it was cutting into the papers, they are just so gorgeous.... But needs must so here goes...
I started by taking a piece of 12 x 12 chipboard for the base and adhered strips from the "concrete" paper along the edges.
Next I took the "Bark" paper, decided roughly where I wanted my photo to appear and free hand drew a heart on the back, cut it out and distressed all the edges and inked them with Walnut Stain Distress Ink.
After I was happy with the way it looked I used it as a stencil on the chipboard to determine where to glue down the photo:
Once I was certain it was all in the right position I created my embellishment cluster on the top paper (it was not yet stuck down at this point) and also did some stamping with one of the wonderful stamps that comes with the collection, Texture 36 and finally adhered the two bits together using foam tape.
And here is what it looked like:
I'll show you a few details still with a bit more explanation:
Here you can see a bit more of the flower cluster. These were variously coloured Prima flowers mostly left over from previous DT kits. I wanted to add a bit of a pinkish colour to the LO which has a photo of my grand daughter just after she was born and I think she looks rather like a boy, so a bit of stereo typing seemed in order lol. I coloured the flowers with some home made spray, made out of Victorian Velvet reinker mixed with water and a little bit of Perfect Pearls mica powder in a mini mister. The little round spools were made by using stamps from the Tim Holtz Attic Treasures set. The butterflies etc were from my stash.
Here you can see a close up of the beautiful Texture 36 stamp. I stamped it twice in a mix of Black and coffee Archival Ink, once directly onto the bark paper and once on a scrap. I then cut out one of the elements and glued it to the other for a bit of depth.
Finally I created my sentiments by stamping the dictionary back ground and words on scraps of paper, cut them out, distressed them and glued them onto the LO. A bit of Treasure Gold was rubbed along the edges of both the heart and the LO and that was it.
Well, hope you like it, and don't forget if you want a chance of a random comment winner prize, leave a comment on Gillian's first post HERE.
I will be back with another couple of projects, - the next one will be on Wednesday, so hopefully see you then. Thanks for visiting today
After I was happy with the way it looked I used it as a stencil on the chipboard to determine where to glue down the photo:
Once I was certain it was all in the right position I created my embellishment cluster on the top paper (it was not yet stuck down at this point) and also did some stamping with one of the wonderful stamps that comes with the collection, Texture 36 and finally adhered the two bits together using foam tape.
And here is what it looked like:
I'll show you a few details still with a bit more explanation:
Here you can see a bit more of the flower cluster. These were variously coloured Prima flowers mostly left over from previous DT kits. I wanted to add a bit of a pinkish colour to the LO which has a photo of my grand daughter just after she was born and I think she looks rather like a boy, so a bit of stereo typing seemed in order lol. I coloured the flowers with some home made spray, made out of Victorian Velvet reinker mixed with water and a little bit of Perfect Pearls mica powder in a mini mister. The little round spools were made by using stamps from the Tim Holtz Attic Treasures set. The butterflies etc were from my stash.
Here you can see a close up of the beautiful Texture 36 stamp. I stamped it twice in a mix of Black and coffee Archival Ink, once directly onto the bark paper and once on a scrap. I then cut out one of the elements and glued it to the other for a bit of depth.
Finally I created my sentiments by stamping the dictionary back ground and words on scraps of paper, cut them out, distressed them and glued them onto the LO. A bit of Treasure Gold was rubbed along the edges of both the heart and the LO and that was it.
Well, hope you like it, and don't forget if you want a chance of a random comment winner prize, leave a comment on Gillian's first post HERE.
I will be back with another couple of projects, - the next one will be on Wednesday, so hopefully see you then. Thanks for visiting today
Monday, 3 June 2013
Design Team Project #1 featuring Kaisercraft Base Coat Collection (by Lesley)
Good Morning Snazzy's visitors!
As you know the DT have some fabulous papers from Kaisercraft in our kit this month called The Base Coat Collection together with some very, very nice stamps which I haven't had time to make full use of yet :-(. The paper designs are all depictions of building materials such as bricks, wood panelling, concrete, stone, etc., all with a weathered look to them and they are gorgeous.
Many moons ago almost at the beginning of my paper/ink/painty obsession I found a Maya Road house box kit in a craft shop bargain bin somewhere, brought it home and promptly left it to languish in a cupboard waiting for just the right 'stuff' to decorate it with. As soon as these papers arrived I remembered my house box (the roof comes off to stash a memory book/album) and decided to make a little 'holiday cabin'.
As you know the DT have some fabulous papers from Kaisercraft in our kit this month called The Base Coat Collection together with some very, very nice stamps which I haven't had time to make full use of yet :-(. The paper designs are all depictions of building materials such as bricks, wood panelling, concrete, stone, etc., all with a weathered look to them and they are gorgeous.
Many moons ago almost at the beginning of my paper/ink/painty obsession I found a Maya Road house box kit in a craft shop bargain bin somewhere, brought it home and promptly left it to languish in a cupboard waiting for just the right 'stuff' to decorate it with. As soon as these papers arrived I remembered my house box (the roof comes off to stash a memory book/album) and decided to make a little 'holiday cabin'.
I began by painting all edges, corners and under the roof eaves with concrete coloured acrylic paint and then cut three different paper designs to cover the cabin, Brick for the ends, Distressed for the sides and Corrugated Iron for the roof. I distressed all the edges and inked with Vintage Photo Distress Ink before sticking the papers to the walls of the cabin. I dry brushed a few more weather streaks down the roof paper using acrylic paints then stuck it on. I found the self adhesive metal ridge cover in my stash and then used a border punch to make the fascias in a co-ordinating colour card. The chimney came as a separate piece so I used the Brick design to cover this before sticking it in place.
I painted the door with acrylic paint, then crackle medium and another coat of paint and then used a wood panel effect stamp (from a PaperArtsy plate) and Coffee Archival ink to stamp over the top, finally adding and Ideology brad to make the handle. I painted the wooden banner with acrylic paint and then stamped 'Cherish' from the Secret Admirer - Definitions stamp set with black Archival ink. Because the stamps are clear acrylic I could gently curve the word to fit the shape of the banner ..... very handy! I stuck this on with 3D foam pads. The heart which was in the 'cabin' kit was given the same paint treatment and stamped with Coffee Archival using the Laugh stamp from the kit. Before I stuck all the bits on this end I spread texture paste through a stencil (Snazzy's have a selection) to make the plants growing either side the door and when dry inked them with Evergreen Bough and Shabby Shutters DI.
For the sides of the cabin I painted the window frames with concrete coloured acrylic paint then smeared on Rock Candy Crackle Paint. When it was dry I added a little Vintage Photo and Evergreen Bough DI rubbed back with a wet wipe. I stamped the Crafty Individuals images onto white card and added a hint of colour to the faces and adhered this to the back of the window frame before sticking it to the cabin. The lintel was added on 3D foam pads and the wild flowers images from Chocolate Baroque were stamped with Olive Archival ink.
The other side was done in same way with different Crafty Individuals images from the same set. I added some texture paste through a stencil and some metallic paste to areas of the roof and then I started on making my embellishments.
I stamped the Crafty Individuals butterflies onto some pearlescent card and cut them out. I nearly always run a black pen round the edges as I don't like to see the stark white cut edge. I die cut the leaf sprays and the flowers which I cut from the Concrete paper design (love the colours on this one both sides) and a few from old book pages. I inked the tips of all the petals with Vintage Photo and Evergreen Bough DI, layered them with brads and set about arranging everything over the 'back' of my cabin and the roof. I also did a couple more word banners. I love these word stamps and the definitions you get in the set.
Finally, I cut a piece of chipboard an inch bigger all round than the house and cut 12 x 1" squares from each of the Concrete and Rock paper designs. I stuck these to 24 x 1" Stampbord tiles, inked the edges with Vintage Photo DI and then stuck the tiles round the edge of the chipboard base alternating the paper designs so it looked like a paved path.
Subscribe to:
Posts (Atom)