Monday, 8 July 2013

DT Project #1 showcasing JoFY stamps for PaperArtsy (by Lesley)

Hello Everyone,

Wow, July already and half way through 2013.  Eek!  At my age that is seriously scary how fast the time is whizzing by but at least as I type this we finally have some SUMMER!!!!  

This month we lucky Snazzy's DTers have some fab summery stamps to play with from the new JoFY for PaperArtsy release.  I love these quirky fun stamps (HERE) and the main set I was sent to work with are JoFY13.  Lots of lovely daisies on this set and daisies always bring a smile to my face, even if they're in the middle of my lawn, lol!

I decided to decorate a treasure chest shaped wooden box (Snazzy's have a lovely selection of substrates).


I've mainly used Fresco Finish acrylic paints to colour the box because these are the type of which I have the most colours but Snazzy's carry a lovely range of acrylic paints too.  Firstly I removed the hinges and fastener and gave the outside of the box a coat of Claret. Once dry I gave it a liberal coat of Fresco Crackle Glaze and here's where I made my first mistake, lol!  I tried to do too much of the box at one go (too impatient!) and (second mistake) I put the glaze on too thick so the it ran down and congealed in thick lumps in many areas.  So much so that I had to peel it off and start again. ..... good lessons learned there.  After that I did one section at a time and let it dry which took me a couple of days to do all the top and all four sides of the bottom.  Because the top is curved I tried not to put too thick a layer on but it still ran to the edges a little bit.  Anyway, I then gave it a coat of Vintage Lace and got a gorgeous all over crackle effect ..... was worth all the faffing about, lol!


Next I started the stamping which was all done with black Archival ink and coloured with watered down Fresco Finish paint.  I've not tried colouring stamped images with acrylic paint before and need a lot more practice but for this particular project I didn't want a perfect paint job so it was ok. The 'don't eat the daisies' phrase and the quote on the top both come from JoFY12 set.


I stamped the dragonfly onto some card from my bit box that I'd made a lovely mica ink background on and again onto a piece of acetate I'd coloured with alcohol inks, cut them both out and layered them attaching just the bodies and the same when attaching to the box.


I had already given the inside a coat of Vintage Lace around the sides, then I cut two pieces of card to fit the bottom and the top, painted them with the same colour, and stamped and coloured as per the outside before gluing them in with Cosmic Shimmer glue.  Finally I reattached the hinges and fastener.

And there you have it!

Don't forget to leave a comment on Gillian's post HERE if you want to be in the random draw for some of these stamps.  I'll be back later in the week with another project but till then


Saturday, 6 July 2013

Design Team Project #2 Featuring JOFY Collection ....

Morning everyone .... hope everyone is enjoying the weekend so far and the promised good weather to boot. I'm back with a quick clean an simple make today .... what you don't realise that clean & simple are not my forte so just to make this card it took errrr many attempts shall we say!


I used my Squeezed Lemonade Distress Ink pad direct to the card, then masked off the images from JOFY Mini 20 and stamped using Archival Ink (Jet Black). I then stamped the saying "Lovebirds" also from JOFY Mini 20 onto spare cardstock, trimmed then mounted with some 3d foam pads.


The leaves are from JOFY Collection 15. I then used a black liner pen to add in some doodles.


Can't believe how long it took me to do this one but at least I can say I gave it a go lol. Lesley will be up on Monday, can't wait to see what she has made. Remember if you leave a comment HERE you could be in with a chance of winning a Snazzy prize.

Until next time .... thanks for stopping by and leaving a comment. x


Monday, 1 July 2013

Design Team Project #1 Featuring JOFY Collection ....

Good morning Snazzy followers, wow where did June go to .... huge thanks to the design team for a fab month of projects using the Base Coat Collection. This month we kick off with some of the newly released JOFY stamps which you can see HERE.

For my 1st project I have used a MDF Heart as the base of my project. I used the following Fresco Paints .... Stone, Mud Splat, Hyde Park, beach Hut, Zesty Zing, Smoked Paprika, Autumn Fire, French Roast, Little Black Dress along with Crackle Glaze & Satin Glaze.


I started out by giving the MDF heart a base coat of Stone, drying with a heat gun before applying a thin layer of Crackle Glaze using a piece of Cut N Dry foam, again dry thoroughly before applying next coat of paint, in this case Mud Splat.

At this point I then dry brushed some more Stone to give the appearance of a more distressed feel to the heart.


Using Archival Ink (Jet Black) I stamped various images from the JOFY15 set.


I then used a selection of colours to add some highlights to the stamped images, before applying a layer of Satin Glaze to make the black of the images "pop" again. I then applied some Treasure Gold (Classic) around the edge of the heart then added some twine.


I will be back at the end of the week with another project using some more JOFY goodies. Don't forget to leave a comment on this 1st post to be in with a chance of winning the Random Comment Winner prize.

Until next time ....


Sunday, 30 June 2013

Random Comment Winners ....

Hello everyone we the design team are kicking off a new month of projects from tomorrow, this time featuring the JOFY collection .... exciting!

The design team will be working with the following new releases which are all available to buy online from Snazzys.


Now without further ado .... the winner of last months Random Comment Winner is: Rebecca


Congratulations, please email Snazzys with your details to claim your prize. To claim your Snazzy's Winner Blinkie simply email me.


Monday, 24 June 2013

Knock On Wood - DT Project by Hels

Gooodly Morning Snazzyfans and a very happy Monday to you all!  This month us teamies have been playing with the superb new Base Coat Collection from KaiserCraft, plus some new gorgeous clear stamps from them too.  To see the rest of the team's gorgeous creations, please do scroll back through the past months posts... from scrapbook pages to mini books, the ladies have made some glorious eyecandy to drool over.  As ever, the generous guys at Snazzy's are offering a prize to a "random comment" left on THIS POST by Gillian, right back at the beginning of our DT month.  Tis simples to join in... just leave a comment for Gillian and the winner will be chosen at random and announced next Monday.  And, as ever, to see a plethora of loveliness, CLICK HERE for the Snazzy online store.


On with my offering... so, I am really into the colour brown, that is no secret... so when I first had a look through the papers, the first thing that leapt at me was that whilst there is brown in the papers, it was the amount of different shades of brown... cue gasps and oooh-ahhh's.  Not only are the papers lush, they are also double sided... and yep, the other side of the papers are equally as lush and also have different colours to them... nothing bright and smack you in the face colourful, instead, they are muted and delicious and ever so shabby.   So, as ever, whenever I get my mits on a d/s sheet of paper, I have to make a rose... it would be rude not to!  There is a step-by-step tut over on my blog HERE where I show exactly how to make this type of rose if you fancy a nosey.  I started out with a piece of mountboard which I painted with black Gesso and then cut a piece of corrugated card (catfood box) and used the Gesso on this too but left some of the card bits showing to keep the colours tied in.


Next I cut some of the papers to fit, the bottom layer was cut twice, adding the top layer on and then tearing the second of the two same size pieces so it looks like the top layer is being revealed (cool cheats way btw)  I used a paper distresser and Walnut Stain Distress Ink to shabby up the edges of the papers.  On the torn piece, I used the Botanical clear stamp with Jet Black Archival to add the floral collage, stamping this again three times onto a different paper and then cutting out the butterflies to use as embellies.  The Secret Admirer words were also stamped onto the torn paper bit using the same ink.  I cut a small strip of cardboard and painted this with the Gesso too and layered this over the paper collage.


Next I began assembling the piece, using Treasure Gold to add some gilding to the base and cardboard... adding in a few faux screw brads so it added to the "wood" effect of the papers... and then finally assembling my rose with some twiggy bits behind for added texture.


That is all from me for now... Have a great week and thanks for looking... TTFN!


Saturday, 22 June 2013

DT Ptoject # 3 by Astrid

Featuring Kaisercraft Basecoat Collection


Hello everyone, welcome and lovely to see you! Today I am showing you another project, using the left over bits of paper from my previous projects. I made a Tagalope. Don't know what a Tagalope is? Well it's an envelope for a tag, - easy....

 I started my making the envelope. For that I cut a large circle out of the Concrete paper. I happen to own the Spellbinders large circle die which I used for it, but you could just as easily draw around a plate or use a compass. You fold in the sides, then fold up. the bottom, making sure it lines up properly, and that's all there is to it.  I inked the edges with Walnut Stain Distress Ink and then embellished it. For that,  I cut a strip of manila card stock, made puddles with Antique Linen, Bundled Sage, Picket Fence and Antiques Bronze Distress Stains on my craft sheet and swiped both this strip and a size 8 tag through this, blending the colours to match the paper. I then inked the edges with some Rusty Hinge, Bundled Sage and Walnut Stain Distress Ink and stamped the Texture Believe stamp in Sepia Archival and edged it with a punch from my stash.

If you look carefully, you can see I stamped it up-side-down by mistake, ah well, embrace imperfection lol.... I also added a Butterfly, Ideaology Pen-nib and a couple of Chit Chat Stickers
Here you can see the whole envelope without the tag in it.
Alright, now to the tag: I made the background in the same way as the strip at the bottom of the envelope. 


I then stamped the Texture 36 stamp with Distress Ink in Bundled Sage in one corner and inked over it with Walnut Stain Distress Ink
I cut a doily with another bit of the Concrete paper, stamped two Kaisercraft clear stamps to create tickets and layered them all up as shown. I stamped the word Believe from the Secret Admirer Definitions stamp on one of them.
The main sentiment is from the Tim Holtz Classics # 5 set. At the top I added a banner with some left over paper and a brad from the Prima Engraver collection and that was it.


Well hope you liked my little Tagelope. Thank you for visiting and don't forget to come back on Monday to see what Hels will have made to show you.

Wednesday, 19 June 2013

DT Project 2 by Astrid featuring

Kaisercraft Basecoat Collection

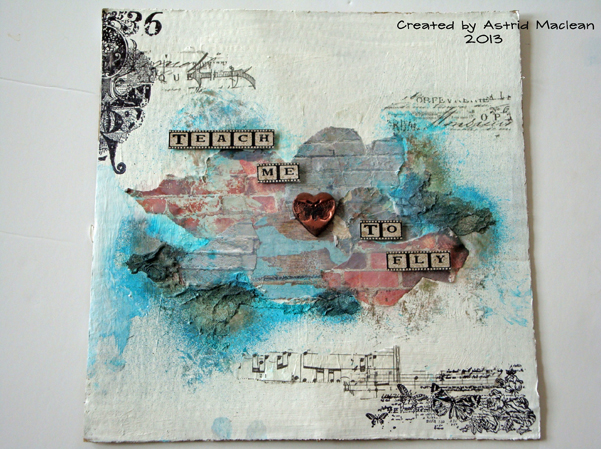
Hello everyone and I am so happy you came to visit today. As you may know already, the paper collection we are featuring this month is full of wonderful amazing textures, you could use them just as they are. BUT one of my latest addictions is playing  and creating with textures and texture paste, so I wanted to see how I could combine the two together, - here is the result:
I started with a piece of 12 x 12 packaging card I had flying around the floor of my craft space (I know, I know, I am very messy). I covered it with two coats of Gesso and when dry tore up random bits of the papers (in fact I used the front and the back of the same paper, "Bricks" and a few bits of the "Concrete" paper, left over from my previous project) I put a very watered down wash of Gesso over them to blend them together a bit and then started to add thick texture past around it with my fingers, trying to create a kind of stucco effect.


Next came some stamping, I added two of the wonderful Kaisercraft Texture Stamps Texture 36 and Texture Botanical in Black Archival on opposite ends of my piece.

I also added a few torn bits of Tim Holtz tissue wrap, to fill up some of the blank spaces.
At this stage it was all a bit bland, so out came the Dylusions Sprays, Vibrant Turquoise and Melted Chocolate. First I covered the papers with some wet baby wipes and then I sprayed randomly over the textured bits and did a bit of dabing with some kitchen roll.
The little heart in the center was made from Sculpey clay, stamped with a little butterfly stamp from my stash and then baked and coloured with some Treasure Gold and Black Paint Dabber. Finally, the text was computer generated and added using some foam mounting squares.


Well, hope you like my bit of paper play.


 I am going to be back with one more crafty project on Saturday and hope to see you then