Friday, 18 January 2013

DT Project #2 featuring MDF Man (posted by Lesley)

Hello again lovely Snazzy's visitors,
I made it back with another project almost at the last minute, lol!  Actually the weather is partly to blame for me being late because I couldn't take any photos till this morning even though my project was finished last night.  I'm actually feeling quite miffed (being polite here) because the blooming weather has put paid to my plans for this weekend.  I was supposed to be travelling down to Swindon tonight, taking a friend with me, for an overnight stay followed by a lovely workshop with Val and my first ever visit to Snazzy's but it looks like the snow has put paid to that and I have to say I'm really gutted.  Ah well, maybe another day but I so wanted to have a go at that fabulous mask which you can see HERE if you've not seen it before.

Before I share my second project this week with you, don't forget to leave a comment HERE if you would like to be in Snazzy's random draw to win this month's DT kit.

Now on to my project which is a piece of wall art.  First I gave the 'butterfly wing' and the small solid cog a coat of Gesso followed by a slightly thinned coat of white acrylic paint.  Next I took a selection of Versamagic inkpads and blended my chosen colours over the wing.  I followed this with some random stamping using stamps from Chocolate Baroque Lace Fragments set and Steampunk Butterfly Set and a Cobalt Archival inkpad.  I then used a script mask and applied Coffee Archival ink here and there over the stamping. 

(Sorry it's not at the proper angle but it is quite a long piece and I haven't yet put any means for hanging it on the back so had to take the photos with it lying flat)

I cut a piece of wire mesh from a roll I found in my local charity shop.  It's actually gold coloured with bits of glitter on and was in their Christmas decorations.  Not my cup of tea at all, lol, but perfect for my purpose once I'd chopped it up a bit and treated it with some alcohol inks.  I attached it to my 'wing' with Ideology Screw Eyes!

I then set about making my embellishments.  I glued some Prima script paper (in two contrasting colours) to Whiteout Clearly for Art using Ranger Glue and Seal and then cut out some flowers using my TH/Sizzix Tattered Florals die.  On the lighter shade of paper I over stamped with a cog background stamp from the Chocolate Baroque Steampunk Butterfly set using Coffee Archival ink and then inked all the petal edges with the Cobalt Archival.  I set about heating and shaping all the flowers and then layered them, securing with Cosmic Shimmer Glue before arranging them all on my wing.  I attached them with silicone glue and then used the Cosmic Shimmer Glue to put blobs in the flower centres to which I added micro beads.


Next, I stamped the Steampunk Butterfly twice using Versamark ink onto Black Clearly for Art and heat embossed with gold detail embossing powder.   I've had this pot for years and it's gone a rather strange colour (pongs a bit too ;D) and I was doubtful it would work but it actually came out the perfect colour for my project.  Once it had cooled I cut the butterflies out and then heated them again to shape the wings before attaching them to my project with silicone glue.


The final bit was the solid cog which I covered with some of the lighter script paper and then inked the edges with Cobalt Archival.  The word 'LOVE' is a Studio 490 Art Part which I inked with Walnut Stain Distress Ink and then heat embossed using an embossing powder in my stash..  I stuck this to the cog with Cosmic Shimmer Glue (note to self - need more of this fab glue) and then stuck the cog with the same glue to the wing.  I finished off with a couple of wire 'antennae'


Well that concludes my projects with this fun kit and I have to say that from starting out a bit baffled about what I was going to do, I ended up having  a fab time with lots of different products from my stash, many of which can be purchased from Snazzy's.  Next week it's Minxy's turn and she usually has something quirky and inspiring for us all so I'm really looking forward to seeing her projects. 

(Now you've seen the project I'll let you into a secret, my almost 5 year old granddaughter was looking at it this morning and asked what it was.  When I told her, the response was that it looks like a fish, lol!  I think she's not far off the mark!)

Till next time .......


Monday, 14 January 2013

DT Project #1 featuring The MDF Man (posted by Lesley)

Hi lovely Snazzy visitors and HAPPY NEW YEAR!

Today it's my turn to show my first Snazzy's project for this brand new year.  As Gillian said in her post last week this kit certainly got the 'cogs' grinding but I have to say it's been great fun.  If you love messing about with paints, inks, pastes, stamps, stencils ...... etc., etc., to alter things, this is the kit for you and if you leave a comment HERE on Gillian's post you are in with a chance of winning a prize in the random comment draw.


I decided to make a clock using the largest solid gear in the kit and I started with a layer of gesso over the whole piece.  I added some texture paste through a stencil (Snazzy's have a great selection) on one area and left it overnight to set before covering it all with darkish blue and green acrylic paints.  I followed this with crackle paste over the large area that didn't have any texture paste on, dried it and then painted with a light colour acrylic paint.


I used a selection of blues, greens and lilac/purple Fresco Finish paints because they are the ones I have the most choice of colours in but Snazzy's have a wonderful selection of good quality acrylic paints in stock too.  I began building up layers of colour, drying with the heat gun between layers until I was happy with the result.  


I then started building up a stamped background using Archival inks in Black and Coffee with a mixture of  timepiece stamps from Chocolate Baroque and one from our Kaisercraft kit back in November 2011 (crikey, didn't realise it was that long ago) , plus a text stamp from Chocolate Baroque.  I topped these off with dabbing some blue acrylic paint through another Crafter's Workshop stencil.


I then began highlighting the texture paste area and the edges of the gear with Treasure Gold.  I cut the weathered clock with the Tim Holtz/Sizzix die, adhered it to my project and then fitted the clock mechanism.  Finally,  I decided to edge the whole thing with black acrylic paint which did take quite a while to do as I had to be very careful.  I had visions on splodging it onto the front and ruining the whole thing right at the last minute, lol!


Finally, I took a few pieces of Ideology, gave them a bit of Treasure Gold treatment and added them to my project.


I hope you like my first project of the year and I'm aiming to come back with another project later this week if possible.  If I don't make it though, our lovely Minxy will be here next week and I know she has a couple of things up her sleeve for you all.


Monday, 7 January 2013

DT Project #1 .... It's All About The MDF Man!

Good morning everyone it's great to be back after our festive break .... the design team are raring to go again with this months kit (will certainly get the cogs ticking that's for sure).

This month the DT will be working with the following shapes courtsey of The MDF Man - so we have a free reign this month in terms of creativity. Look forward to seeing the design team members interpretation.


For me their was only one way to go with this .... out & out grunge (sorry folks if that is not your thing).


I started out by using Distress Ink (Antique Linen) on all the cogs, after adding a couple of layers I then inked the edges with Distress Ink (Walnut Stain). The largest of the cogs was then stamped using Tim Holtz/Stampers Anonymous Classics #6 in Archival Ink (Sepia). I then applied a second layer of stamping using the "text" stamp from Tim Holtz World Traveller Stamp Set, this time using Archival Ink (Jet Black).

 The small cog at the top was stamped using the large background from Tim Holtz Remnants stamp Set.
I stamped the "face" image (from Tim Holtz/Stampers Anonymous Classics #5) onto cardstock and cut to size, the quote is from Tim Holtz World Traveller Stamp Set ....
.... which was cut up into small bits rather than keeping it as one long sentence.

 
I've used Tim Holtz Ideaology to decorate - Hitch Fasteners, Clock Face & Game Spinner which were coloured using Metallic Distress Stain (Antique Bronze), I've also used an Ideaology key.

I hope you have enjoyed this project, it sure was fun to do .... don't forget to leave a comment here to be in with a chance of winning the random comment prize drawn after Hels week. 
 
TFL x

Monday, 31 December 2012

Winner ....

Morning Snazzy followers .... Christmas seems to have come and gone so quickly, hope you had a lovely festive break with loved ones. As we near the end of 2012 we have the winner of this months kit to announce.


This months winner chosen at random is #22 which corresponds with MaryAnn .... Congrats MaryAnn please e-mail your details here to claim your prize.

On behalf of all the design team I would like to wish you health & happiness as we make our way into 2013 .... may it be filled with everything you have wished for.

The design team will resume normal duties from the 7th January .... until then stay inky!


Monday, 24 December 2012

Santa Claus Is Coming To Town...By Hels Sheridan

Goodly Morning Snazzyfans and a very Happy Christmas to you all.  Today I am here with my DT offering featuring the gorgeous Carta Bella Christmas Day Collection papers - oooh lalalalaaa, Carta Bella always do the most fabulous designs and these papers are simply beautiful.  The colour palette appeals to me - it is a vintage red, green, cream and brown toned collection, absolutely perfect for all your Christmas projects - do scroll back through the month because the DT have made some totally amazing arty pieces using the papers.


I am in a bit of a Paper Blocking mood at the moment and each year I make something festive to pop onto the wall... so this year I decided to alter a canvas, using the Paper Blocking technique - which really is simple, use up all your little off-cuts by simply layering them onto a board or canvas, smudge over some watered down creamy coloured paint, in my case I used Traditional Tan paint, using Cut & Dry foam... once this is dry, use either Multi Medium or Glue & Seal to give the whole piece a waterproof seal and then use either charcoal, black paint or a Stabilo All pencil and smudge along the overlapped bits to add some definition.  I added on one of the stickers from the paper collection, I bobbed him onto some card, cut it out, glued it to the canvas and then edged around him so he pops from the design.  The finishing touch was the addition of the Christmas Muse Token... I love these little charms because they are so versatile and the word fits perfectly with my theme.


As ever, Snazzy's are doing a special offer on the DT Collection, you can find the details HERE on the website.  Also, if you click HERE you can leave a comment and be in with a chance of winning one of the DT kits.  Thanks for looking... I wish you all a very Happy Christmas and hope that all your wishes come true!  TTFN


Thursday, 20 December 2012

DT Project #2 featuring Hero Arts Believe stamp se...Carta Bella Christmas Day Collection, Hero Arts Believe stamp set

Hello everyone and welcome. Today I will be showing you my second and final project for this month....
Well, here we are, less than a week away from the big day. I don't know about you, but even though I don't consider myself a card maker as such, at this time of year my mind definitely turns to making some quick last minute cards, and I tell you, the Design Team Kit we are using is great for just that.
Here are the ones I made

I'll talk you through them one by one:


For this one I took one of the deep burgundy papers and ran it through one of my embossing folders. I then sanded the raised bits to bring out the embossing and reveal the white core of the papers. To call them papers is actually a misnomer I think as they have almost a card-stock quality to them. I matted it on another of the papers and then first on white and then burgundy card-stock. I embellished it with  a diecut, a ribbon and some other bits and pieces from my stash and of course the sentiment is one of the stamps that come with the kit. which I stamped in Archival Maroon Ink


Card number two was made in a similar way, by matting some of the papers, using a die cut behind the Santa image (fussy cut from just the cover of the collection!), one of the stamps, this time stamped in Library Green Archival Ink and the merry Christmas image, which is cut from one of the papers in the collection.


For the final card I used another bit of the burgundy paper from the collection, ran it through a different embossing folder, sanded the raised bits and then matted as before. Then, I know this is getting boring, I embellished with some die cuts and bits and pieces from my stash. The pretty bird in the center is not a stamp but one of the elements that comes with the collection.
That's it from me for this time, pfew, 3 more cards to cross off my list. Hope you liked them and don't forget to come back on Monday when Hels will show you some further examples of what you can do with this wonderful kit.
Well, before I leave you I'd like to say a big thank you to all of you, - followers and visitors and also to my lovely teamies, you are all stars! And our bosses, well I can tell you THEY ARE THE BEST!!!
Wishing you all a blessed and peaceful festive season and I look forward to seeing you again in the new year.
Until then, - stay crafty!

Monday, 17 December 2012

Christmas Light DT Project #1 By Astrid Featuring Carta Bella Christmas Day Collection and Hero Arts Believe Stamps

Hello everyone and a warm welcome to the Snazzys blog. 
Most of you I'm sure will have seen the fantastic projects posted earlier this month already, if not, don't forget to scroll down! For those of you who are still looking for some last minute Christmas inspiration, I will share one project with you today and another one later on in the week. And, don't forget, you can win the awesome collection we are working with just by leaving a comment HERE
I decided to use the wonderful papers and elements in the collection to make a Christmas lantern:

The quality of these paper is so good that it is easy to make something like this as the thickness of the papers makes it very sturdy
I want to apologize in advance that the quality of the photos is pretty awful, the light has just been so bad, but I hope you get a bit of an idea.
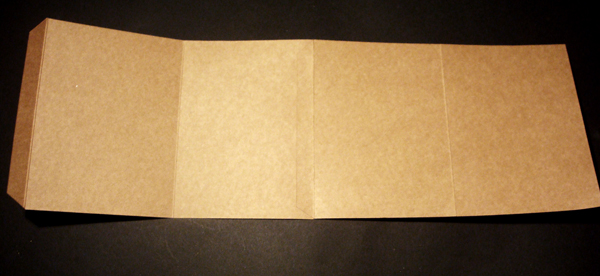
I started by cutting 2 pieces of Kraft card to 5 1/2 by 81/2 inches and scored them along the 81/2" side at 4 and 8 ". You are then left with a 1/2" piece at the end which is the glue strip. I then glued both pieces together, this leaves you with one long bit as shown in the photo:


Cover each of the panels with a bit of your chosen  paper, cut to 3 3/4 by 5 1/4. Next cut apertures in each of them so that light can shine through. I cut mine with a Gothic Arch Window die from my stash, but you could obviously use any suitable die you may have or even cut an aperture by hand. I then covered each of the apertures with a bit of parchment paper, large enough to cover the aperture from the inside. Now all you need to do is glue the remaining glue strip to the end panel and you have made your basic lantern. I embellished mine with some of the lovely elements on the papers which I fussy cut and glued around my windows. Here are some pictures still of the different sides:


This was an easy and fun project to put together and could just make a little last minute gift for someone special.
Hope you are all a lot more organised with your Christmas preparations than I am, and if you have a minute, pop by again on Thursday when I'll show you another project still. Until then stay happy, warm and crafty!