Showing posts with label distress inks. Show all posts

Monday, 30 September 2013

Snazzys DT project #1 by Astrid

Hello and welcome lovely Snazzy visitors! Well, today is somewhat of a bitter-sweet day, as this will be my one but last project for this design team. Like Gillian and Lesley, life has pulled me in different directions.....

But without further ado, today I'm showing my first project for this week using the fab Chalk Studio/MME - Enjoy Everyone paper kit and the clear stamps from Kaisercraft we have been featuring this month.

I decided to make a pocket card with several tags and a little envelope to hold a gift card. I made my card in shabby chic style to form a contrast to the bold chalk board stickers and tags that come with this fabulous collection.
Here you can see the inside:
So how did I go about making it?
Well I picked some of the lighter coloured papers, cut them down to size (my card is 6 x 6") so I cut the papers to 5 3/4 by 5 3/4" and toned them down even more by spraying them with several layers of Dylusions White Linen. I then inked around the edges with Victorian Velvet Distress Ink, used various stencils and Weathered Wood Distress Ink, did some background stamping with a Darkroom Door script stamp and some of the Kaisercraft Texture stamps that are all stocked by Snazzys, and finally inked around it all again with Gathered Twigs Distress Ink.

For the outside I matted my chosen paper on Kraftcard and distressed the edges. I added some lace and then stamped one of the sentiments in Versamark and then embossed it in Wow Vanilla White embossing powder onto one of the labels that comes with the collection. I then embellished with a doily, some flowers and bits and pieces from my stash.


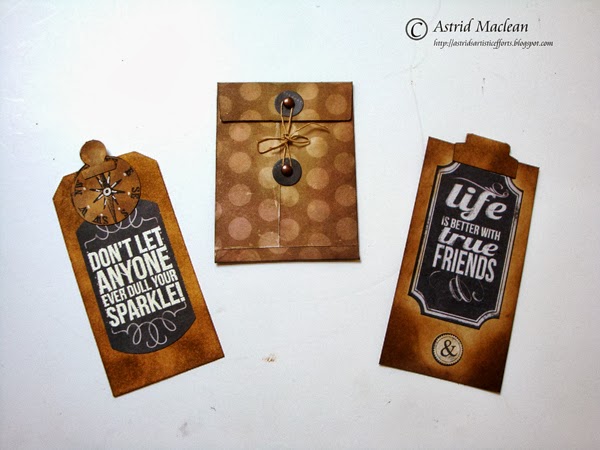
For the left inside I created two pockets and made a number of tags and a little money wallet (using a Tim Holtz die) to fit in the pockets:
The tag on the left has a stamped white embossed sentiment onto one of the stickers in the collection, the one on the right was a pre printed label that comes with the collection. Both are mounted on inked Kraftcard. The money wallet was cut from one of the papers which I had inked with Gathered Twigs again to match the Kraftcard.
Here on the right side, just one pocket with a flap. The tag was stamped again in the same way and embossed in white once more and then mounted again on Kraftcard.
For this project I have not made the description too detailed as I think the pictures pretty much speak for them selves and I did not want to bore you. If you have a question, please just email me or leave a comment.
Well, I hope you like my shabby pocket card, I will be back on Thursday with my final project for Snazzys. I wish to thank all of you for your wonderful support over the months!! Your lovely comments have been a joy to read!!

Monday, 2 April 2012

Design Team Project #1 Featuring Prima Almanac Collection

Hello everyone ... Gillian here back with a new collection of products for the month of April and what a beautiful collection it is! This month the Design Team will be featuring the Prima Almanac Collection

Before I go on to show my DT project, I would like to thank everyone who stopped by and left the design Team a comment last month. It is very much appreciated. As promised one lucky person would win the "Chocolate Baroque" stamp set  ...... and the winner is ......


No 5 ... Yorkshire Fox (Mel) ... please email with your details so I can have your prize sent out.

This month we have a fabulous set of Metal Charms & Two Mini Size Stamps from the new Prima Almanac collection to be won.


To be in with a chance of winning the above, please stop by and leave a comment in THIS POST, one lucky winner will be chosen by Random.Org and announced on the 30th April. This month we also have a challenge beginning on April 30th, as always there will be some goodies up for grabs.

For my 1st project I have used the Tando Creative Mini Printer Tray, Prima (Almanac) Collection 12x12 Papers, Prima Wood Buttons, Prima Art Tiles & Prima Cling Stamp Plate #555146 - all available from Snazzy's.


Other supplies available from Snazzy's - Kaisercraft Wooden Shapes, Archival Ink - Sepia, Distress Ink - Vintage Photo & Tattered Rose, Ideaology Hitch Fasteners.

I will be back later in the week with another project ..... TFL x

Saturday, 11 February 2012

Design Team Project #3 Featuring Studio 490 ....


Hello everyone .... I'm back with my last DT project featuring the awesome range that is Studio 490
can you hear the sadness in my voice .... really I could create art every day with these little beauties.

For this project I dug deep into the Art Parts Sample Pack we were sent .... well I didn't have to dig deep as I had oodles of parts still to play with. I started out by covering the circle insert with paper from Tim's Ideaology paper pad, trimmed to size and then sanded around the edges. I then coloured the circle frame with Distress Ink (Crushed Olive) and stamped the background stamp from Well Worn Art

For the centre I have used a frame from the Bookplate Art Parts Set which I have inked using Distress Ink (Wild Honey) then stamped the centre image of the Bookplate using a stamp from Well Worn Art , I then stamped around the edge of the Bookplate with the background stamp from It's More Flower Art. 

My fav gent of all time is from the Art Part Set "For The Guys"  which I inked with Ditress Ink (Crushed Olive) and stamped with the corresponding stamp which is from SteamPunk Art.

I then used two of the scallop borders which are also in the sample pack, inked them using Wild Honey & Crushed Olive, stamped again with the two background stamps used above .... this is where the "lightbulb moment" came in ... I wondered if I could create like a layered shelf for the circle to stand within .... so I adhered the borders slightly offset from one another using Glossy Accents, I then used Ideaology Hitch Fasteners either side. I used four of the small circles from the spool kit to create a stand either side of the frame to add more stability (again using Wild Honey) for colour. To finish off I added Ideaology Cork Vials either side and filled them with metal brads & fasteners again adhering with Glossy Accents and also Ideaology pen Nibs

Don't forget throughout the moth of February we would LOVE to see YOUR Studio 490 Art and remember there are fabby goodies to be given away too, see HERE.

TFL x

Monday, 2 January 2012

Design Team Project #1 Featuring 7Dots Studio Dreamer Collection ....


Good morning everyone ... Gillian here with my 1st DT project of 2012 featuring this to die for set from
7Dot Studio (Dreamer) Collection ... J'adore!

My 1st project is a scrapbook layout featuring papers from the Dreamer collection .... papers used are: Drive All Night, Sweet Dreams & Night's Fever. I have also used pieces from the Dreamer Elements 12x12 collection, Dreamers Stickers 12x12 & Dreamers Stickers 6x12 which are all available from Snazzy's. The stamped Dream Ticket image on the bottom right corner is from the A6 Unmounted Stamp Plate (Ticket) from Creative Expressions.

Other elements used: PaperArtsy Fresco Paints, Distress Inks (Evergreen Bough), Charcoal Pencil,Crafter's Workshop Mask, the picture is from my own collection of images.

I will be back later this week with two more projects from this collection .... TFL x

Monday, 19 December 2011

Design Team Project 3 .... Featuring My Minds Eye


Hello everyone, I'm back with my 3rd and final project of this year featuring My Minds Eye.

I made this home decor piece using a Large Rectangle Art Part Frame (Large Flourish Frames Set) from Wendy Vecchi's Studio 490 range. I covered the frame using MME papers (Remember This). I then used another rectangle frame to add dimension which again was covered in MME papers (Good Measure) and adhered to the centre of the frame using 3d foam pads. I then cut Tim Holtz's Caged Bird die using GrungePaper which was painted with Adirondack Paint Dabber (Expresso) and spritzed with Perfect Pearl Mists (Biscotti). The picture is from the Ideaology Lost & Found Paper Pad which has been mounted using 3d foam pads. I have used brads from the "Everyday" Decorative Brads Set. The Chain Tassles are also from the Ideaology range. I also used Distress Inks (Walnut Stain) to distress the frame.

I would like to take this opportunity on behalf of the DT to say a huge big thank you to Paula for her contribution and inspiring projects for Snazzys.

Snazzys DT would like to wish everyone a Merry Christmas & a Happy New Year.
Don't forget to check back in January for lots more projects and a sneak peak at our newest DT member.

Thursday, 8 December 2011

DT Project 2 Featuring My Minds Eye ....


Hello everyone, I'm back with my 2nd DT project featuring these wonderful goodies from My Minds Eye.

I started out by making a simple Birthday Card. Cover white cardstock with a sheet of Coredinations in black, then simply cut and layer co-ordinating papers of your choice. I used "Admit One" and "Picnic" to create the rosettes. The "Happy Birthday" quote is from Funstamps UK. The embellishments are from the Kraft Fun - "Everyday Fun" Decorative Brads set & "Everyday Fun" Button pack. The kisses stamp is from the "Everyday Fun" Stamps set.


I then covered the front of a size #5 Manilla Tag with more of the "Admit One" paper, distressing the edges with Distress Inks (Walnut Stain). Using various Ideaology pieces, Swivel Clasp, Jump Rings, Philosophy Tag, Baubles to create a Handbag Charm as the birthday gift. The locket is from my own stash, which has decorative brads adhered on the inside and the outside (adhered using Glossy Accents) from the "Everyday Fun" set.


The reverse of the size #5 tag has been stamped with Archival Inks (Jet Black, Coffee & Manganese Blue) using stamps from the "Happy Days" set & "Everyday Fun" set.

Well that's all from me today, I do hope you liked the projects. I will be back at the weekend with another project using this kit. TFL x

(Edited to say that my next project will be on the 19th Dec and not this weekend)

Monday, 7 November 2011

Design Team Project By Gillian .... Featuring Kaisercraft


Good morning everyone .... the beginning of a new month sees some more projects from the Design Team, again featuring Kaisercraft goodies.

For this project I started out by using an Art Frame (size 20x16cm) available from Snazzys. To achieve the "Peeled Paint" effect ....

1. I applied a base layer of Burnt Umber Acrylic Paint, allow paint to dry fully (I used a heat gun to speed things along).
2. I then painted a thick layer of PVA glue (you can also use Vaseline) for this technique.

3. I then painted another layer of Acrylic Paint this time using Buff Titanium, to speed things along I used a heat gun but you can equally leave it to air dry.

4. Remove the PVA glue by using a soft cloth (I used a baby wipe), this will also remove the second colour of paint and give you the "Peeled Paint" effect, you can choose to remove as little or as much as you like.

5. I then used Distress Inks in Walnut Stain to highlight the edges of the frame and the centre insert.

6. I then tore strips of paper from the Timeless Paper Pad (this pad is available in Vintage or Black & White) again inking with Walnut Stain, adhere strips to frame using Claudine Hellmuths Matte Medium.

7. For the insert I used a Tim Holtz Texture Fade on cardstock, highlighting the crackle effect with Distress Inks Vintage Photo, trim to size and adhere to insert stand.

8. Apply Rock Candy Crackle Paint to top corners, allow to dry before highlighting areas with Distress Inks.

9. Stamp clock face from Kaisercraft Clear Stamps (Duchess Collection DS209) onto torn paper areas using Archival Ink Coffee.

10. Ink Kaisercraft Wooden Flourish (Roman Clock) with Distress Inks Walnut Stain, apply layer of Rock Candy Crackle Paint, set aside to dry. Adhere Ideaology Game Spinner and Hitch Fastener to clock then using Ranger Glossy Accents adhere to frame.

11. Tear quote "Time after Time" from above paper pad, ink with Distress Inks Vintage Photo and adhere to bottom left of frame.

12. Cut words from paper pad, ink with Vintage Photo and adhere to Ideaology Ornate Frame, adhere to wooden frame using Glossy Accents.

Thanks for stopping by and watch out for more projects throughout the month.

Wednesday, 3 August 2011

Design Team Project #1 (Part Two)


Good Morning ... Gillian here back with my extra bonus project using the 7Gypsies DT project kit.

I started out by covering this 7x5 canvas board using a selection of the 7Gypsies Lille paper collection and distressing areas with Distress Inks (Vintage Photo). The Tando Chipboard shades were inked with Vintage Photo & Versafine (Crimson Red). Adventure, Life is Good, Music and Bird images are all from the 7Gypsies Clear Stamps Set inked using Versafine (Onyx Black). All of the above are available from Snazzy's by calling 01793 60 24 70.

That's it from me for now, don't forget to check back next Monday when Lesley will be sharing her 7Gypsies DT project.