Thursday, 11 October 2012

DT Project # 2 by Astrid

Featuring Tim Holtz "Halloween Blueprint" stamps & Carta Bella "All Hallow's Eve" paper collection

Hello everyone, I'm back with my second project for this week. This time I decided to make a foldout tag holder that could be used as a Halloween gift for a special friend.


This is how I went about making it:
1. For the holder, cut a strip of Brown A4 Kraft card 12 cm wide length wise and score at 9.5 cm, and 12.5 cm along the long side.


2. Shape the shortest end piece for the flap, either with a die, a template or you could even just sketch a shape by hand.


3. Cut 3 pieces of one of the papers to 0.5 smaller than your 3 panels, sand the edges to bring out the white core of the paper and then ink them a bit. I used Dusty Concord Distress Inks. I also added a few spritzes of Ancient Copper Cosmic Shimmer mist. Glue to the outside of the holder and then add two brads for the closure. Do this before lining the inside of the holder!


4. For the inside, choose a different paper and line as before, I used the same inks and spray to alter the paper a bit. I created a pocket for the tag with a Tim Holtz Movers and Shapers die and then used one of the Tim Holtz Blue print stamps, embossed with Wow Vanilla White embossing powder. I darkened the edges a bit with some Dusty Concord and added a bit of colour with Rusty Hinge Distress Ink. I also added some bits from the sticker sheet that comes with the collection.


5. The bottom and top flaps were decorated in similar ways:


I used a white pen to add eyes to the cat and give it a bit of definition. Here you can see the whole inside:


6. The tag was made with a Manila Tag, cut a bit shorter to fit in the pocket. I Inked it with the same two inks and I also used a small chicken wire stencil to add a bit more interest. Again I embellished with stickers from the collection.


The final step was to embellish the outside with some little sprocket grears and other steampunky bits. Snazzys stock their own collection of these! The holder can be closed with some raffia wrapped wire wound around the two brads. Here you can see the tag inside the holder:


Well that's it from me for this month. Don't forget to come back on Monday when the wonderful Hels will have some amazing projects to show you!


Monday, 8 October 2012

DT Project 1 by Astrid

Featuring Stampers Anonymous Tim Holtz 
"Halloween Blueprint" stamps & Carta Bella "All Hallow's Eve" paper collection


Hello everyone and welcome to this week's projects using these wonderful products. 
If you are a regular here you will have seen all the marvelous projects my teamies have made this month already. If not, make sure to scroll down and have a look. There is even a chance of winning some awesome Halloween goodies by leaving a comment HERE.

Well, on to my first project, - I decided to make some Halloween wall art, using both the papers and the stamps.

Unfortunately I got so caught up in the process of creating it that I forgot to take photos of the early stages, so I'll just have to talk you through it.

I started with a piece of 8 x 8" chipboard from my stash. I then cut random strips of a variety of the papers and glued them onto the chipboard. The next step was that I covered it all with a thin layer of Gesso to tie it all together. I added some bits of wasi tape and some Tim, Holtz tissue tape in random places to add more interest. Next I used the stamps with Black Archival Ink. Time for a focal image, - I chose a Halloween photo from my stash, - a freebie from LandofNod studios, you can find it here if you are interested. I glued it on, covered it with a baby wipe and then sprayed various colours of Perfect Pearls Mists and some Dylusions Inks. I then added some stamping still with a chicken wire stamp from my stash.
I embellished with some of the stickers that come with the paper collection and shaded around them with black charcoal pencil for extra impact. Here are some close up photos. The papers have wonderful texture that really bring out the various inks and sprays.

Here you can see the wonderful texture of the papers

One of the elements that come with the papers, I added some doodling to make it look as if it was hanging.

There are two sets of letters that come on one of the sheets, great for adding journaling. The letters at the top are wasi tape though.
Now for the final touch. I felt it needed a bit more red to pick up the red in the photo, so I decided to give the witch a rose in her mouth for a whimsical touch:o)


Well that's it for now but I'll be back on Thursday with another project. If you are ineterested, you can order the DT pack HERE


Hope you enjoyed this project and hopefully see you Thursday.

Thursday, 4 October 2012

DT Project #2 by Minxy, Featuring:


***
Hay Snazzy Folks
It's me again with another spooktastic project.
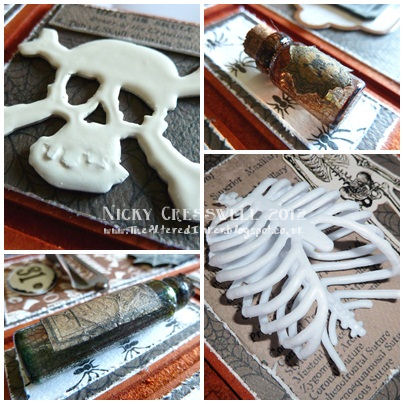
This time i've made a display assemblage using one of the very cool MDF blanks that Snazzy's sell.


I coloured the whole board with rusty hinge distress stain.
I then cut the various lush carta bella papers just smaller than the panels on the board.
In some cases I also used some of the strips from the front packing sheet.
I stamped a couple of the blueprint stamps onto black shrink plastic with white adirondack paint dabber, and used as embellishments.


I grunged up some mini bottles with rock candy distress crackle and alcohol ink and again used the front cover sheet for the mini labels {grunged up a bit with distress ink}
I used bits of a plastic skelly for some added dimension, and a selection of various idea-ology pieces to complete the look.
***
I hope you have enjoyed the projects so far, There are still more wonders to behold from both Astrid and Hels, starting with Astrid on Monday, so make sure you pop back xx
Till next time, Stay Inky

Monday, 1 October 2012

DT Project #1 by Minxy, Featuring:

Stampers Anonymous Tim Holtz 
'Halloween Blueprint' Stamps

Hay Snazzy Folks
Can you believe it's October already!!  The excitement of Halloween is just round the corner, and no home would be complete without some sort of spooky decoration.
***
As soon as I saw the stamps I knew I wanted to make a lantern, and luckly Snazzys do a really cool 'Victoria  Lamp Kit' It's an {easy} build wooden frame and you add your own sides, and in my case a lid too.
 I made my side panels from parchment paper, Stamping the blueprints with black stazon and dry embossing from behind to create a bit of a highlight.
The frame was coloured with my 'black soot' distress stains.
I also used this and 'spiced
marmalade' to die some gause fabric that I ripped up and stuck to the frame with the BEST glue ever {in my opinion} cosmic shimmer specialist acrylic glue
For the lid I cut a piece of card that I painted black and added more of the dyed cloth,
I then painted a cool little paper mache skull with white acrylic dabber, once dry I coated all over with Tim Holtz 'rock candy' crackle and then once that was dry I dirtyed it up a bit with 'antique linen' distress ink.
I added a couple of cut out blueprint bats also, 
To finish the look I added a couple of the battery opperated tealights in the skull and lantern to provide that spooktastic night time glow.
*
I hope you have enjoyed my first project, I'll be back on thursday with another fun piece.
If you haven't already, scroll on back and check out the cool projects both Gillain and Lesley have made with this months DT KIT.

Friday, 28 September 2012

Design Team Project #2 featuring Carta Bella All Hallow's Eve and Stampers Anonymous Halloween Blueprints (posted by Lesley)

Happy Friday Everyone!

Well general life has been conspiring against me a bit this week (as it does ;D) and at one point I didn't think I was going to get to blog a 2nd project but I've managed it by the skin of my teeth, lol!  Today I have a  simple origami box to show you using one sheet of the Carta Bella papers for the top and one of Bazzil cardstock for the base.

I've still given mine a slightly Halloween theme but I think it shows that these papers could quite easily be used for all occasions and I think they would make really classy cards for men.  The design I chose for the box top is called Poisoned and when folded it has given me a box just under 4.5" square.  If you search for origami boxes online it brings up quite a few simple tutorials.


I die cut a motif from the Zig Zag Bats design and inked the edges with a little Black Soot and Seedless Preserves Distress Ink.  I also used the Seedless Preserves to stamp the spider web from the Stampers Anonymous Halloween Blueprints but I lightly stamped off onto scrap before stamping the motif so that it wasn't too dark.  I attached the skull charm from Snazzy's before attaching the motif to my box with 3D foam pads.


I die cut the branches from a co-ordinating cardstock and positioned them on the box and then die cut the flowers from the Eerie Notes paper design alternating the two sides of the paper.  Again I inked the tips of the petals with Seedless Preserves and curled them before layering them with brads and attaching to the box.


Finally I added a black ribbon and trimmed one of the little spider stickers before attaching it near the bow.


Well unfortunately, that's it from me this month but I'm sure our Minxy has something up her sleeve for you next week.  Don't forget if you want to be in this month's Snazzy random draw for some Halloween style goodies leave a comment HERE and as always Snazzys has fabulous products in store so visit them online or telephone for your favourites.

Oooer, I just realised my next turn to post is the last week in October and ............. there will only be EIGHT
weeks left to Christmas!  Now that is scary, lol!


Monday, 24 September 2012

Design Team Project #1 featuring Tim Holts Halloween Blueprint Stamps and Carta Bella All Hallow's Eve Designs (posted by Lesley)

BOO!!!!!

Hello lovely visitors.  It's my week to show you what I've been up to with the lovely products our smashing bosses, Val and Don sent us to play with this month.   For my first project this week I've mainly used the brilliant Halloween Blueprint stamps from Mr Holtz together with a few of the stickers from the Carta Bella All Hallow's Eve set.  Later in the week I'm hoping to show the versatility of these fabulous papers.  Actually, they are a heavyweight paper which is quite sturdy and more like card and this also adds to their usefulness and not just for Halloween either.

Anyway, to kick off my week I decided to alter some old coasters I had in my stash (another of my charity shop purchases ;D).  I started off by putting masking tape on the back so that I wouldn't get them all messy and then I gave them each two or three coats of Gesso because the surface of the coasters is really shiny.  I was going to use black Gesso which I KNOW I have somewhere in my tip of a craftroom but could I find it?  Could I heck, so I had to go with white and I followed this with painting two coasters with Sunset Orange Dabber and the other two with Citrus Dabber.  I gave them all two coats.  I deliberately used thick Gesso and paint layers to keep the brush strokes so that the surface has some texture.  It resembles linen.


I then used some Cut and Dry foam and Archival Black ink to apply ink roughly over the coasters and then added more over some Tim Holtz masks (barbed wire and an ironwork border).


The next step was to stamp my chosen images from the Halloween Blueprints using Archival Black ink.  I didn't always use the whole image as you will see.


Next, I cut out some skeletons and bones from the 'Eerie Notes' sheet of paper and then decided which of the stickers I wanted to use from the Carta Bella products.  There are some really good ones on two whole 12 x 12 sheets.  I arranged them on my coasters, stuck them down and finished off with a coat of multi-medium too seal the surfaces.  I only gave mine one thickish coat but I think a couple more thin layers might be advisable if these are to be used for their original purpose and not just decoration.

Finally, I removed  the masking tape from the back and used a thick Sharpie marker to ink all the edges black.


Well, that's it from me for today.   I hope you like my fun Halloween coasters but don't forget to drop by later in the week to see what else I've made with these fab products.  Also, if you haven't already done so, leave a comment on Gillian's first post for last week HERE to be in the monthly Snazzy draw to win some goodies and of course, the products I've used can be purchased from Snazzys either via the online shop (more goodies being added all the time), in store or via the phone.  As Gillian mentioned last week, the DT pack we lucky ladies are sent to play with will be available as a kit each month at a fab discounted price.  See HERE for this month's kit.

Have a lovely Monday folks and I'll see you later!

Saturday, 22 September 2012

Design Team Project #4 ....

Good morning Snazzy folks, me again (I know I know lol) ....... I hope you have enjoyed the projects so far this week and that it has illustrated how versatile the products are. Today I'm back with my final project for the month.

For this project I opted to do a scrapbook layout (eeek this does not come easy to me lol, but here goes)!


with touches inspired by Anna Dawbrowska (I feel much more within my comfort zone).

I have used the following papers from the All Hallows Eve collection (Poisoned, Eeire Notes, spooky Damask & Halloween Words). The cabinet card & hat are from my own stash of digital images. I have used Dylusions Ink Sprays (Melted Chocolate, Black Marble & Squeezed Orange) to grunge up the paper flowers & doilie (which is also available from Snazzy's) and also on the background spraying through a Crafter's Workshop Mask (Reversed Chicken Wire). Other elements are from the Elements Sticker Sheet & Curiosity Cards Sheet, Halloween Ideaology and Tim Holtz Alterations Dies (Weathered Clock & On The Fence).

Don't forget to leave a comment HERE to be eligible for the random comment prize at the end of the month. Thanks to everyone who stopped by and left a comment on my projects, it is very much appreciated. TTFN x