Friday, 25 April 2014

DT Project No 3 by Lucy - Featuring Teresa Collins' Save the Date Collection


Hi, Lucy here with my third and final make with the Teresa Collins' Save the Date Collection. I decided to make a little book with pockets, etc which the bride-to-be could carry around with her to make notes for her wedding preparations and keep business cards of possible florists and photographers and have as a keepsake afterwards. I covered all the chipboard pages with a selection of the beautiful papers and inked the edges. The book rings and the book plate on the cover were silver so I coloured them with a black alcohol ink pen and a green gilding wax. I stamped the 'Forever For Always Love' wording from the clear stamp set onto one of the papers and placed it behind the book plate and added the glazed brads from the collection. I chose this particular paper for the cover so that the book plate could be positioned in one of the frame settings of the design. I stamped and cut out some flowers from patterned paper to go top left on my cover and used some of the lace we were sent on the book rings. As you can see in this picture, the book has tabbed dividers which are named The Dress, The Cake, The Photos, The Food, The Music, and The Flowers.


Here are a couple of examples of the inside pages. This one is for information about the photographer. I randomly stamped all over with words and added some butterflies and a dove. I stamped some words inside the frame from the clear stamp set in Coffee Archival and added this bottom right. I cut the 'Picture This' section from one of the pages and folded the edges inwards to make a pocket and inked the edges and glued this down and added some of the strips from the Ephemera pack.


For the Cake page I randomly stamped all over again and made a faux wedding cake out of a sticker and some Ephemera pieces with pillars from pieces of the paper collection and added the Bride and Groom from the Prima Something Blue Wooden Icon pack.

Wednesday, 23 April 2014

DT Post No 2 by Lucy - Featuring Save the Date by Teresa Collins


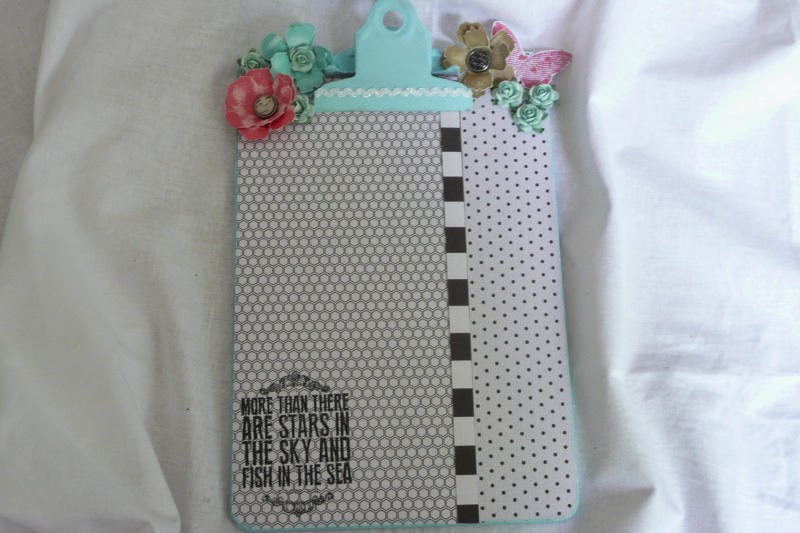
Hi Lucy here, with my second make with the beautiful Save the Date collection. I decided that my bride needed a clipboard to take with her when she goes to appointments to arrange her wedding. I painted the edges and the metal clip with Fresco Finish paint in Mermaid. The paint covers the metal perfectly without chipping! I added papers from the range front and back including the black and white strip from the title bit of one of the 12 x 12 papers. I stamped the wording from the clear stamp set, 'I love you more than there are stars in the sky and fish in the sea' in Onyx Black Versafine bottom left.


I added the ric rac we were sent to the clip and made some more matching Core-dinations sanded flowers, some with the flowers from our kit in the centre and some with the glazed brads from the Teresa Collins' Save the Date collection. To finish off, I stamped a butterfly onto one of the pink Save the Date papers.

I will be back on Friday with my final make.

Monday, 21 April 2014

DT Project No 1 by Lucy - Featuring Teresa Collins' Save the Date


Hi, Lucy here, with my first make using the beautifully romantic 'Save the Date' kit by Teresa Collins. I decided to use the papier mache heart I had left from one of our previous Snazzys kits and painted it with Fresco Finish in Mermaid to match the duck egg blue of the papers. I then wrapped the silver and white ric rac from our goodies around the twine hanger. I covered the front of the heart with the paper called 'Ikat' which I stamped with the damask stamp from the clear stamp set using a peppermint ink pad. I then stamped 'Just Married' and 'Forever For Always Love' in Coffee Archival. They are lovely quality stamps!

Here's a view of the back where I stamped the paper all over with the 'Forever' wording, using some secondary stamping.


Returning to the design on the front, I wrapped the beautiful lace we were sent across the heart and glued it in place and threaded the end through the gorgeous diamante ribbon slider also in our kits. This provided a backdrop for the bride and groom wooden figures from the Prima 'Something Blue' icon set. You can just see in this sideways view that I have wrapped some 'Save the Date Decorative Tape' around the heart to neaten it off as I decided to get some of this too as I love this set so much!

I also bought a Teresa Collins clear stamp set called 'Tell your Story' which co-ordinates really well and stamped the butterfly in Coffee Archival onto a scrap of the Ikat paper, which I tucked behind the roses I made from Core-dinations cardstock and sanded. I popped the peppermint flowers from our kit in the centre, and tucked an arrow from the Ephemera Pack underneath.

I hope you enjoyed this, and I will be back on Wednesday with another make.


Friday, 18 April 2014

Save the Date Project #2 by Claire

Hello Everyone

Claire back again today to share my second project using the lovely Save The Date collection by Teresa Collins.

So when planning a wedding there is a ton of things that need doing, so what better way to get organised than to have a special wedding note pad!?

So here is the note pad I created using this wonderful paper collection:

This is how the note pad started out - not very interesting:

I covered the front of the note book with the little heart paper and then added a length of the lace down the left hand side:
Next I cut the sentiment out from the paper collection and added it down the left hand side of the note book over the lace. I added the mini tag at the top of the sentiment with a brad from the collection.
I took five of the paper roses and very gently brushed them with evergreen bough distress ink. I twirled the stems of the paper roses around my pokey tool and clustered them around the bottom of the sentiment panel.
Finally I added the large blue brad, also from the Save the Date collection, to the bottom right corner of the note pad.
Here are a couple of photos of the finished article:
 

I hope you enjoyed my projects this week, don't forget to pop back next week to see what Lucy's been up to with this beautiful kit :-)

Thanks, Claire x


Tuesday, 15 April 2014

Save the Date Project #1 by Claire

Hi Everyone

Claire here this week to share a couple of projects using the stunning Save the Date collection from Teresa Collins.

So I decided to alter a MDF door hanger that I bought ages ago and never got around to the actual altering part!

So here is the finished project and then I have a couple of step by step photos to share:

So here the hanger in its original form - not very pretty....


I started by giving the edges a couple of coats of Fresco paint in Snowflake so the MDF colour wouldn't show around the edges once finished.

I then added that lovely floral paper to both the front and the back. I trimmed the paper to shape then added it to the hanger using multi medium, I then sanded away all the rough edges to create a nice, smooth finish.

The texture on the paper is just beautiful - it really looks like fabric and has a lovely heavyweight to it.

So next I tore around the sentiment panel which was included in the paper pack and I also tore a slightly larger pierce from another sheet. I distressed the edges of both pieces with the edge of a pair of scissors and also folded and bent the corners around a pencil for a curled effect.

I added a piece of the wonderful lace that came in the kit this month before layering up the torn paper pieces on top of the hanger. Then I also added a couple of the brads from this collection also.

At the top of the hanger I added another sentiment - this time it was part of a sticker strip that came in the paper pack.

To finish the back of the hanger I added one of the little Prima wood embelishments on top of the lace.

Thanks for joining me today here on the Snazzys Desigh Team blog!


Love Claire x


Saturday, 12 April 2014

DT Project #3 by Minxy

Featuring Teresa Collins 'Save the Date' Collection

Hay Snazzy Gang
Here I am for my final share of the week
It's a short and sweet post as there is little to explain
Just a couple of cards thrown together using papers, brads, lace and wooden embellies all from the kit.


Click HERE to see the whole selection of Teresa Collins papers, If you hover your mouse over the paper it shows the reverse side.

See told you it was short and sweet.
Thanks for taking the time to visit and don't forget there is still plenty of inspiration to come from my fellow teamies over the next few weeks so do pop by xo

I'm off to Ally Pally today & tomorrow for the Big Stamp & Scrapbooking show so if you're going maybe i'll see you there, Have a great weekend whatever you're up too.

Till next time
Stay Inky

Thursday, 10 April 2014

DT Project #2 by Minxy

Featuring Teresa Collins 'Save the Date' Collection. 

Hay Snazzy Gang
Here I am as promised with another crafty make... And as you can see, again there is not a hint of wedding to be found.
What can I say, I started off with the plan to make some wedding cards but this idea took over and practically made itself.


I actually started off with the 3 cut out sections from the last project!!
I cut 1 in half lengthways
Left 1 whole and the last I cut 2 side sections with a piece let over.


I assembled, taped and created a box shape.

I covered all the edges with Tim Holtz tissue tape.
Then I cut 4 side panel strips of the 'the detailsSD1002 paper


And 1 long strip for the inside and 2 side panels, I roughed up all the edges and glued in place.

I stamped 3 sides of the box with 2 different clear stamps from the kit and added one of the stickers to the front.

To complete the project I cut out the mini tabs from the 'remember this' SD1009 paper, and added each month with some of the alphabet stickers from the kit.

Hope you've enjoyed todays make, Sorry again that it's not wedding related if thats what you were hoping for.. I have made a couple of cards that i'll be back to share on Saturday.
Till then, Stay Inky