Thursday, 24 May 2012

DT Project #2 by Minxy : Featuring:

Pan Pastels
***
It's me again.. 
As promised i'm here with another project
But instead of a load of words and pictures i've done a utube.. So
Sit Back
Relax
and Enjoy x


The size of the canvas I used was 9" x 12".
Any questions please feel free to ask in the comments and i'll do my best to help x
Oh and don't forget one lucky person could win some pan pastels just by leaving a comment HERE
Stay Inky

Monday, 21 May 2012

DT Project #1 by Minxy : Featuring

Pan Pastels
Sam Poole Vintage Photography Stamps
***
Howdy snazzy folks, my time is finally here to share the first of my projects,
To say I was excited when I heard we were getting pan pastels to play with was an understatement,  Yes I know I already had a few but one can never have too many in my opinion, I LOVE THEM
If you've not tried them all I can say is YOU NEED THEM!! lol
So onto my card...
I started with a piece of plain white card, and I randomly stamped the film strip in versamark ink, I then used a sofft tool to apply black pan pastel to the inked areas, I found that some of the black also transferred to the background but I wanted that effect so it was fine, I also added some burnt sienna to the background without fear that the film strips would change colour as the ink had already grabbed the black.
Next I stamped the photographer and the frame with sentiment onto encaustic art card with versamark ink,
 I used more burnt sienna pan pastel on the guy and after cutting him out edged him with some vintage photo distress ink. I used raw umber on the frame and words. Because I used encaustic card which has a super smooth finish the pan pastel only stuck to the ink and not the background.
Then it was just a case of cutting out and arranging it all together with some added touches in the form of some idea-ology film strip and a couple of friendly plastic cameras that I made myself using a hand made mould.
***
I hope you have enjoyed my first offering, and try the whole versamark stamping technique, it's a lot of fun.
I'll be back later in the week with my second project and a new UTube vid to match.
See you then
Stay Inky

Friday, 18 May 2012

Snazzy DT Project # 3 Featuring Pan Pastels (By Lesley)

Hi Everyone,

This is my final project for this month and I have to say I've had a great time playing with the lovely Pan Pastels.  I hope I get time to continue experimenting with them because I'm sure there's lots more for me to discover.

Before I show details of my project, just a little reminder in case you haven't already done so, go leave a comment HERE to be in the random.org draw to win a set of these gorgeous Pan Pastels.

Now on  to my final project and this time I decided to make a card combining the Pan Pastels with the quirky Dylusions stamps.


I started by covering the whole surface with Paynes Grey Tint followed by a very light layer of Paynes Grey.  I then stamped the various leaf and flower images from Around the Edge and How Does Your Garden Grow (Dylusions) with Versamark ink and patted the Pan Pastel colours I wanted lightly over the images using the Sofft Tools.  I used a mixture of Chromium Oxide Green Tint and Shade and Paynes Grey.  I then coloured the flowers and some of the leaves along the bottom with Distress Markers.


I stamped Doolally Doris (Dylusions) onto separate card with Versamark, patted Pan Pastels in various colours over the stamped image and then coloured the image with the pastels using the Sofft Tools. I cut Doris out and gave her a coat of glaze by patting it over the surface with Cut n Dry foam.  I then coloured a piece of card with Violet Tint pastel and stamped the quote from The Right Words (Dylusions) with black Archival ink and cut the sections out before mounting them onto the card with 3D foam.


I stamped the wings onto a sandwich of fusible fibres and film, and then mounted Doris onto the card with 3D foam pads .......... and there you have it!


I hope you've enjoyed my projects this week and we still have Minxy and Astrid's designs to look foward to yet.  I can't wait!

Have a good weekend everyone!

Hug
Lesley  Xx

Wednesday, 16 May 2012

Snazzy DT project #2 using Pan Pastels (posted by Lesley)

Hi Again Everyone,

Time for my second project for this week showcasing the fab Pan Pastels.  I said on Monday how much I've enjoyed using these pans of beautiful colour and so when I went to a show last week where our lovely bosses were exhibiting I just had to add a few more colours to my collection.  I limited myself to 5 but it was really difficult because the colours are so gorgeous.  I shall have  to make myself keep using them so I can justify buying some more lol!  In case you don't want to read all my waffle, lol, if you want to be in with a chance of winning a set of Pan Pastels in the monthly prize draw you need to leave a comment HERE.

Today I have a tag to show you on which I had a go at building up layers using masks and stamping.


I started off by covering the whole tag with Paynes Grey Tint and Turquoise Tint and then placed a diamond mask and honeycomb mask randomly over the tag and sponged Versamark ink through them.  I removed the masks then patted Paynes Grey onto the Versamark.  I then did exactly the same using sequin waste but I used Turquoise Shade in some areas and Paynes Grey in others.


Over the top portion of the tag I used Versamark Ink to stamp a leaf spray from Hero Arts Delicate Leaf Clusters clear stamp set and then patted Turquoise Shade Pan Pastel over the top.  I then stamped the quote which is from a Chocolate Baroque set called Artistic Affirmations (which I think Snazzys can supply) using black Archival Ink.  Over the bottom half of the tag I used the damask border from the Kaisercraft Velvet Ensemble clear stamp set to create a background using Versamark ink with Turquoise Tint patted over it.  Next I coloured some Tim Holtz Tissue Tape with Paynes Grey and Turquoise Shade Pan Pastels before ruffling it onto my tag.


The leaves are stamped onto Grungepaper, cut out and coloured with Barn Door Distress Ink.  I cut the flourishes and the little bird cage from tan card and distressed and stamped all the pieces with a script stamp using Vintage Photo Distress Ink and I added a little Rock Candy Crackle to the birdcage too.  I coloured the little bird with Black Soot and Barn Door Distress Inks and the larger bird was covered with Guilding Flakes.  I edged the larger bird with a black Sharpie pen to give him a bit of definition.  Finally I added the three teeny vellum roses which I rescued from an old project, ribbon and some beads and a pin.

That's it from me for today.  I'll be back at the end of the week with my final project for this month.  Have a good day folks.

Hugs
Lesley  xx

Monday, 14 May 2012

Snazzy DT project # 1 featuring Pan Pastels (by Lesley)

Hello Everyone,
Wow, don't the months just whiz by ............. especially when you're having fun as I've been doing this month learning how to use a product which is completely new to me.  I will own up now, I have never used pastels of any kind in my life before now and think I've probably started on the pastel 'learning curve' with the best there is.  These pans of colour are absolutely gorgeous and you can create a blended background very quickly or you can spend as long as you want either building layers or colouring an image.  I'm sure there is lots more for me to discover using the Pan Pastels but at least anyone who has never used them before can see that a complete beginner can achieve lovely results quite easily.

For my first project I wanted to try the pastels on something other than card so I decided to decorate a textured tile I'd had in my stash for quite some time.  


I laid down rough bands of colour more or less diagonally across the tile starting with Red Iron Oxide Shade followed by the Tint, then Chromium Oxide Green Shade followed by Tint and finally Turquoise Tint followed by Shade.  Believe it or not it we were having a period of brilliant sunshine when I took my photos and no matter how I tried it kept bleaching the colour from the lightest colours.  I had wanted them quite subtle but not invisible, lol!  I then placed a honeycomb mask over random areas and added more of the base colours.  I really liked the way the rough texture of the tile grabbed the colour more on the peaks.  I did a little more masking with a piece of sequin waste.


I then stamped a border onto tissue paper using the bare stem stamp from Studio 490 Make Mine Mini Art and adhered this to the tile with matte Multi Medium.  Next I stamped a flower with stem and leaves from the same Studio 490 set onto Grungepaper three times using Onyx Black Archival ink.  I stamped the same flower (without inking the stem and leaves) several more times onto the Grungepaper and then cut all of them out.  I coloured all of the flowers with Distress Markers which, I have found, blend quite well on Grungepapers.  When they were dry I curled all the flower petals before adhering them to the tile.


I then stamped several of the little butterflies from Studio 490 Make Mine Mini Art and one large butterfly from Nature's Art, cut them all out and coloured them with Pan Pastels Violet Tint and Shade before curling their wings.  I adhered these to the tile and finally added some Ideology little safety pins and a metal leaf to the butterfly bodies.  Finally, as I don't have any proper sealer I gave the whole project a decent spray with a cheap hairspray which seemed to work just fine.


I thoroughly enjoyed making this project and found it extremely easy to cover the background. I was also pleasantly surprised at how well the Pan Pastels worked on the Grungepaper too.

I'll be back again in a couple of days with another Pan Pastel project so hope you call back for a look.  In the meantime, don't forget, if you haven't already done so, leave a comment on HERE this month to have a chance of Random.org picking you to win a set of these lovely pastels.

Hugs
Lesley  Xx


Friday, 11 May 2012

Snazzy DT Project #3


 Hello everyone, I'm back with another quick & simple make using PanPastels. I started out by applying Magenta PanPastels to a 6x6 Kraft card. I then stamped the Kaisercraft Bird Cage Stamp using Versamark, then adding another layer of Magenta PP. I then overstamped the Bird Cage stamp using Archival Ink (Jet Black). The stars & script images are from 7Gypsies Lile Collection, the border along the bottom of the card which was again stamped with Versamark, then appling Magenta PP over the top is from Kaisercraft Duchess Collection. The flowers & ribbon have been edged with Yellow Ochre & Magenta as has the wooden butterfly embellishment from Kaisercraft.

That's it from me, can't wait to see what Lesley has instore for us next week using PanPastels.

Wednesday, 9 May 2012

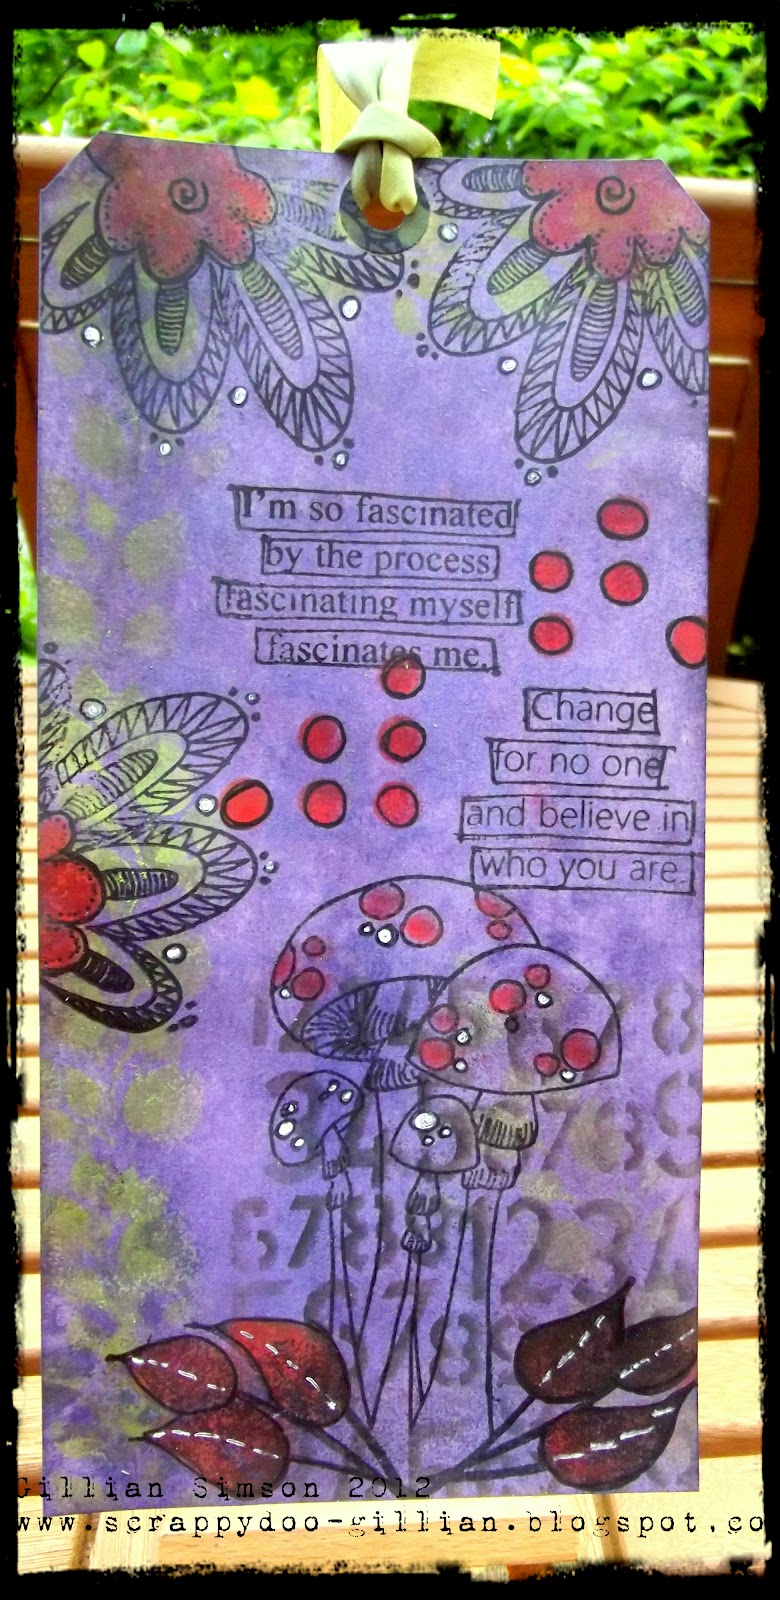
Snazzy DT Project #2 Featuring Panpastels

 Good morning everyone .... today I'm back with a simple and quick project using the oh so versatile PanPastels. All stamps & stencils are from the Dylusions range which are available at Snazzy's. I wanted to try an re-create the bold colours that you associate with Dyan's products that would normally be achieved using the Dylusion Inks. I started out by applying Violet PanPastels to a manilla tag. I then sponged Bright Yellow Green PanPastels through the Luscious Leaves 5x8 stencil. I then sponged Violet Shade PanPastels through the Dotted Flowers 5x8 stencil & Black PanPastels through the Number Jumble 5x8 stencil. Other PanPastel colour used is Permanent Red.


Again Permanent Red PanPastels sponged through the Dotted Flowers stencil and then highlighted with a Black Pitt Pen. I have also used a white Gelly Roll pen to highlight certain areas of the Dylusions Stamps (Doodle Parts & Say What You Mean).

I will be back on Friday with my final project of this month incorporating PanPastels. TFL x