Hello lovely visitors!
I hope this Monday morning finds you all fine and dandy and looking forward to the week ahead. To set you on your way I have a project to share which I hope will give you a 'feel good' factor.
As you will know from Gillian's two fab projects the team are working with the latest range of beautiful papers from 7 Dots Studio called 9th Wave this month, together with some Hero Arts stamps and a stencil. As usual if you would like to be in the random draw for our kit this month leave a comment HERE on Gillian's first post.
As my teamies are much better than I at both grungy and Anna Dabrowska styles I chose a different tack and I've made a Piano Hinge Minibook and teamed the beautiful papers with a collection of old Chocolate Baroque stamps from my stash keeping to the theme of the sea. My thinking is that the book could be a mini album/journal of a seaside holiday and although the CB stamps are not by any means new, they are still in their catalogue so Snazzy's could probably obtain them for anyone interested or you could choose a theme of your own.
This post is going to be rather photo heavy and a few were taken under artificial light so I apologise in advance, lol! The main ones of the finished article were taken in daylight though. There are lots of tutorials online on how to make piano hinge books but I've shown a few pics on how mine developed.
First of all I chose the 3 paper designs I wanted, Stormy Sea for the covers and Coral Reel and Sea Foam for inside and then cut 2 pieces of 21cm x 15 cm from each sheet. I also cut 9 pieces of co-ordinating plain paper (I chose pale cream) the same size then folded all the pieces in half folding the cream paper 3 sheets together each time.
I made a template with 5 equidistant notches and used this to mark all the folded edges and cut the triangles out
I did all my stamping before proceeding to the next stage but wanted these first photos to follow in sequence of construction. You gradually add the pages to each other, threading the bamboo sticks through alternate sheets. NOTE: If you wish the sticks could be painted before this stage but I wanted to keep the natural state here as the colour was perfect.
The final stage of assembly is to fold a length of wool/ribbon/cord in half and then tie the folded end to the stick at the back before weaving through all the sticks . Continue weaving back and forth for a depth of about 2 cm and then tie off to the back stick. I changed the yarn from the one shown here because I decided I didn't like it when I saw it in daylight, lol!
And now I'll show you the fully stamped and assembled book waiting to be filled with seaside holiday photographs and little notes, etc., of how much holiday fun was had or perhaps hand written pieces of more poetry about the sea.
This one shows the spine of bamboo sticks decorated with some of my absolute favourite and very precious silk ribbon, ;D!
Here on the front cover I used several of the CB stamps to create an underwater scene which I coloured with Fresco acrylic paints. I also used one of the Hero Arts border stamps which I made to look like bubbles rising through the water with the help of a white pen. The quote is a CB stamp from the same series of sea themed sets and I even managed to find a charm which I'm sure is a flying fish ;D.
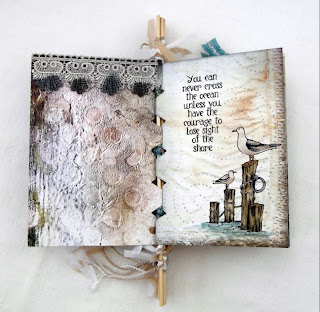
Another CB stamp of the seagulls painted with a mixture of Fresco paints and Distress Inks. I think the quote is Creative Expressions.
I don't know who's the lovely poem stamp is but I teamed it with another scene created with CB stamps using some masking to get the little pile of shells in the foreground. This time I painted it all with Distress Inks and added the little anchor charm .
.
This page is all done with CB
stamps including the piece of poetry and I also added some inking through the Hero Arts stencil in the background. The starfish charm is from some
cheap jewellery I had in my stash!
Below is a close up of the little seahorse from the front cover and it also shows the beautiful subtle colouring there is in these stunning papers. I think they make the perfect backdrop for my underwater scenes!
I hope you enjoyed my little project for today.
See you all again soon.


