Hello again lovely Snazzy's visitors,
I made it back with another project almost at the last minute, lol! Actually the weather is partly to blame for me being late because I couldn't take any photos till this morning even though my project was finished last night. I'm actually feeling quite miffed (being polite here) because the blooming weather has put paid to my plans for this weekend. I was supposed to be travelling down to Swindon tonight, taking a friend with me, for an overnight stay followed by a lovely workshop with Val and my first ever visit to Snazzy's but it looks like the snow has put paid to that and I have to say I'm really gutted. Ah well, maybe another day but I so wanted to have a go at that fabulous mask which you can see HERE if you've not seen it before.
Before I share my second project this week with you, don't forget to leave a comment HERE if you would like to be in Snazzy's random draw to win this month's DT kit.
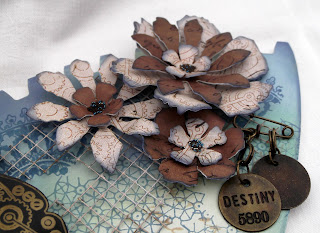
Now on to my project which is a piece of wall art. First I gave the 'butterfly wing' and the small solid cog a coat of Gesso followed by a slightly thinned coat of white acrylic paint. Next I took a selection of Versamagic inkpads and blended my chosen colours over the wing. I followed this with some random stamping using stamps from Chocolate Baroque Lace Fragments set and Steampunk Butterfly Set and a Cobalt Archival inkpad. I then used a script mask and applied Coffee Archival ink here and there over the stamping.
(Sorry it's not at the proper angle but it is quite a long piece and I haven't yet put any means for hanging it on the back so had to take the photos with it lying flat)
I cut a piece of wire mesh from a roll I found in my local charity shop. It's actually gold coloured with bits of glitter on and was in their Christmas decorations. Not my cup of tea at all, lol, but perfect for my purpose once I'd chopped it up a bit and treated it with some alcohol inks. I attached it to my 'wing' with Ideology Screw Eyes!
I then set about making my embellishments. I glued some Prima script paper (in two contrasting colours) to Whiteout Clearly for Art using Ranger Glue and Seal and then cut out some flowers using my TH/Sizzix Tattered Florals die. On the lighter shade of paper I over stamped with a cog background stamp from the Chocolate Baroque Steampunk Butterfly set using Coffee Archival ink and then inked all the petal edges with the Cobalt Archival. I set about heating and shaping all the flowers and then layered them, securing with Cosmic Shimmer Glue before arranging them all on my wing. I attached them with silicone glue and then used the Cosmic Shimmer Glue to put blobs in the flower centres to which I added micro beads.
Next, I stamped the Steampunk Butterfly twice using Versamark ink onto Black Clearly for Art and heat embossed with gold detail embossing powder. I've had this pot for years and it's gone a rather strange colour (pongs a bit too ;D) and I was doubtful it would work but it actually came out the perfect colour for my project. Once it had cooled I cut the butterflies out and then heated them again to shape the wings before attaching them to my project with silicone glue.
The final bit was the solid cog which I covered with some of the lighter script paper and then inked the edges with Cobalt Archival. The word 'LOVE' is a Studio 490 Art Part which I inked with Walnut Stain Distress Ink and then heat embossed using an embossing powder in my stash.. I stuck this to the cog with Cosmic Shimmer Glue (note to self - need more of this fab glue) and then stuck the cog with the same glue to the wing. I finished off with a couple of wire 'antennae'
Well that concludes my projects with this fun kit and I have to say that from starting out a bit baffled about what I was going to do, I ended up having a fab time with lots of different products from my stash, many of which can be purchased from Snazzy's. Next week it's Minxy's turn and she usually has something quirky and inspiring for us all so I'm really looking forward to seeing her projects.
(Now you've seen the project I'll let you into a secret, my almost 5 year old granddaughter was looking at it this morning and asked what it was. When I told her, the response was that it looks like a fish, lol! I think she's not far off the mark!)
(Now you've seen the project I'll let you into a secret, my almost 5 year old granddaughter was looking at it this morning and asked what it was. When I told her, the response was that it looks like a fish, lol! I think she's not far off the mark!)
Till next time .......


