Thursday 29 August 2013

DT Project #2 showcasing 7 Dots Studio 9th Wave Collection by Astrid

Hello dear Snazzy visitors and happy Thursday to you all.
For my second project this month I made a little tag book:
I used size #10 Manila tags and covered both sides with the wonderful papers. I then used stencils, inks and stamps to decorate them. Though the outside is quite chunky, I left the inside fairly plain to really showcase the beautiful papers. I had great fun decorating them all.
Here's the front cover before I bound it together, this is the only page I embellished, I also added some texture paste through a part of the Hero Arts Stencil.  The sentiment is from the Tim Holtz Simple Sayings set.
Here I used the new Tim Holtz stencils and some stamps from my stash Sentiment is from the same set.
More stenciling, some background stamping with Prima stamps from an earlier DT kit and the butterflies are of course from the Tim Holtz Papilon set and the Hero Arts Notebook Essentials stamp that came with the DT kit.
Here I used the Tim Holtz Classic #1 set and the Hero Arts stamps as well as the stencil from Hero Arts
More stamping and stenciling and using the same stamp sets again plus some chit chat stickers
Nearly there.... this time using the beautiful Dragon fly
And for my last page a la Blanche stamp from my stash
Finally the back cover is just from the papers with nothing much added to it at all.

Well, hope you like my little tag book. I had great fun stenciling and stamping, trying to pick up on the colours that are there in the papers already. I found Victorian Velvet, Weathered Wood, Broken China, Tea Dye and Black Soot Distress inks all blend to perfection with the colours of these papers.

Well, that's it from me for this month. I'm off to Swindon tomorrow to meet up with all the Snazzys folk, can't wait, and who knows,  I might see you there :)

Don't forget to come back on Monday when Hels will be here to show us her take on these wonderful papers and stamps!!

Monday 26 August 2013

DT Project #1 showcasing 7 Dots Studio 9th Wave Collection (by Astrid)

Hello dear Snazzy visitors, lovely to see you here!! Can you believe we are nearly at the end of August??? Scary! Well by now you will know that this month we are featuring the wonderful papers designed by Finnabair. We at Snazzys are all very excited because this coming weekend Finnabair herself will be doing workshops at Snazzys, yippee!!
Anyway, on to my project:
The moment I clapped eyes on these wonderful papers I knew that one of my projects would be a layout of some sort. Now I am not a scrapbooker by any stretch of the imagination, but these papers are so gorgeous, you just cannot go wrong. I decided I would use some of the techniques I learnt from Finn when I did workshops with her last year, and I also wanted to pick up on some of the elements that are printed on the papers themselves, like lace and textured tapes.
So here is a quick step by step of how I did my LO
I cut a piece of mount-board to 12" by 9" and covered it with one of the papers. I then tore some rough strips of another paper and adhered them to my background with gel medium.

I added a thin layer of watered down gesso to blend them into the background and then added some texture paste through some stencils to add some texture. I used both the Hero Arts Stencil,  Boarders that came with our DT kit and some stencils from my stash.
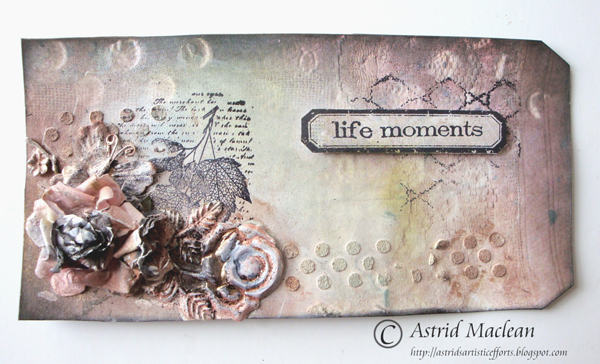
Here's a close up so you can see the texture a bit better:
I added texture both over the background and the paper strips.
Next I gathered some of the bits and pieces I wanted to add to my LO, a photo of course (the one I chose is one of my dad and uncle when they were little boys, I think it was taken in 1914, my dad is the one on the left)
Don't you just love that photo? And yes, for those who like to do their maths, I am quite ancient, but he was quite old when he had me lol....
So here are some of the other bits and bobs I used, chipboard elements, lace, a doily, textured ribbons and tapes, some cheesecloth etc. Flowers will come later. I didn't have many metal embellishments left in my stash so I used mainly chipboard, but Snazzys has a great collection of steam punk and other metal embellishments that would be brilliant for this.
Next I arranged and re-arranged  them onto my LO  until I was more or less happy with the result and also added some flowers lying around in various baskets on my desk. The colours don't matter at all at this stage.
I glued them on with a mix of Cosmic Shimmer glue and gel medium and when it was dry covered everything with several layers of Gesso.
I really quite liked it at this stage, but of course it needed a bit more drama, so out came the sprays. I used a mix of Tattered Angels, Cosmic Shimmer and Dylusions sprays.
Yikes, I don't like this, far too blue. It needs more depth...
Onto the Acrylic paints next, dark brown, black and white. I added dark shadows around the main embellishments and whited out some of the areas that had gone too blue, I also highlighted some of the raised bits again with more white and finally rubbed some Treasure Gold in Pewter to add a few more highlights, - done!
Here you can see some close ups:


And the final result of the whole LO:

Well there you have it, hope you like my LO, not exactly Clean And Simple lol....
Anyway, as you probably know, if you leave a comment on Gillian's first post you're in with a chance to win a fab price, and don't forget to check out the other wonderful projects my teamies have been making with this fantastic collection! I'll be back later on in the week with another little project, so hopefully will see you then.

Thursday 22 August 2013

DT project Pt2 by Minxy, Featuring:

7 Dot Studio : 9th Wave Collection
Hero Arts Stencils & Stamps
***
Hay Snazzy Gang
So here as promiced is the 2nd part of this weeks project


I hope you enjoyed this weeks offerings, Pop back next week to see more 7 Dot goodness from Astrid xo 


Monday 19 August 2013

DT Project Pt1 by Minxy, Featuring ....

7 Dot Studio : 9th Wave Collection
Hero Arts Stencils
***
Hay Snazzy Gang
Today I will be sharing the first half of my project, which is this paper case.


This is a really simple make and all you need is 1 sheet of 12x12 paper,
a scoreboard {or ruler and embossing tool} and something to cut like a paper trimmer or scissors.

Oh yeah and to watch MY VID

I used dusty concord and mowed lawn distress ink through the Hero Arts stencil.
The clasp is a Tim Holtz idea-ology piece and the ribbon is from my stash although snazzy's sell a massive range of ribbons in store.


I'll be back on thursday to share what goes in the case..
Till then stay inky


Monday 12 August 2013

DT Project #1 showcasing 7 Dots Studio 9th Wave Collection (by Lesley)

Hello lovely visitors!

I hope this Monday morning finds you all fine and dandy and looking forward to the week ahead.  To set you on your way I have a project to share which I hope will give you a 'feel good' factor.  

As you will know from Gillian's two fab projects the team are working with the latest range of beautiful papers from 7 Dots Studio called 9th Wave this month, together with some Hero Arts stamps and a stencil.  As usual if you would like to be in the random draw for our kit this month leave a comment HERE on Gillian's first post.

As my teamies are much better than I at both grungy and Anna Dabrowska styles I chose a different tack and I've made a Piano Hinge Minibook and teamed the beautiful papers with a collection of old Chocolate Baroque stamps from my stash keeping to the theme of the sea.  My thinking is that the book could be a mini album/journal of a seaside holiday and although the CB stamps are not by any means new, they are still in their catalogue so Snazzy's could probably obtain them for anyone interested or you could choose a theme of your own.

This post is going to be rather photo heavy and a few were taken under artificial light so I apologise in advance, lol!  The main ones of the finished article were taken in daylight though.  There are lots of tutorials online on how to make piano hinge books but I've shown a few pics on how mine developed.

First of all I chose the 3 paper designs I wanted, Stormy Sea for the covers and Coral Reel and Sea Foam for inside and then cut 2 pieces of 21cm x 15 cm from each sheet.  I also cut 9 pieces of co-ordinating plain paper (I chose pale cream) the same size then folded all the pieces in half folding the cream paper 3 sheets together each time.


I made a template with 5 equidistant notches and used this to mark all the folded edges and cut the triangles out 


 I did all my stamping before proceeding to the next stage but wanted these first photos to follow in sequence of construction. You gradually add the pages to each other, threading the bamboo sticks through alternate sheets.  NOTE: If you wish the sticks could be painted before this stage but I wanted to keep the natural state here as the colour was perfect.


 The final stage of assembly is to fold a length of wool/ribbon/cord in half and then tie the folded end to the stick at the back before weaving through all the sticks .  Continue weaving back and forth for a depth of  about 2 cm  and then tie off to the back stick. I changed the yarn from the one shown here because I decided I didn't like it when I saw it in daylight, lol!


 And now I'll show you the fully stamped and assembled book waiting to be filled with seaside holiday photographs and little notes, etc., of how much holiday fun was had or perhaps hand written pieces of more poetry about the sea.
This one shows the spine of bamboo sticks decorated with some of my absolute favourite and very precious silk ribbon, ;D!


Here on the front cover I used several of the CB stamps to create an underwater scene which I coloured with Fresco acrylic paints. I also used one of the Hero Arts border stamps which I made to look like bubbles rising through the water with the help of a white pen.  The quote is a CB stamp from the same series of sea themed sets and I even managed to find a charm which I'm sure is a flying fish ;D.


 Another CB stamp of the seagulls painted with a mixture of Fresco paints and Distress Inks.  I think the quote is Creative Expressions.


I don't know who's the lovely poem stamp is but I teamed it with another scene created with CB stamps using some masking to get the little pile of shells in the foreground.  This time I painted it all with Distress Inks and added the little anchor charm .
 .


 This page is all done with CB stamps including the piece of poetry and I also added some inking through the Hero Arts stencil  in the background.  The starfish charm is from some cheap jewellery I had in my stash!


And finally the back cover page which is again painted with Distress Inks.  Apart from the 'bubbles' and the flourishes on the above page which are done with Distress Inks, all the stamping is done with Archival  Inks.
 

Below is a close up of the little seahorse from the front cover and it also shows the beautiful subtle colouring there is in these stunning papers.  I think they make the perfect backdrop for my underwater scenes!

I hope you enjoyed my little project for today.

See you all again soon.


Saturday 10 August 2013

Design Team Project #2 By Gillian ....

Good morning everyone, Gillian here with another make featuring the 9thWave collection from 7Dots Studio incorporating some Hero Art goodies.

For this project I started out by covering a piece of Grey Board with Little Black Dress Paint. I then used {Wavy Ocean} from the 7Dots 9th Wave Collection which was cut to size and adhered using Cosmic Shimmer Glue.


I then sprayed the reverse of {Wavy Ocean} with the following Dylusions Ink Sprays {Pure Sunshine, Postbox Red, Calypso Teal}.


I also used Pure Sunshine to spritz through the Hero Arts Stencil included in this months kit. Next I stamped the images from the Eclectica Collection By Sara Naumann {ESN01 & ESN07} onto white cardstock using Jet Black Archival Ink before laying the stencil over the stamped images and spritzing with the above Dylusions colours. The words were then adhered to the background using 3D Foam Pads.


The heart images are from the Hero Arts Grafitti Glam Collection which were stamped and coloured as above.


The Wood Icon ruler was coloured using Dylusions Ink {Calypso Teal & Cut Grass}.


To finish with I "flicked" more Dylusions Inks, this time using White Linen & Black Marble.

That's it for me this week, don't forget to be in with a chance of winning, leave a comment HERE.

Until next time x


Tuesday 6 August 2013

Design Team Project #1 Featuring 7Dots Studio and Hero Arts ....

Good morning everyone, I cannot believe we are into August already .... seriously where does the time go!

For the next five weeks the design team will be working with the new 7Dots Studio 9th Wave Paper Collection in conjunction with Hero Arts .

Before we begin though I'd like to announce the winner of last months Random Comment winner ....

.... which was No 15 ..... Congratulations Beryl, please email Snazzy's with your contact details to claim your prize.


For my first project I opted for an inky splatty tag, inspired by Anna Dawbrowska (of course). Those lucky enough to have secured a class at Snazzy's do not have long to wait now .... excited!!

I started out by using the {Stormy Sea} paper from the 7Dots Studio 9th Wave Collection cutting two different size tag templates. I then stamped an image from the Grafitti Glam Collection by Traci Bautista using Archival Ink (Jet Black). Using the Hero Arts Stencil in this months kit, I sprayed Dylusions Ink Spray {Vibrant Turquoise}, again using the Vibrant Turquoise & Black Marble to create ink splats over the background.

I then added some Tim Holtz Ideaology Remnant Rub Ons to the top left of the backround. Using a left over scrap of paper from the collection, I stamped the {Dragonfly} image from Stampers Anonymous Classics #1 collection, I used Distress Ink {Vintage Photo} to distress around the edges. I repeated the previous step with the word {Voyage}. I then adhered Clear Epoxy Stickers from the Sunrise/Sunset collection from Prima.

The wooden leaf embellishments have also been sprayed with Vibrant Turquoise then stamped with Archival Ink using the Traci Bautista background image.


I've then layered some more embellishments .... Ideaology Ticket along with some twine and a Wood Icon ruler from the Sunrise/Sunset Collection by Prima.
 
To be in with a chance of being this months Random Comment Winner, simply leave a comment on this first post.

I will be back again later in the week with another project to share. Until then thanks for stopping by.