Friday 28 September 2012

Design Team Project #2 featuring Carta Bella All Hallow's Eve and Stampers Anonymous Halloween Blueprints (posted by Lesley)

Happy Friday Everyone!

Well general life has been conspiring against me a bit this week (as it does ;D) and at one point I didn't think I was going to get to blog a 2nd project but I've managed it by the skin of my teeth, lol!  Today I have a  simple origami box to show you using one sheet of the Carta Bella papers for the top and one of Bazzil cardstock for the base.

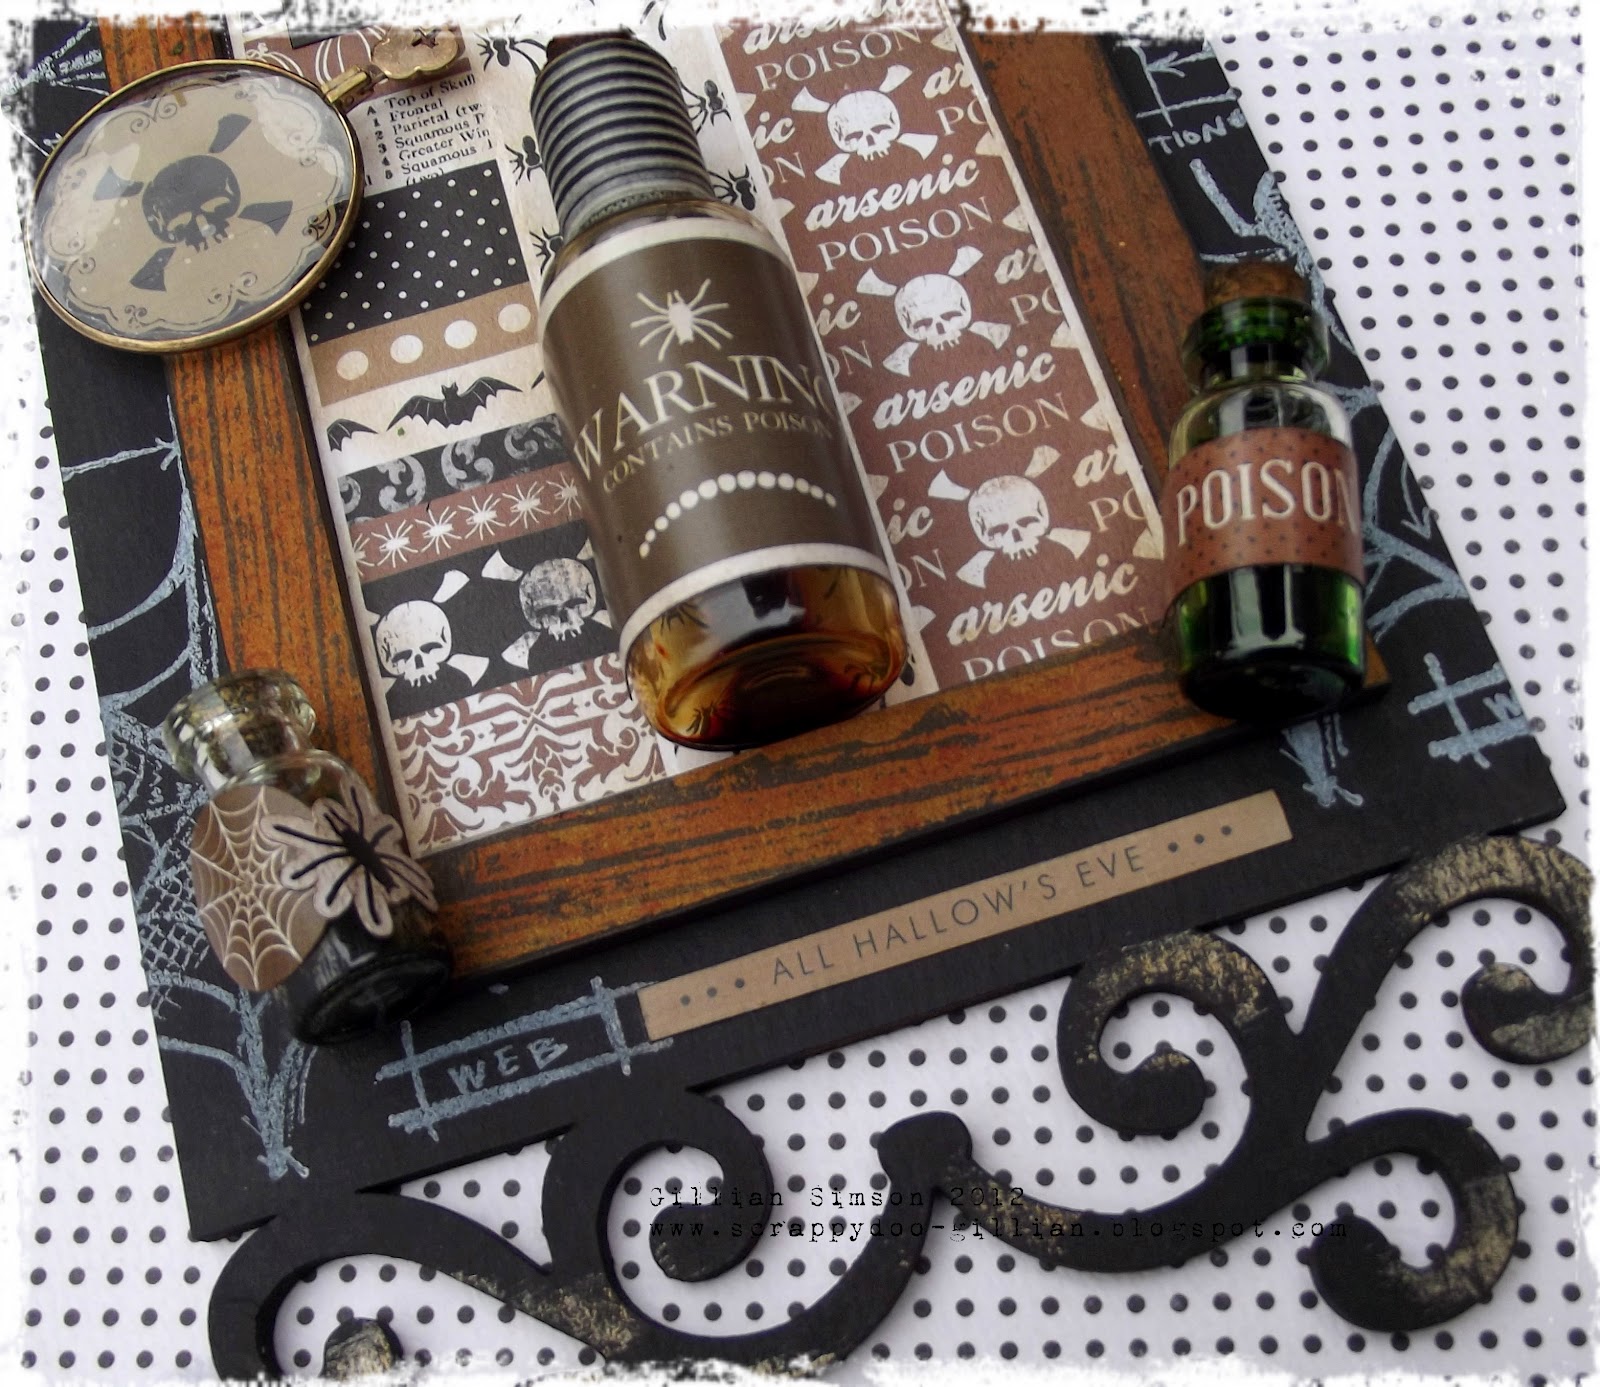
I've still given mine a slightly Halloween theme but I think it shows that these papers could quite easily be used for all occasions and I think they would make really classy cards for men.  The design I chose for the box top is called Poisoned and when folded it has given me a box just under 4.5" square.  If you search for origami boxes online it brings up quite a few simple tutorials.


I die cut a motif from the Zig Zag Bats design and inked the edges with a little Black Soot and Seedless Preserves Distress Ink.  I also used the Seedless Preserves to stamp the spider web from the Stampers Anonymous Halloween Blueprints but I lightly stamped off onto scrap before stamping the motif so that it wasn't too dark.  I attached the skull charm from Snazzy's before attaching the motif to my box with 3D foam pads.


I die cut the branches from a co-ordinating cardstock and positioned them on the box and then die cut the flowers from the Eerie Notes paper design alternating the two sides of the paper.  Again I inked the tips of the petals with Seedless Preserves and curled them before layering them with brads and attaching to the box.


Finally I added a black ribbon and trimmed one of the little spider stickers before attaching it near the bow.


Well unfortunately, that's it from me this month but I'm sure our Minxy has something up her sleeve for you next week.  Don't forget if you want to be in this month's Snazzy random draw for some Halloween style goodies leave a comment HERE and as always Snazzys has fabulous products in store so visit them online or telephone for your favourites.

Oooer, I just realised my next turn to post is the last week in October and ............. there will only be EIGHT
weeks left to Christmas!  Now that is scary, lol!


Monday 24 September 2012

Design Team Project #1 featuring Tim Holts Halloween Blueprint Stamps and Carta Bella All Hallow's Eve Designs (posted by Lesley)

BOO!!!!!

Hello lovely visitors.  It's my week to show you what I've been up to with the lovely products our smashing bosses, Val and Don sent us to play with this month.   For my first project this week I've mainly used the brilliant Halloween Blueprint stamps from Mr Holtz together with a few of the stickers from the Carta Bella All Hallow's Eve set.  Later in the week I'm hoping to show the versatility of these fabulous papers.  Actually, they are a heavyweight paper which is quite sturdy and more like card and this also adds to their usefulness and not just for Halloween either.

Anyway, to kick off my week I decided to alter some old coasters I had in my stash (another of my charity shop purchases ;D).  I started off by putting masking tape on the back so that I wouldn't get them all messy and then I gave them each two or three coats of Gesso because the surface of the coasters is really shiny.  I was going to use black Gesso which I KNOW I have somewhere in my tip of a craftroom but could I find it?  Could I heck, so I had to go with white and I followed this with painting two coasters with Sunset Orange Dabber and the other two with Citrus Dabber.  I gave them all two coats.  I deliberately used thick Gesso and paint layers to keep the brush strokes so that the surface has some texture.  It resembles linen.


I then used some Cut and Dry foam and Archival Black ink to apply ink roughly over the coasters and then added more over some Tim Holtz masks (barbed wire and an ironwork border).


The next step was to stamp my chosen images from the Halloween Blueprints using Archival Black ink.  I didn't always use the whole image as you will see.


Next, I cut out some skeletons and bones from the 'Eerie Notes' sheet of paper and then decided which of the stickers I wanted to use from the Carta Bella products.  There are some really good ones on two whole 12 x 12 sheets.  I arranged them on my coasters, stuck them down and finished off with a coat of multi-medium too seal the surfaces.  I only gave mine one thickish coat but I think a couple more thin layers might be advisable if these are to be used for their original purpose and not just decoration.

Finally, I removed  the masking tape from the back and used a thick Sharpie marker to ink all the edges black.


Well, that's it from me for today.   I hope you like my fun Halloween coasters but don't forget to drop by later in the week to see what else I've made with these fab products.  Also, if you haven't already done so, leave a comment on Gillian's first post for last week HERE to be in the monthly Snazzy draw to win some goodies and of course, the products I've used can be purchased from Snazzys either via the online shop (more goodies being added all the time), in store or via the phone.  As Gillian mentioned last week, the DT pack we lucky ladies are sent to play with will be available as a kit each month at a fab discounted price.  See HERE for this month's kit.

Have a lovely Monday folks and I'll see you later!

Saturday 22 September 2012

Design Team Project #4 ....

Good morning Snazzy folks, me again (I know I know lol) ....... I hope you have enjoyed the projects so far this week and that it has illustrated how versatile the products are. Today I'm back with my final project for the month.

For this project I opted to do a scrapbook layout (eeek this does not come easy to me lol, but here goes)!


with touches inspired by Anna Dawbrowska (I feel much more within my comfort zone).

I have used the following papers from the All Hallows Eve collection (Poisoned, Eeire Notes, spooky Damask & Halloween Words). The cabinet card & hat are from my own stash of digital images. I have used Dylusions Ink Sprays (Melted Chocolate, Black Marble & Squeezed Orange) to grunge up the paper flowers & doilie (which is also available from Snazzy's) and also on the background spraying through a Crafter's Workshop Mask (Reversed Chicken Wire). Other elements are from the Elements Sticker Sheet & Curiosity Cards Sheet, Halloween Ideaology and Tim Holtz Alterations Dies (Weathered Clock & On The Fence).

Don't forget to leave a comment HERE to be eligible for the random comment prize at the end of the month. Thanks to everyone who stopped by and left a comment on my projects, it is very much appreciated. TTFN x


Friday 21 September 2012

Design Team Project #3 ....

Good morning Snazzy folks .... tis only me again!! Today I'm sharing a little Halloween gift idea using the Carta Bella All Hallows Eve papers. So if you are going to a Halloween party or expecting little gremlins at the door why not fill the bag full of candy.


I have used the Tim Holtz Alterations Die (In The Bag Die) to create the little bag using the Scary Stripe paper which has been inked around the edges with Distress Ink (Gathered Twigs). I've then used stickers from the Element Sticker sheet & Curiosity Cards sheet to decorate. I then stamped an image from the Halloween Blue Print stamp set in Archival Ink (Coffee) onto the background of a kraft tag. I then cut to size images from the Skeleton paper with co-ordinating stickers from the Element Sheet.

I will be back tomorrow to share my final project with you before Lesley kicks off her week on Monday. Until then TFL x


Wednesday 19 September 2012

Design Team Project #2 ....

Good morning again Snazzy followers, today I'm back sharing my 2nd design team project which is soley focusing on the Tim Holtz Halloween Blue Print stamp set.

Now I must warn you it's all gone a little bit spooky-licious on this card lol


are you still with me lol .... well I did warn you!

I started out by spritzing a piece of 8x8 cardstock with water, I then added Dylusions Spray Inks in the following colours (Cut Grass, Fresh Lime & Black Marble) I used a That Special Touch Mask (Steampunk Border) on the first layer, then drying again between each application of colour. I then stamped the images from the Tim Holtz Halloween Blue Prints, Dylusions Doodle Parts & Bits And Bats using Archival Inks (Library Green, Emerald Green & Jet Black). 

I stamped the bat on some left over cardstock, cut out and mounted using 3d foam pads. I have used a Posca White pen to doodle on some of the images. The skeleton image is from the All Hallows Eve Elements Sticker Sheet.

Well that's all from me until next time .... I do hope you are enjoying the projects so far, to be in with a chance of winning the random prize this month, be sure to leave a comment HERE.


Monday 17 September 2012

Design Team Project #1 Featuring Tim Holtz & Carta Bella (All Hallows Eve) ....


Good morning Snazzy followers .... Gillian here kicking off this months DT projects featuring Tim Holtz Halloween Blue Print stamp set & the lovely Carta Bella All Hallows Eve Collection Kit.

I have used the Large Flourish Frame from Studio 490 which was painted with Acrylic Paint Dabber (Pitch Black). The centre frame was inked with Distress Stain (Wild Honey) and stamped with the background image from Studio 490 Art Inspiration set using Archival Ink (Jet Black).

I then stamped the spider/cobweb image from Tim Holt's Halloween Blue Print set using Adirondack Ink (Snowcap). I then used a section of border images from the All Hallows Eve Collection Kit, adhering to the centre frame. The Cork Vials & Bat embellishment are from Ideaology the cork vials have been decorated with stickers from the Elements Sticker Sheet and have been filled with Distress ReInkers (Rusty Hinge & Mowed Lawn). To distress the top & bottom of the Flourish Frame I swooshed it with some Distress Stain (Tarnished Brass).

Don't forget you can now play along with the Design Team by ordering the kits online saving 10% if bought together.

To be in with a chance of winning this months random comment prize please leave a comment on this post.

Well that's it for now but I will be back with several more projects this week .... until then TFL x

Sunday 16 September 2012

A Winner ....


 Hello Snazzy followers, Gillian here to announce last months random comment winner, firstly a huge thank you from the Design Team to everyone that left a comment. Mr Random.Org has chosen #8 as the lucky number .... this corresponds with ....


Sam .... well done Sam, can you e-mail me your details so I can send out your Steampunk supplies.

Join us tomorrow when I will be sharing the next kit ...... here's a little sneak peak!


The design Team kit is available to buy from midnight online saving 10% or you can
purchase the items individually.

Until tomorrow .... TFL x


Friday 14 September 2012

Steampunky Layers by Hels

Goooodly Morning Snazzyfans. Tis me, the old waffler, here again with my final DT piece for this month using the fabby Chocolate Baroque Steampunk Travel stamps. I have found these stamps to be really cool to use - they are not mahoosive in size so they are easily fit-able onto smaller projects... but they are also versatile enough to use repeatedly to make a larger project. The one I have made is a layered card.


I started out with cream cardstock and used the Dirigible (LOVE that word) stamp, repeat stamping it randomly onto the card using Jet Black Archival. I then stamped the Balloon Phone image, again using Archival ink and repeat stamping. I like doing this because you can make custom patterned papers this way. I used a waterbrush and Distress Ink to colour the images in - Peacock Feathers for the Balloon and Broken China for the Dirigible. I used a heat tool to dry off the colouring and then edged the cardstock with Antique Linen and Gathered Twigs DI's.


The border strip was made by masking off the majority of the text stamp and leaving the bottom two lines, stamping along a piece of card, colouring the edges as before and then matting onto black card. Finally, I masked the bottom of the text stamp and stamped the rest onto card, edging with the same as before and matting again onto black card. I then put the card together, adding the text and strip on 3d foam for more dimension.


That's all from me for this month... here's a group piccie of all the projects I have done using these stamps... it just goes to show that one stamp set can give you so many options, each one is completely different! As ever, you can get all the stashly goodies I have used from the Snazzy web-shop... each day there are more and more goodies being loaded. CLICK HERE to be whizzed off there. Thanks for looking... see you next month! TTFN

Monday 10 September 2012

Steampunkery Trio By Hels

Gooodly Morning Snazzyfans. I am here (again) and I am getting it right this week. I got all confused last week and blogged a week early! Anyways. I have been playing with the fab Steampunk stamps from Chocolate Baroque and for my second DT piece this month I have made an ATC trio.


I started with blank cardstock, cut to ATC size. I spritzed each one individually so I will just say how I did one, then you know that is how I did the rest too: Spritzing the ATC with water so it was nice and wet and then using Dylusions Sprays to colourize it; the colours I used were Fresh Lime, Vibrant Turquoise and Black Marble. Once the sprays were on the ATC I lifted it up so they all dripped and blended together and then dried it off with a heat tool. The steampunky image was stamped with Jet Black Archival and I made a mask for it by stamping onto a big sticky-note pad. Overlaying this onto the base image covers it up so you can then go in and stamp over the top with the text stamp and the text will appear behind the image, meaning that you don't get text on the image in the foreground. I did this for all the ATC's.


Next I used a bottle cap and stamped out some black and white circles using Jet Black Archival and Snow Cap paint Dabber. Once these were dried, I edged each ATC with a black pen to give it a nice frame. The bottom of the text stamp has some nice bigger words, so I stamped those onto cream card and cut them out, mounting them onto 3D foam to add some dimension.


To make the ATC's sturdier, I mounted them onto more cardstock... whilst the card is a decent thickness, after all the wet and heat treatment it can go a bit wibbly, so popping it onto more card flattens and strengthens it.


Finally, I punched some holes in the ATC's and added Jump Rings to fasten them together and added a Snazzy Steampunk clock and a metal key embellishment.


That's all from me for today... if you missed my Steampunk Locomotive that I accidently blogged last Monday, please click HERE to see it... here's a peek at what it looks like :O)) Don't forget that all the stashly goodies I used on this project are available on the Snazzy website HERE. Thanks for looking... have a Snazz-tastic week! TTFN

Thursday 6 September 2012

Design Team Project 2 by Astrid Featuring Chocolate Baroque Steampunk Travel Plate


Hello everyone, here is my second project featuring the wonderful steampunk set by Chocolate Baroque. If you were here on Monday, you will have seen the box I made. This little fan is just the right size to fit inside.

A template and description of how to make the fan can be found here
I cut the different blades out of scrapbook paper and stamped the images from the Steampunk Travel Plate on each of the blades with Archival Plum Ink. I coloured them with Distress Markers in Victorian Velvet, Tattered Rose and Spun Sugar. I fastened them together with a ribbon and added the charm at the bottom which was made by stamping the top hat stamp with black Archival ink on white card, cutting out the clock part and then inking it slightly with some Distress inks. I glued it to a small charm and added Glossy Accents over the top. Here you can see some of the details 


 Here you can see how the fan fits inside the box.


And finally here is a close up of the little clock charm


Well that's it for this week from me but make sure to come back on Monday to see what the wonderful Hels has made. Oh and if you are looking for even more inspiration, check out the personal blog of Val, one of our fabulous bosses. The steampunk embellishments she has created using the stamps are simply amazing, check it out!!

Monday 3 September 2012

Design Team Project #1 featuring Chocolate Baroque Steampunkery Stamps (by Astrid)

Hello, hello everyone! Where has the summer gone I wonder, here we are, in September already....

As many of you know, this time round we are showing you creations with the wonderful Chocolate Barque Steampunk stamps, the Steampunk Travel Plate. I hope most of you will have seen all the wonderful projects created this month already, and if not, make sure you have a look before leaving.
I will be showing you two projects this month,  both under the theme of "Steampunk with a Feminine Twist". Both projects belong together. I'm showing the first one today and the second on Thursday, so I hope you'll come back.


I decided to alter a box that was a gift given to me by my friend Zuzu It started life looking like this:


Very sexy I know, but the real reason I love this type of box is because it has a really strong magnetic closure, is very sturdy and really fun to alter. This is how I went about it: First I painted it inside and out with Espresso Paintdabber.  Once dry I painted it with crackle medium from my stash and when that was dry to the touch I added a second layer of paint, this time Cloudy Blue Dabber. The background pattern was then created with the help of the very thin top layer from a paper serviette. Finally I inked the edges with  Timber Brown Stazon and Inka Gold.
The inside of the box was lined with paper from my stash


For the embellishments on the lid I used some of the stamps


I took a piece of silver miri card, dabbed a black dabber all over it and wiped most of it off again with a piece of kitchen roll. I then sprayed it with 3 colours of Cosmic Shimmer Mist, Ancient Copper, Patina and Bronze Blushthese last two belong to the Vintage range of colours. When dry I stamped two of the stamps from the set with black Stazon, cut them out and adhered them to the box.


The watch with wings is part of the Tando Creative Steampunk Wings and Cogs set, sprayed with the mists again. I also added a bottle cap from my stash. The clock was cut out of one of the papers from the Kaisercrafts Timeless Collection which I covered with Glossy Accents.
I further embellished with some of the Tim Holtz Idea-ology Sprocket Gears and the Clock Face from Snazzys Steampunk Supplies and finally some flowers from my stash. Because the box has the magnetic closure all I needed to do to to finish it was to add a charm to the side. The sentiment is from the Darkroom Door Steampunk set


The very last step was to seal it all with a good coat of Mod Podge Matte.
Well that's it for just now; if you want to know what I am going to keep inside the box, you'll just have to come back on Thursday to see another Steampunk project with a feminine twist. Hope to see you then!