Friday, 31 January 2014

DT Project #3 by Claire - featuring Jilly Bean Soup

Hello Everyone

Claire here again today to share my final project with you all for this week featuring the JillyBean Soup: Heart Healthy Red Bean Soup Collection.

So here is another Valentine's Day card I created:


 I started by cutting some of the 'XOXO' paper and some of the 'Hearts' paper to size for my 5x7 card blank.  I pierced around the edges of both pieces and inked around the edges with Vintage Photo distress ink.  I then punched the doily border along the bottom edge of the 'XOXO' paper using a Xcut border punch.

 I then die cut the hearts from the 'hearts' paper, attached a tiny ribbon hook to each one and threaded them onto the string of mini pearls.  I added them to the card using foam pads and glossy accents to keep the pearl string in place.  I then added the cream ribbon around the card, tied in a bow and added two heart hat pins which came with the kit this month.


Lucy will be back on Monday to share her makes with you all and don't forget that you can win the stamps, ink and embossing powder we've all been playing with - all you need to do is leave a comment on the blog and one lucky person will be selected at random!

Thanks for joining me this week!

Claire xx 

Wednesday, 29 January 2014

DT Project #2 by Claire - featuring JillyBean Soup

Hello Everyone

Claire here - back again today to share a Valentine's Day card I created using the JillyBean Soup Heart Healthy Red Bean Soup collection:

 I created the kraft tag by stamping the sentiment using Perfect Medium and embossing with the Wow Bright White embossing powder from the kit.  I then stamped the line of birds and the little hearts from the same stamp set using Versafine Satin Red ink - also from the kit.  I inked around the edges of the tag using Vintage Photo Distress ink.   To complete the tag I added the lace to the top and layered with a golden button (which was previously cream - I coloured it with Treasure Gold wax) and tied with some twine.


I then cut a piece of red card to fit a DL kraft card blank.  I cut a piece of the arrow designer paper to size, distressed the edges with the Tim Holtz distressing tool then inked around the paper again using Vintage Photo Distress Ink.
 To finish off I added the tag to the card using foam tape.

I have one more project to share with you using this Jilly Bean Soup collection - see you again soon!

Claire xx

Monday, 27 January 2014

DT Project #1 by Claire - featuring JillyBean Soup

Hi Everyone!

Claire here this week to share my DT makes using the JillyBean Soup: Heart Healthy Red Bean Soup Collection.

For my first project I chose to alter the papier mache hanging heart that came with the kit - I wanted a very vintage, muted kind of look:


I chose to alter my heart using Paperartsy Fresco Finish Acrylic paints - firstly I gave it a good base coat of Irish Cream Fresco.  Next I wanted to add some texture so I used a stencil by SplodgeAway and spread Grunge Paste through sections of it.  I also spread the Grunge Paste around the sides of the heart and texturised it using my palette knife.


Once the Grunge Paste was dry I went over the whole heart again with Irish Cream Fresco, I then started blending in Mocha Mousse, Toffee, Cinnamon and French Roast - adding some of the paint and then blending it back using a damp baby wipe.

Next I stamped the sentiment from the stamp set using Potting Soil Archival ink onto tissue paper and dried with my heat tool.  I added the stamped tissue paper to the heart using Claudine Hellmuth's matte multi medium.  I blended the edges of the tissue into the heart by adding a little bit more paint.

For the back of the heart I stamped onto tissue paper again - this time I stamped the heart balloon, masked and then stamped the word 'love' again using the Potting Soil Archival ink. 

To finish off my heart I swirled Treasure Gold gilding wax in Renaissance over the Grunge Paste on the front of the heart and smudged it around the sides with my finger.  

So there it is - my first project this week using this lovely kit!

I'll be back again later in the week with some more traditionally Valentine's Day coloured projects!

See you soon,
Claire xx


Thursday, 23 January 2014

DT Project #2 by Minxy, Featuring:

JillyBean Soup: Heart Healthy Red Bean Soup Collection

Hay Snazzy Gang
So i'm guessing you're all back today to find out "what's in the tin"


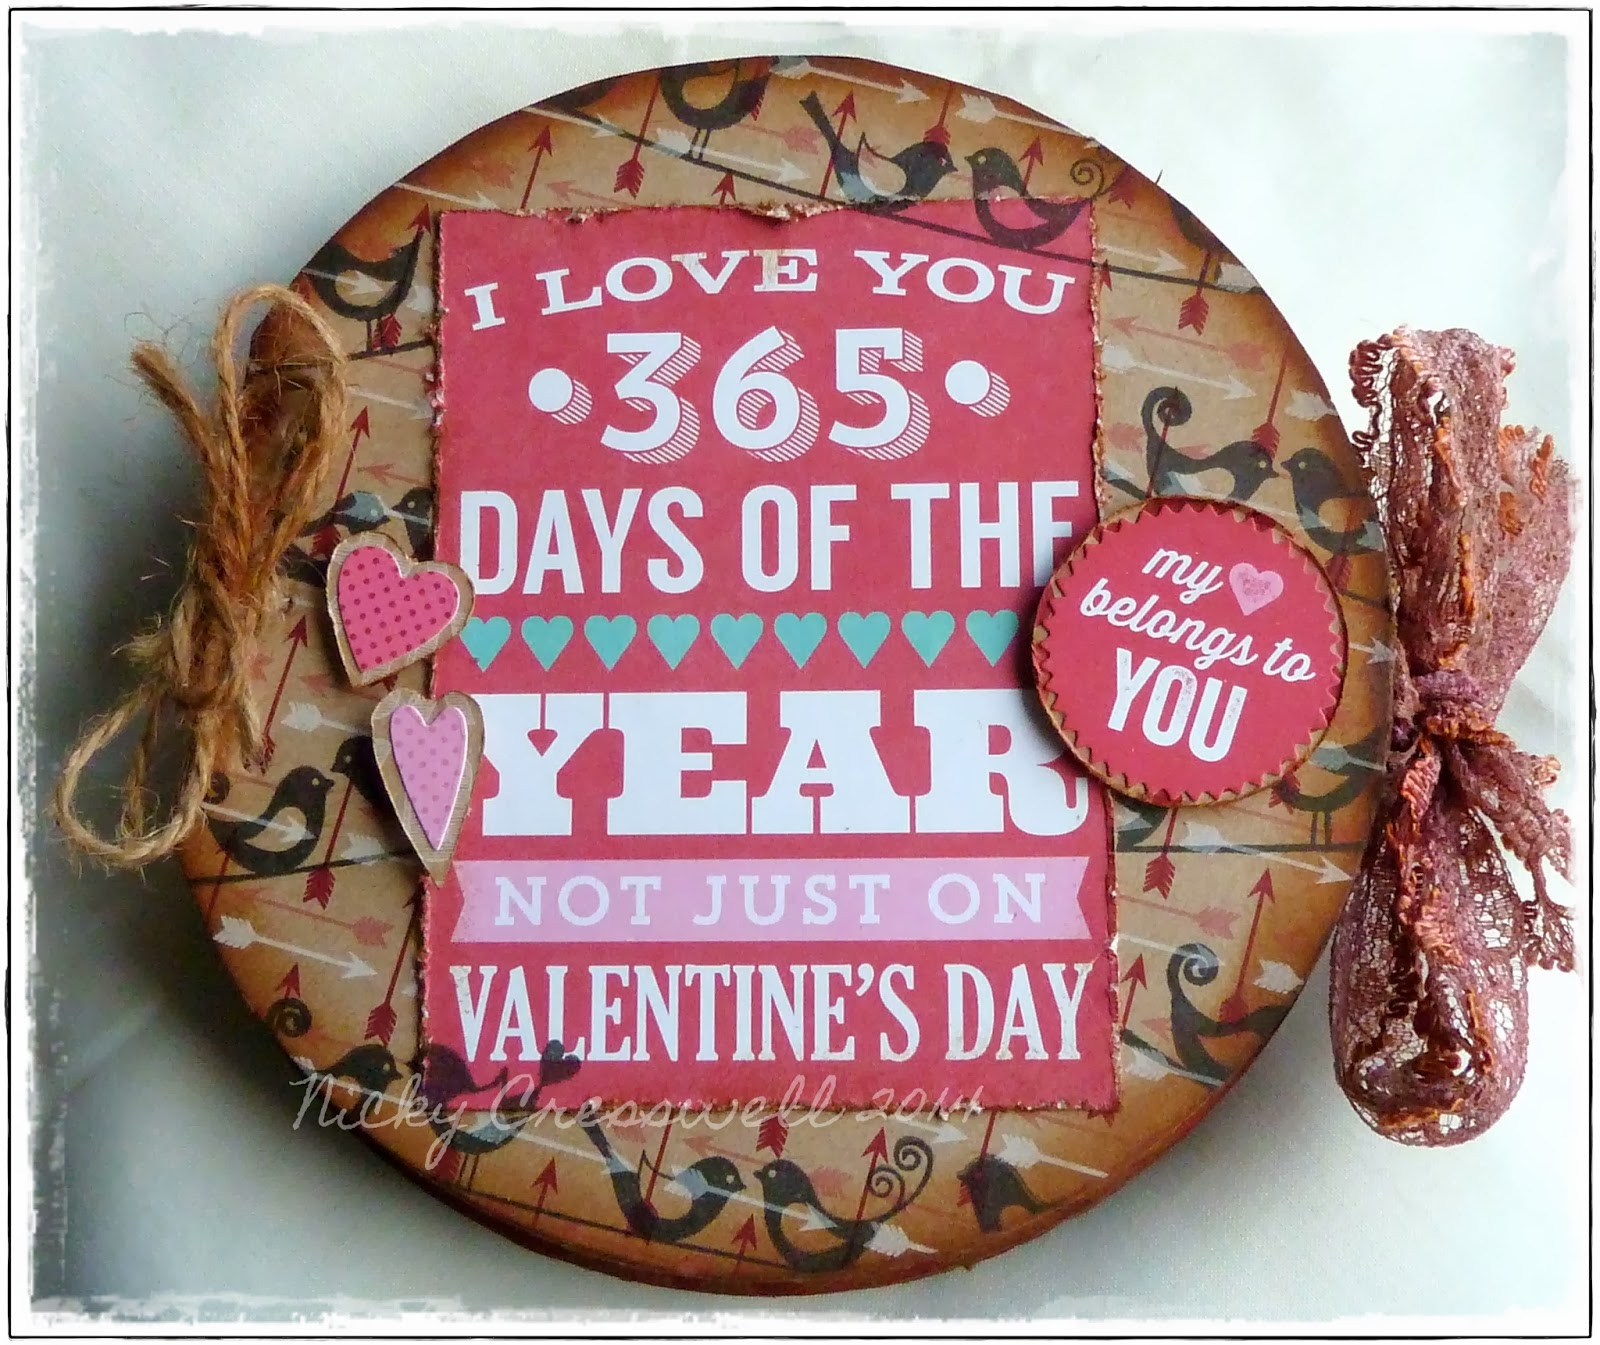
It is of course a little mini book


I started by cutting 4 circles of mountboard and covering each piece back and front with the various Jellybean Soup PapersI dyed some lace with distress stain for the closure, and stuck this 2 the front and back page before the papers. {i made a shallow channel in the mountboard so the lace would not be raised under the paper.}


I then cut out 6 of the elements from the bite size bits sheet, and added 1 to each page.


I used all the clear stamps from the kit to accent each page, along with some of the stickers and some shapes cut from the backing papers.


I used the largest of the stamps to finish the last page.
I punched 3 holes into each page and bound with twine.

So... Thats me done for another rotation, I hope you have enjoyed my little book in a tin project, Don't forget there is still plenty of inspiration to come from my fellow teamies, starting with Claire on Monday.
I'll see you again in Feb
Till next time, Stay Inky

Monday, 20 January 2014

DT Project #1 by Minxy, featuring:

JillyBean Soup: Heart Healthy Red Bean Soup Collection

Hay Snazzy Gang.
I have 2 projects to share this week for you, The first of which was rescued from my local charity shop.
I came across this cool round tin and just knew I wanted to give it a makeover.


To start I cut 2 circles, 1 for the top and one the bottom from the red bell pepper sheet, Luckily the tin was just under the 6x6 size.
Next I diecut a couple of paper roses from the back of the bite size bits sheet, which was normal paper as opposed to the kraft card the rest of the papers were made from and therefore harder to mold into a rose shape. I inked round the edges with vintage photo distress ink, and added a couple of the heart pins from the kit and a couple of little love notes which I stamped using the clear stamp set {also from the kit} onto plain kraft card using the satin red versafine ink.


The bite size bits sheet is made up of 12  3x4 segments, I used one of these segments to stamp and cut out the word love as the focus to my box lid.


I stamped a few of the balloons from the clear stamp set in the red versafine ink onto the red sherry sheet, I found it gave a sort of resist effect which I liked. I cut them out and the used the tail stamp to finish off the balloons. I also cut a couple of the little birds from the scraps of the base paper to 3D a couple of them up.


And voila.. 1 complete made over tin. Simples but effective.
I will be back on thursday with my 2nd offering, A little hint.. it fits inside the tin!
Till then, Stay Inky


Friday, 17 January 2014

Jillybean Soup Project #2 - (Very) Quick Cards

The Jillybean Heart Healthy Red Bean Soup collection includes a set of clear stamps which have some good clean, bold, modern images so, being a tad overloaded with workshops this week, I set myself a challenge to make six clean and simple cards in an hour.

The kit included WOW's Bright White embossing powder which is great on Kraft card and I also used their Red Apple and clear powders with Tsukineko's Versafine in Satin Red (from the kit) and Onyx Black plus their Vesamark clear pad. Then I simply mixed and matched the various stamps, powders and inks to create these.....


The 365 days of the year stamp could have been masked to create the multiple coloured effect, but I am a bit too lazy for that so I simply cut the stamp itself up to make the task quicker - as long as you don't trim the cut pieces then it is easy to reassemble the whole thing on your acrylic block and maintain the original spacing when you stamp full image.

The whole process took 75 minutes rather than the planned 60 but I ended up with six simple, and I think, quite stylish cards with no masking or any fiddly techniques.

Thanks for stopping by, I will be back tomorrow with a simple Valentines layout.

Take care
Val xx


Monday, 13 January 2014

New Year, New DT Kit....

Hello and welcome back to a New Year of DT posts. I hope you are all dry, not too blown about after the very stormy start to the New Year, and ready for some great new projects from our wonderful Design Team.

To business, here is the first Snazzy DT Kit of 2014.


At it's core are some wonderful papers from Jilly Bean Soup's latest collection Heart Healthy Red Bean Soup together with the Bite Size Pieces, Label Stickers and co-ordinating stamps. To this we added some Bright White Embossing Powder from WOW - the best white out there IMHO - a Versafine Satin Red Inkpad, and some embellishments including a papier mache hanging heart which I forgot to include in the photo.

The first workshop project I have to show you is a mini book just 3" x 3". Each page is a 4"x 3" piece scored at 1" to create the page with a little pocket on one side secured with contrasting grograin ribbon. I used a mix of white, red and deep pink cardstock all from Bazzill's Smoothie range and the lighter weight version of Bazzill's Plastic Paper for two of the pages with the heavier version for the transparent covers. I used a piece of each of the papers from the collection to make mini photo mats and to line the pockets of each page, except the transparent ones.

 
There are 10 pages in all and each pocket has a little numbered card tucked in ready for Valentine's day and which are going to detail the 10 reasons why I love the Headmaster, once I figure that out - some days that's still a puzzle, even after nearly 35 years lol! 
 
Here's how each facing looks with a mini photo mat on the left and a pocket on the right...
 
 
and you will also see it is bound using my Zutter.
 
I also made a little box for my book - just 8" x 8" scored on all four edges at 2" for the base, and 5 1/8" x 5 1/8" scored on each side at 1/2" with an image cut from the Bite Size sheet and some ribbon to finish.


That's all for today but I will be back later in the week with a layout and some cards from the same kit when hopefully Mr Blogger will be more co-operative and it won't take forever to load.

Meantime our teamies work very hard creating interesting and inspiring projects each cycle and do very much appreciate you stopping by and leaving a comment. To thank you, all followers who leave comments will be entered into a draw by Mr Random at the end of the cycle, and someone will win the stamps, ink and embossing powder the teamies have been working with.

Hope to see you again soon.
Val xx

Friday, 10 January 2014

A winner.....


Oh I feel so much better about all the scraps I hoard, turns out I am not alone, and people do get very creative when using them up. Have a look at these.....


This journal page is from Stamping by H and if you pop over to her blog
http://stampingbyh.blogspot.co.uk/2014/01/time-to-use-up-leftovers.html she has provided a very clear and simple step by step to how she achieved this look. Love those sliced up stamped images!

This card is by Craftyfield.....


I hadn't thought of using scraps of shirt fabric on a card but it is ideal for stamping on, not too heavy to attach to a card and I just love her intaglio UTEE embellishment. Again you will find all the details of how this card was constructed over at http://craftyfield.blogspot.co.uk/2014/01/pocket-valentine.html


 Finally, this journal page from Shilpa over at http://nagaonkarshilpa.blogspot.in/2014/01/silence-art-journal-page.html features a really interesting technique to simply create a negative image on the patterned paper layers using masks and black acrylic paint. Gives a great sense of depth doesn't it.

All three would be worthy winners and have blogs which are well worth a visit over a cuppa too and do leave a comment to let them know you stopped by - it's what makes the blogging world go around you know!

My favourite, for three reasons is Helen's monochromatic journal page, firstly because it is monochromatic which I love, secondly as an enthusiastic keeper of Art Journals myself, I think her really clear step by step might just encourage other stampers to start a journal of their own, and thirdly, as I often stamp the same image in different inks before selecting one to add to a project, I now know what to do with all those leftover images lol.

Helen, huge congratulations, email over your details and a paper collection from Kaisercraft's stunning Art of Life will be winging it's way to you. Many thanks to those who took the time to enter our challenge and shared their wonderful work with us.

Back on Monday with the newest DT kit and a couple of workshop projects using it.

Thanks for stopping by xx

Friday, 3 January 2014

A Snazzy little challenge....

Hello, and a very Happy Hew Year to all.

This is traditionally the time of year when leftovers feature. Following last week's 100 ways with leftover Christmas turkey and stuffing, almost all papercrafters now move along to resolving not to buy any more stash until they have used up all the crafty stuff they already have hoarded in every nook and cranny.

Does this sound like you?

Most resolve weakens almost as soon as the new CHA Sneak Peeks appear, meantime..........

I'd like to challenge you to share what you make with your leftovers.

I am reknowned for not being able to throw the smallest scrap of paper away, even the gutters showing the revese side of double sided cardstock find themselves stashed away.

So, to start us off, here is what I made from my leftovers from the last DT kit.

I started by jazzing up a blue inked background in my journal that had been blank for too long with some Perfect Pearl Mist through a Dylusions stencil.


I had been playing with some small scraps plus the borders I had removed from the paper sheets I used to line the Christmas House project to create a Christmas tree shape and then paper pieced some stamps from the Dylusions Couture release. An old sticker alphabet came to the rescue for the sentiment. Not at all my usual sort of thing but my scrap box is a tad lighter lol!

 
More my style is the second piece I'd like to share, again all made from scraps of paper, washi tape, vellum, Kaisercraft background stamps and a fair bit of ink and paint with just a smidge of embossing powder.
  
 
This graffiti style piece started as something to console myself with on a rainy afternoon when my mojo had left the premises in a sulk, and blow me over it turned itself into a workshop project somewhere along the way lol!
 
So, share with us what you make with your leftovers in the comments below, with a link to a project made with same, and you could win the paper collection from the Snazzy DTeamies next kit - it's a goodie but I'm not telling you any more just yet.
 
Entries by midnight GMT on 9 January and I will pick my favourite and announce the winner on January 10.
 
Look forward to hearing from you. Happy crafting.
Val xx


Wednesday, 1 January 2014

From all of us here on the Snazzy blog we wish you all a very