Wednesday, 29 February 2012

Studio 490 Winners ....

Good morning everyone .... Thanks to everyone who stopped by and left a comment on our Studio 490 challenge, it was lovely to hear from so many of you. Mr Random.org has chosen a winner .....

drum rollllll ....... and the winner of the Art Parts Sample pack is Helen ... congratulations, please e-mail me with your details so I can arrange to have your prize posted out to you.

Thanks too to everyone who joined in the challenge and shared their gorgeous artwork with us ..... Mr Random.Org has chosen no 3 which is Gabrielle, congratulations .... please e-mail me with your details and choice of Studio 490 stamp set .


Monday, 27 February 2012

DT Projects 1 & 2 by Astrid featuring Studio 490

Hello everyone,
Isn’t it surprising how the month has flown by and here we are already nearly at the end of it and with that it is my turn to show you some projects featuring the amazing Wendy Vecchi products: “Art Parts”, “Clearly for Art” and a set of ”Studio 490 stamps” .

Those of you who follow this blog regularly have seen incredible projects this month already. Remember also there is still a chance to enter our challenge and win some for yourself, just click on the Studio 490 picture on the right and you will be taken straight there.

With my projects I want to show just how versatile these products are, they can be used for any style and the result can look quite different from Wendy’s own work.

My first projects are made in Shabby Chic style, a hanger and reel to hold lace.


They are simple to make. For the hanger I covered the art parts in papers and fussy cut elements using Kaiser Craft 61/2” Paper Pad “Vintage Timeless”. I glued lace between the backing and the rim and covered the rim with Rangers Crackle Accents. I then embellished with a combination of flowers and leaves made from the “Clearly for Art” coloured with distress inks and some flowers etc I had in my stash. The photo is an old photo of my dad and uncle, it must have been taken in about 1914.


The reel was made from some of the smaller circles in the “Art Parts”, again covered with the Kaiser Craft papers and embellished. The cylinder between the circles is an empty toilet roll.


I will be back on Thursday with my final two projects using the art parts and the stamps. Hope to see you then and meanwhile, stay creative!

Friday, 24 February 2012

DT Project #3 by Minxy : Featuring:

Wendy Vecchi Studio 490
Art Parts
'Seriously Art' stamp set
MME Kraft Funday papers
*****
Well here I am for my last offering this month. Have you all been playing along??
My last piece this month was another thrown together piece.. Proving that someone like me who has never really played properly with art parts before can do it so, so can you.. you still have a couple of days left to be in with that chance of winning some 490 stash, check out the link in the sidebar.
So to my piece..
 This was a nice simple piece to make as all I did was pick a selection of art parts, some were from the DT pack and some were my own but all are available from Snazzy's.
I covered some of the art parts with papers from the MME funday collection, and the leaves I stained with distress stain and adirondack colourwash spray.
 I arranged and glued them all together with some stix2 ultra clear tape. I stamped one of the quotes from the   'seriously art' set onto a piece of lined paper I had in my stash and added a idea-ology pen nib to the top, I slipped this into place, again using the ultra clear tape
I finished with a couple of pine cone die roses cut out of the MME papers and attached a couple of idea-ology memo pins to the back with a hot glue gun making the loops stick out so I could use some twine to hang the piece.
So there you have it from me for another month. I hope you have enjoyed my offerings, but don't despair, the 490 fun isn't over yet, we still have Astrid's fab art to come so check back in a few days for her first piece.
Till next time.. Stay Inky

Wednesday, 22 February 2012

DT Project #2 by Minxy : Featuring:

Wendy Vecchi Studio 490
Art Parts Sample Pack
Clearly for Art
'Nature's Art' , 'Art Inspiration' & 'In Love With Art' 490 Stamps
.........................
Hi Snazzy Folks, Tis me again with my next Wendy inspired art piece.
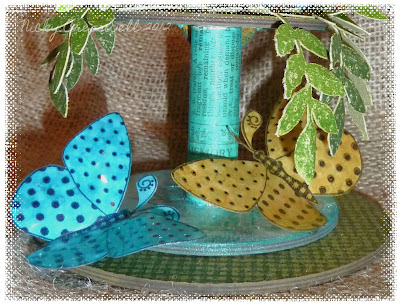
This time I decided to work with the DT set of stamps I had received and one of the spool sets from the sample pack {something i've never tried b4}
 Now where to start: I say this as the piece kind of developed as I was making it rather than having a set plan when I started. I think I started by inking the lrg circle and the small spool circle top art parts with peeled paint distress stain and stamping with archival ink the background from the nature's art set.
 I covered the other spool circle bottom and centre piece with Tim Holtz vintage shabby papers and gave them a touch up in colour with some broken china distress stain.
 Before I stuck them all together with stix2 ultra clear tape and matt accents I made a small slit in the top spool piece large enough for one of the petals from one of the large flowers to sit snugly in creating a backdrop for the top. 
I finished off the base with some butterfly's that I created by stamping the butterfly from the nature's art set in black stazon on clear clearly for art, and then alcohol inked the underside giving the butterfly's their colour.
I coloured the large flower art part with a wash of picket fence then mustard seed distress stain, and distress inked the edges with spiced marmalade. I stamped the petals with the doily from the 'in love with art' set and the ART from the 'art inspirations' set in black archival ink. I attached the flower to the base by inserting it into the pre made slit and adding a bit of glossy accents to hold in place.
Next came the painstaking task of stamping and cutting out goodness knows how many of the leaves from the 'nature's art' set, I stamped 4 on the clearly for art in stazon cactus green and archival olive, I don't know if it was the extra juicy pads but both inks seemed to bleed out a bit on the C4A surface. 
The rest I stamped onto grungepaper
Once they were all cut out I arranged on the top, Using the C4A leaves for some height and interest and draping the grungpaper ones on the base. Another butterfly finished the top and I was done.
Sorry if you've nodded off after that mammoth explanation.. When you get caught up in the making of something you often forget you have to explain how it was done after lol
So have you been making 490 Creations?? If you have don't forget to share them with us HERE for your chance to win a 490 prize.
I'll see you again on Friday for my final piece of the month
Stay Inky


Monday, 20 February 2012

DT Project #1 by Minxy : Featuring:

Wendy Vecchi Studio 490 stamps and art parts.

Hi snazzy folks, Here we are for my week of 490 fun, The girls have done a fab job so far so I hope my efforts continue to inspire and maybe even get you to crack open your 490 stash and have a play too. You could be a lucky winner if you do! see HERE for details.
My first project uses the rectangle frame and scalloped trims from the art parts sample pack
 I stuck my frame to the matching base and attached one of the scallop trims to the bottom with stix2 ultra clear tape, I then gave the whole thing a coat of gesso, followed by a coat of stormy sky distress stain
Next I stamped the tiny alphabet from the 'art inspiration' stamp set randomly over the frame.
 I cut a piece of metal card to the size of the frame and placed it inside using more ultra clear tape to look like a mirror.  And a happy accident occurred, as I was smoothing it down it created a frame within the frame so I decided to stamp inside with the believe quote also from the 'art inspiration' set and the tiny heart from the 'in love with art' set, I used black stazon for the words and ultramarine and timber brown stazon for the heart.
To finish off the front I coloured another scallop trim art part piece with walnut stain and attached it as a mini shelf. I took 2 hands from the 'dress forms and more' art parts set, and stamped then with the checked background from the 'nature's art' stamp set in vintage photo distress stain. and added them to the frame.
To finish the piece I needed a way for it to stand so I chopped up and used  petals from the large flower art part. I coloured with stain and stamped with the dots background from the 'seriously art' stamp set, then I used superglue to fix the stands in place super quick.
I hope you have enjoyed my little project for today.. I'll be back on wednesday with my next 490 offering.
Till then 
Stay Inky

Thursday, 16 February 2012

Design Team Project #2 featuring Studio 490 (by Lesley)

Hello Again,

I hope everyone had a lovely Valentine's Day spent with someone you love, whether that be your partner or a beloved child, grandchild or anyone else that comes into the 'love' catagory.

Today I have my second project to show you for this month using the fabulous Studio 490 products designed by Wendy Vecchi.  This time I have mainly used various flower stamps from different sets of Studio 490 stamps, together with some of the butterflies and also a couple of leaf Art Parts.


I decided to alter one of those fab cheap mirrors from a certain well known store but I have placed a piece of black card over the mirror for the purposes of taking the photos otherwise you would have had pics of me taking pics, lol!  The artwork is much prettier!  Anyway, I started with two layers of acrylic paint with a crackle medium sandwiched between  (I used Fresco paints).  After drying with a heat gun I stamped along the top and bottom with various Studio 490 stamps and also added a quote from the Dimensional Rose Art set using Archival inkpads.  


I then used black Archival ink and several different flower stamps from the Make Mine Mini Art and Art Fit for a Queen stamp sets together with butterflies from Make Mine Mini Art again and Nature's Art, all onto Grungepaper.  I cut them out and coloured all the flowers with Distress Inks using Cut n Dry Foam and painted the butterflies with Distress Re-inkers so that I could get the colour graduation on the wings.  I always colour the backs too as this shows once they are shaped.  I left them all to dry thoroughly and then shaped them all by rolling the edges before layering and adhering to the mirror with Glossy Accents.


Before adhering the flowers and butterfly to the bottom left corner, I took two of the leaf Art Parts, coloured them with Distress Inks and over stamped with a darker colour using a large background stamp from the Nature's Art set.  I again used Glossy Accents to adhere.  Finally, when everything was well and truly stuck I added the flat backed pearls to some of the flower centres and black Enamel Accents to the smaller ones.

Well, unfortunately, life has taken a bit of a twist this week so I won't be able to get back with another project at the weekend as I had hoped but our lovely Nicky will be here on Monday with the first of her Studio 490 projects and it's bound to be fabulous and totally inspirational.

Don't forget you can still be in with a chance of winning some Studio 490 goodies this month by linking a project you have made with any of their products to our post HERE.  We'd love to come and visit you!

Thanks as always for visiting us and I'll be back next month with our next showcased products.

Hugs
Lesley  Xx

Tuesday, 14 February 2012

We Have A Winner ....

Good Morning everyone .... the Design Team were overwhelmed at the response to our first ever challenge. so many inspirational projects it was hard just to pick one winner.

The Design Team chose their top three favs  ....

1.
2.


3.


Congratulations Stampersuzz .... you are our winner!
Please can you email me with your details so we can send you the design team kit. Thanks again to everyone who entered ... watch out for more challenges and goodies along the way!

Monday, 13 February 2012

Design Team Project #1 featuring Studio 490 (by Lesley)


Good Morning All,

What a lot of fun the DT are having this month playing with the fabulous Studio 490 products designed by the wonderful Wendy Vecchi.  I already had three sets of Wendy's stamps but had never had chance to use them much ............ what a shame!  Well, they've been brought out this past couple of weeks to use in conjunction with the products the bosses sent us to work with and they won't be neglected again if I can help it!  Following on from Gillian's gorgeous projects my first piece to show you is very different and actually quite a change from my own normal style but I so enjoyed making my little hanging piece.  In fact I was having so much fun I just realised I forgot to make a note of colours, paints, etc.,........ whoops!


I decided to use the circle frame from the sample pack of Art Parts and covered the back piece with a designer paper from the Kaisercraft Vintage Timeless pad we worked with a couple of months ago.  I overstamped the paper with the large background stamp from Wendy's 'It's More Flower Art' set but you can't really see that in the photo.  I then covered the circle frame with acrylic paint and when dry with Viva Precious Metal paint.  When that was dry I stamped an image from 'Make Mine Mini Art' in black StazOn and then sanded the frame to give a distressed look.  


I then covered some flower Art Parts with acrylic paint, followed by some more of the Kaisercraft paper and then inked around the edges.  For the stem of the big flower I applied touches of a gold Dabber to the stem and leaves and then positioned them on my main piece.  I found some teeny bottle tops in my stash which I coloured with a peeloff pen, attached to the flowers and then filled with beads and Glossy Accents.

The quote comes from another of Mrs Vecchi's stamp sets called 'Nature's Art' as does the large butterfly.  I stamped the quote onto the Kaisercraft paper before cutting out with a deckle edged Nestie die, inked the edged and attached with 3D foam.  I stamped the big butterfly and the small ones (from the 'Make Mine Mini Art' set) onto Clearly for Art molding plastic, cut them out, heated them to enable shaping and then painted them with Viva Precious Metal paint.  Finally, I attached the keyhole and embellies at the bottom and sprinkled the beads.  I used Glossy Accentss to attach all the embellishments.


Apart from the mini bottle tops and the Viva Precious Metal paint which I'm not sure about, everything I have used in this project can be purchased from Snazzy's.  Their range of products is quite amazing!

I'll be back later in the week with my second project using these lovely products so please keep checking back and don't forget we'd love to see any artwork you have made using Studio 490 so please leave us a link HERE so we can come and visit and also put you into the draw to win some fab 490 goodies at the end of the month. 

As always, your visits and any comments are very much appreciated by us all.
See you later in the week.

Hugs Lesley  Xx

Saturday, 11 February 2012

Design Team Project #3 Featuring Studio 490 ....


Hello everyone .... I'm back with my last DT project featuring the awesome range that is Studio 490
can you hear the sadness in my voice .... really I could create art every day with these little beauties.

For this project I dug deep into the Art Parts Sample Pack we were sent .... well I didn't have to dig deep as I had oodles of parts still to play with. I started out by covering the circle insert with paper from Tim's Ideaology paper pad, trimmed to size and then sanded around the edges. I then coloured the circle frame with Distress Ink (Crushed Olive) and stamped the background stamp from Well Worn Art

For the centre I have used a frame from the Bookplate Art Parts Set which I have inked using Distress Ink (Wild Honey) then stamped the centre image of the Bookplate using a stamp from Well Worn Art , I then stamped around the edge of the Bookplate with the background stamp from It's More Flower Art. 

My fav gent of all time is from the Art Part Set "For The Guys"  which I inked with Ditress Ink (Crushed Olive) and stamped with the corresponding stamp which is from SteamPunk Art.

I then used two of the scallop borders which are also in the sample pack, inked them using Wild Honey & Crushed Olive, stamped again with the two background stamps used above .... this is where the "lightbulb moment" came in ... I wondered if I could create like a layered shelf for the circle to stand within .... so I adhered the borders slightly offset from one another using Glossy Accents, I then used Ideaology Hitch Fasteners either side. I used four of the small circles from the spool kit to create a stand either side of the frame to add more stability (again using Wild Honey) for colour. To finish off I added Ideaology Cork Vials either side and filled them with metal brads & fasteners again adhering with Glossy Accents and also Ideaology pen Nibs

Don't forget throughout the moth of February we would LOVE to see YOUR Studio 490 Art and remember there are fabby goodies to be given away too, see HERE.

TFL x

Thursday, 9 February 2012

Design Team Project #2 Featuring Studio 490 ....


Hello everyone ... continuing with all things Studio 490 inspired, I have gone from bright & colourful project #1 to dark vintage tones project #2.

For this project I have used the large rectangle frame and insert from the Art Part Sample Kit. I inked the frame using Distress Stain (Brushed Corduroy) and spritzed with Perfect Pearl Mist (Green Patina & Cappuchino). I covered the insert of the frame with paper from Tim Holtz Lost & Found Paper Pad.

The stamp & quote is from my choice of stamp set .... (Ticket To Art). The image is stamped with Archival Ink (Coffee) and distressed with Distress Stain Antique Linen. The truck is from "For The Guys" Art Part Set.


So that's all from me today I will be back with one more project before Lesley begins sharing her Studio 490 inspired projects next week. TFL x

Monday, 6 February 2012

Design Team Project Featuring Studio 490 ....

Hello everyone ... I must tell you that I am super excited to share the news that Snazzy's will be featuring one of my FAV designers ("The" Wendy Vecchi) throughout the month of February .... Woot!

The DT will be sharing with you some inspirational projects, and again this month we would like to see all your amazing projects featuring the Studio 490 range. You can upload your projects until midnight on the 28th February ... this month ONE lucky person who shares their art work with us will win a Studio 490 STAMP SET of their choice .... AND there is more, one lucky person who stops by and leaves us a comment will be chosen by Random.Org on the 29th and will receive an ART PART SAMPLE PACK!

Each of the DT were sent an Art Part Sample Pack, Stamp Set of their choice & Clearly For Art Sample Pack.


For my 1st project I opted to use elements from the Art Pack Sample Pack & Clearly For Art (Clear). I started out by configuring my design. I used Distress Stains in (Faded Jeans, Stormy Sky, Pine Needles, Barn Door & Brushed Corduroy). I stamped the hearts from (Love To Make Art Set) onto GrungePaper and coloured using (Barn Door). The stamped quote on the Cylinder Roll is from (Love To Make Art). I also stamped the leaves from (Ticket To Art) onto GrungePaper, which was inked using (Pine Needles).


Other stamps used are (It's More Flower Art & Destination Art). The wing is from the Art Parts set (Simply Wings) & the key is from (Door Plate & Keys)


The Tulips are from the (Art From The Heart Set) which I stamped onto Clearly For Art (Clear) then inked with Alcohol Inks (Watermelon, Red Pepper & Lettuce). The rose buds are from Ideaology (Trimmings) pack which have been sprayed with Adirondack Colour Wash Spray (Lettuce).


I will be back later in the week with some more Studio 490 makes ... until then TFL x

DON'T FORGET OUR CHALLENGE IS ALSO STILL RUNNING UNTIL THE 13TH OF THIS MONTH, STILL TIME TO ENTER AND BE IN WITH A CHANCE OF WINNING THAT FAB GOODY PRIZE SEEN HERE